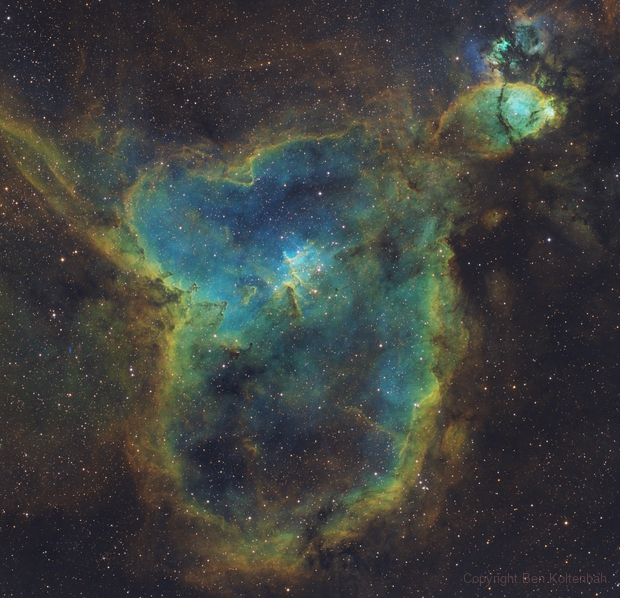
Astronomical NotesMelotte 15 is one of my favorite nebula regions because of its high contrast detail with bright OIII background when imaged in narrow band. It's a neat target for testing and comparing new equipment and processing steps, which is exactly what I've done here. First, here are some notes on this object.
Melotte 15 is located at the center of the Heart Nebula,
IC 1805, in the constellation Cassiopeia. The full Heart Nebula itself is a popular object to image. I have imaged it in the past here, obviously a wider field of view than my present image:
 IC1805 Heart Nebula in SHO
IC1805 is an emission nebula in which massive stars generate stellar winds and radiation. This is a young star cluster, possibly only 1.5 million years old. Its distance is about 7,500 light years. The full nebula is about four times the size of the full moon (referring to the height in my image).
Melotte 15 is about 15 light years across. It is an open cluster that contains several stars that are upwards of 50 times the size of our sun, but many more that are smaller and dimmer.
Equipment NotesMuch of the equipment I used for taking this image is new or at least fairly new to me, and I notice that I have not published a finished image in quite some time. This is due to my acquiring the new equipment, testing it, modifying it, and learning more about the new gear. As it has been a while since I posted about my imaging, here is a quick list of my present equipment with a few notes:
- I really like the Teleskop Service version of the 10" Ritchey-Chretien telescope. It is rated with high reflectivity and sturdy build. It is my wish to get a PlaneWave CDK in the future, but that's presently out of my price range. This is a satisfying compromise, although I'd hardly call it cheap, just cheaper than my wish list. This is a truss RC with independent adjustment between the primary mirror and a tip/tilt corrector at the back of the scope. I have earlier experience with an RC8 where the primary was mechanically linked to the imaging train, and I was never able to satisfactorily align that scope as a result. This one is easier (see note below).
- The RC10 requires collimation adjustment to align the primary, secondary and imaging train including camera. As I mentioned above, the independent adjustment of each mirror as well as the imaging train is a big plus with this scope. I have acquired several collimation tools over the year including some new ones that I am still testing. Quite a number of years ago I got the Takahashi collimating scope, and this has been a great daytime tool. As I do not have a permanent setup, I need to collimate each time I move my scope outdoors. Recently, I also have been trying out a couple more tools like this through Teleskop Express, and if these prove to be useful, I'll post about them. I have also just started examining Innovation Foresight's SkyWave software. So far the only thing I can say about it is that it has confirmed my collimation procedure is adequate for my usual seeing conditions. Let me emphasize that my last and final collimation step is always a star test, but getting things dialed in well with the Takahashi scope nearly always puts me quite close, and star collimation is typically just a small adjustment.
- Many of these RC's (the many variants from GSO) suffer from an unfortunate design in which light can infiltrate from around the secondary housing and reflect back from the primary to the secondary and end up causing light arcs and other unwanted features in the image. I noticed this from the very beginning before learning of the cause. Luckily, several clever people worked out the geometry of the problem and came up with the solution, which is to extend the baffle tube a small amount and also narrow the entrance. If anyone is interested in this matter, please consult this forum link, and I highly recommend this product.
- Prior to learning about the light leak issue, I took it upon myself to blacken much of the interior of the scope with flat black paint and flocking material. This actually did improve matters somewhat, even before adding the baffle tube extension. With all of the mitigating materials and pieces in place, I now have a very darkened and baffled system that is an improvement on the original design. This is of particular satisfaction to me in that I am imaging in a suburban environment with bright skies, lots of competing lights around me, and teenage daughters forgetting about their daddy's wish for strict light discipline at night and instead turning every light on in the house whether in the room or not - why do we keep all these lights on? - it costs money - money doesn't grow on trees you know - when I was your age ...
- I have added the TCF Leo Low Profile Focuser as I wanted to have as much back focus available as possible to try out all kinds of equipment and spacing variations. Ideally, I'd love to also include the Innovation Foresight ONAG in the imaging train, but that isn't possible due to the need for a corrector. This is a good focuser, and I'm pleased with its load capacity and its small, manageable amount of shift with travel.
- I use the TSRCFlat3, which does a good correction job, even with my large camera sensor. I acquired the telescope before the flattener, and the corner stars in my image were laughable. I am not quite yet dialed in with spacing to achieve perfect round stars at the corners, however they are a vast improvement over the doughnut flares from before.
- For about a year now, I have been using the QHY 600M-PH (and also its baby brother, the QHY 268M-PH). Many have acquired these cameras, and I've been mostly pleased with them. I was a holdout for CCD technology as I waited for the specs of the CMOS cameras to catch up to or surpass those of CCD, and this has mostly happened now, at least to my satisfaction. In addition to learning about the nuances of the gain and offset parameters of the camera, I also had to get my mind around whether or not binning was of benefit. It is my conclusion that, unless one wishes to reduce the file sizes and transfer speeds, there is no advantage to higher binning. In fact, using 1x1 binning, even for a high resolution image such as this one, allows for the possibility of binning in software, application of deconvolution and other processing steps, etc. Recall that CCD binning has the advantage of reduction of read noise, however that is not enjoyed in CMOS binning.
Imaging NotesThis image was acquired over the last couple of weeks of September, 2022. There have been more clear nights this season later into the Fall than usual for the Pacific Northwest. However, like much of the West, I have had to contend with smoke. I ended up only using a little more than half of the images I acquired due to these issues. Usually, clouds roll in to my area around mid-September, and I can be out of luck for many weeks through the Fall and Winter. This year, we have had a longer and most welcome extension of clear nights, except the winds are often blowing smoke into the area. Thankfully, we've been treated with a few weather systems that blow the smoke out, at least for a couple of nights.
I settled on 900s exposure frames for each of the three narrow band filters, H-alpha, OII and SIII. This is a long exposure in which to guide, but most of the frames seemed to come through well enough. I am noticing some issues with my PHD2 guiding that I need to address, namely larger fluctuations in RA than DEC. I guide with 5s exposures but tiny pixels, and it may be that I would benefit binning the guide camera. I am also in dire need of a refresher course on the guiding algorithms.
Processing NotesUsing PixInsight, I ended up selecting just a little more than half of the subframes, using PSFWeight as my selection parameter. There is enough integration time in the final image to draw out some neat details.
This image also presents my first use of StarXTerminator. I've balked at the notion of separating the stars from the nebula during processing, but I saw that this was now an optional integrated package that could be processed directly in PixInsight. I was pleased with the outcome. One issue I ran into was how best to put the stars back in after I had finished processing and stretching the nebula. In the end, I opted to take the extracted star image, perform a simple stretch, then add the nebula and stars together using a simple formula in PixInsight. Looking more carefully, however, I see that I have some green stars, and so I'll need to look into that, perhaps with a future revision.
Having extracted the stars, I wished to apply the Deconvolution process, and this took more time for me to adjust than usual since I am so used to having stars in the image. I've never liked what this step does to the stars, and this was now my opportunity to apply it with the stars safely extracted. I ended up creating a point spread function image using DynamicPSF applied to an earlier image that still had the stars. And now I learned that I simply needed to turn off the Deringing section altogether, otherwise the algorithm goes nuts because it sees practically every pixel as a star. In the end, I figured it out, and am pleased with the outcome.
This is also my first use of NoiseXTerminator. I am impressed with this step. I dialed the noise reduction back from its default as I though the result looked a bit too overprocessed, although even with my present result I am curious to go back and dial it back a bit more.
The use of these two new processes compelled me to really work out the colors I desired based on the SHO palette, and the outcome is perhaps a bit more technicolor than I usually prefer, but I'll let the results stand as they are as my first use of these two new tools (new to me, anyway).


Comments