Hi again,
This problem of overcorrection has been a hot topic in many forums and I couldn't find any good solution after testing the various recipes read on those forums (exposure time of the flats > 5 seconds - I have been doing flats with all kind of exposures to avoid "non linear" responses of the camera, but nothing works, short or long exposures ; I have tried various way of calibrating my lights, with Darks that includes Bias or not, with or without Optimize Darks etc.). And I had the same problem in Pixinsight as well as Siril.
Anyway, the thing is : when measuring the ratio between brighter and darker pixels on the flat and in a light, the difference was of around x1,7 (ratio of the ratios). So mathematically, it couldn't work.
I will add some pictures (jpg of my 32bits files) so that you see what I had.
My workaround - which I don't like because it is a dirty trick - was to adapt the contrast of the Master Flat to match the one I have in my light.
To measure the contrast, I have taken some values manually on the flat, at the center and at one of the darkest corner, and did the same - near the same areas in a Light. I derived the contrast ratio in both images and computed the ratio between them (1,7).
Then, with Pixelmath in Pixinsight, I just tweaked the contrast in a classical way :
(MasterFlat - mean(MasterFlat))/(2*1.7) + mean(MasterFlat)
The 1,7 was derived from my previous measurements of contrast ratios above. I still don't know if that's reproductible with my setup.
Then I saved the new MasterFlat ("TweakedMasterFlat"), and the correction works like a charm.
Of course, I may do something wrong elswhere and this is probably not the way to go, but if people who are starting astrophotography like me and haven't finished all the books yet, struggle with that, they may have a quick workaround :-)
  |
You cannot like this item. Reason: "ANONYMOUS".
You cannot remove your like from this item.
Editing a post is only allowed within 24 hours after creating it.
You cannot Like this post because the topic is closed.
Seems I can't post the Light...
Anyway, one last thing to measure intensities in the Light, that is really noisy : I applied a blur (convolution with a 70x70 kernel).
|
You cannot like this item. Reason: "ANONYMOUS".
You cannot remove your like from this item.
Editing a post is only allowed within 24 hours after creating it.
You cannot Like this post because the topic is closed.
Hi Jérémie,
It could be a couple of things that went wrong here, basically everything qualifies that means inconsistently substracting dark and/or bias signals from your lights, flats and darks.
If you use a CMOS camera, the easiest way is to completely leave out bias frames and take flat darks (darks with the exact same length as your flats).
Then, the steps go as follows in PixinSight (assuming you use weightedbatchpreprocessing script):
* load all your lights (using the "Add Lights" button)
* load all your flats (using the "Add Flats" button)
* load all your darks and flat darks (using the "Add Darks" button)
* in the "flats" tab, select "calibrate with flat darks"
* indicate an output directory
* Run the script, go get some coffee
Afterwards, you should find correctly calibrated light frames.
If there is still over/undercorrection, this might indicate you took your light/flat/darks using inconsistent camera gain/offset settings.
Hope this helps,
Ray
|
You cannot like this item. Reason: "ANONYMOUS".
You cannot remove your like from this item.
Editing a post is only allowed within 24 hours after creating it.
You cannot Like this post because the topic is closed.
Hi @rayp
Many thanks for your detailed recipe.
Unfortunately, I have already done EXACTLY what you described (and more) : give up biases and make dark flats that matches exactly the exposure, temperature, gain and offset of my flats etc. I also tried other methods of calibration. Nothing works, and I have also tried different ways to record my flats (target ADU tests, etc... even letting APT determine the correct exposure). I have taken flats of all durations, from less than a second to more than 6 seconds (with flat darks).
The last thing I havent't tried is adding a pedestal (didn't dug into it yet... don't know yet how to do that :-) Maybe that's just the offset ??).
But for a reason beyond my understanding, it does not work, my master flats are more contrasty than my subs. Always.
And I am afraid I am not the only one that can't solve this problem.
In the end of all conversations I have read on forums, people were more or less left alone when these recipes didn't worked.
Hope they can read my post because this dirty trick works when you can find the deep reason of this flat problem :-)
By the way, I have an ASI183MM Pro.
Thanks again
Jeremie
|
You cannot like this item. Reason: "ANONYMOUS".
You cannot remove your like from this item.
Editing a post is only allowed within 24 hours after creating it.
You cannot Like this post because the topic is closed.
Hi @Jérémie Ochin,
Maybe you have an inconsistent offset setting in the flats and lights?
The offset is set in the camera driver and needs to be the same in the darks, flats and lights.
That could also explain the problems you are seeing.
CS,
Ray
|
You cannot like this item. Reason: "ANONYMOUS".
You cannot remove your like from this item.
Editing a post is only allowed within 24 hours after creating it.
You cannot Like this post because the topic is closed.
I checked that as well.
I never touch my offset and gain : I did some tests to adjust the offset to the minimum, but high enough so that noise do not get "clamped" (ie. not getting any dark pixels when doing a bias). And checked it before shooting (both lights, darks and flats).
That's a mistery.
But I think the way to get flats is sufficiently different to "explain" that this non linear behavior can occur : the light source is way higher than the light coming from the sky, even dimmed. Maybe there are other phenomenoms that occurs due to using the iPad screen ? Maybe the spectrum of this light source ? But with narrowband filters, that wouldn't play... and I have done flats with narrowband filters as well (for my SHO sessions). And even my sky flats are more contrasty !
I am sure there is something else, other than the calibration process, gain, offset, temp.
When I have time, I will give it more thought...
Thanks Ray !
|
You cannot like this item. Reason: "ANONYMOUS".
You cannot remove your like from this item.
Editing a post is only allowed within 24 hours after creating it.
You cannot Like this post because the topic is closed.
If you like you could send me the master flat and dark and a light frame so I could try the calibration? That way we could narrow down the problem.
If you also include one single flat and single dark I could check how these deviate from mine.
I know how these problems can drive you nuts, it's always good to have a second pair of eyes.
|
You cannot like this item. Reason: "ANONYMOUS".
You cannot remove your like from this item.
Editing a post is only allowed within 24 hours after creating it.
You cannot Like this post because the topic is closed.
Hi Jérémie,
That's an interesting way to fix the problem and I'm impressed that it works, but it doesn't get at why the problem is occurring. In theory, flat correction is very simple but in practice there can be a lot of things that screw up the result and sometimes the cause of the problem is tough to figure out. I've been there so I understand the impulse to simply make it work and move on.
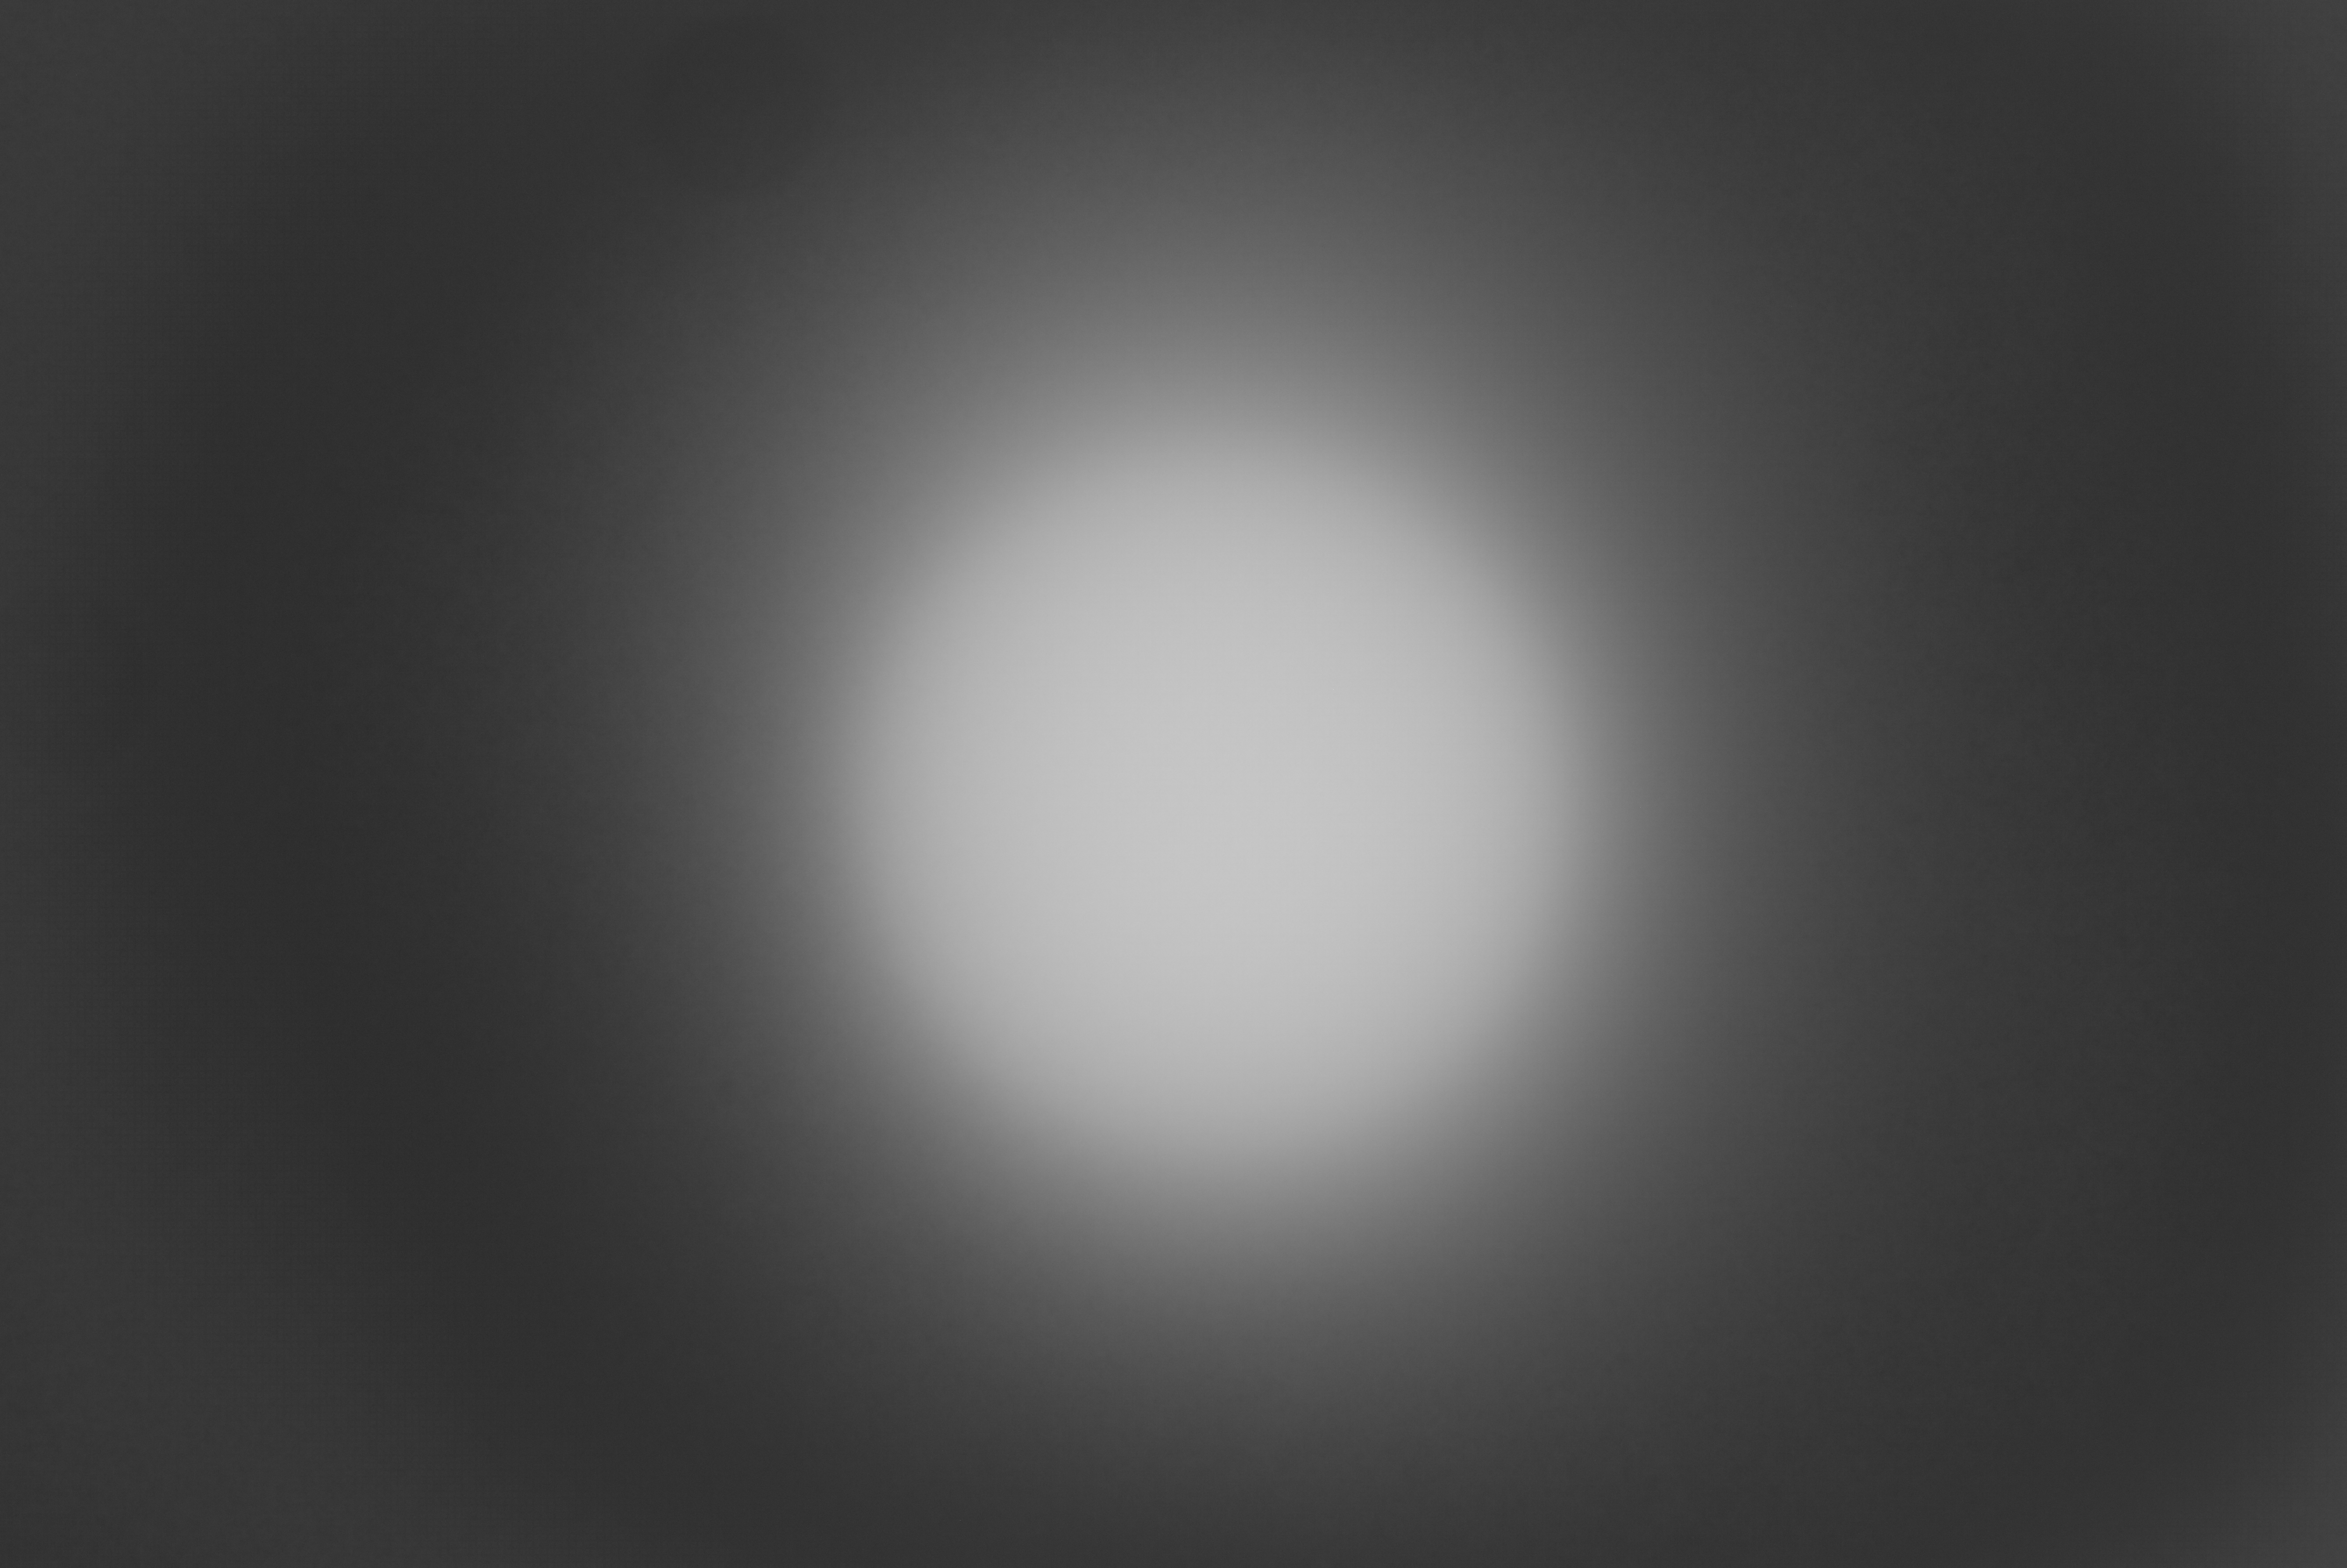
My very first reaction after looking at your flat frame is that something is seriously screwy with your optical system. A good flat should record only two things: 1) The cos^4 radially symmetric radiometric irradiance fall-off and 2) The irradiance fall-off due to optical vignetting, which includes the effects of dust and flaws in the optics such as bubbles and pits as well as light loss due to mechanical edges that may protrude into the beam. Flats should NOT record any stray light from reflections, diffraction, or other stray light that might be different that what your light data includes. Stray light is a killer! In general, a good master flat frame will show mostly smooth variations in signal across the field and the dimmest regions will not be significantly fainter than the bright regions. Sharp variations across the field like I see in your flat data are typically an indication of serious problems.
From what I can see, it appears to me that you are starting off with WAY too much vignetting in your system. Have you looked backwards through your system from the sensor position to determine: 1) What things are blocking the off-axis ray bundles and 2) If there are excessive stray reflections from interior surfaces in either the telescope or your camera package. When you have so much vignetting, small differences across the flat frames can turn into very large differences in the calibrated result. I don't know for sure if that's the problem here but in my opinion, it would be a good idea to get the optics right first before moving downstream to fix anything else.
John
|
You cannot like this item. Reason: "ANONYMOUS".
You cannot remove your like from this item.
Editing a post is only allowed within 24 hours after creating it.
You cannot Like this post because the topic is closed.
I know how these problems can drive you nuts, it's always good to have a second pair of eyes.
You can’t imaging how nuts it drove me indeed ! I have made many tries and spent lots of time on it, without success...
I will post a link with some files if you can indeed have a look at it : I am pretty sure I am part of the problem, if you get me out of the equation, you have a better chance to solve it 😂
Thanks for the proposal Ray
|
You cannot like this item. Reason: "ANONYMOUS".
You cannot remove your like from this item.
Editing a post is only allowed within 24 hours after creating it.
You cannot Like this post because the topic is closed.
Hello Jeremie,
I do agree with John the vignetting seem's to be to strong let's say. Please describe your optical path. Whenever you succeed in the flat the signal to noise ratio in the corners would be very bad.
Clear Sky
|
You cannot like this item. Reason: "ANONYMOUS".
You cannot remove your like from this item.
Editing a post is only allowed within 24 hours after creating it.
You cannot Like this post because the topic is closed.
Hi @John Hayes ,
Many thanks for your answer. I am happy to read that, because I was suspecting other causes, but was really lost about the causes.
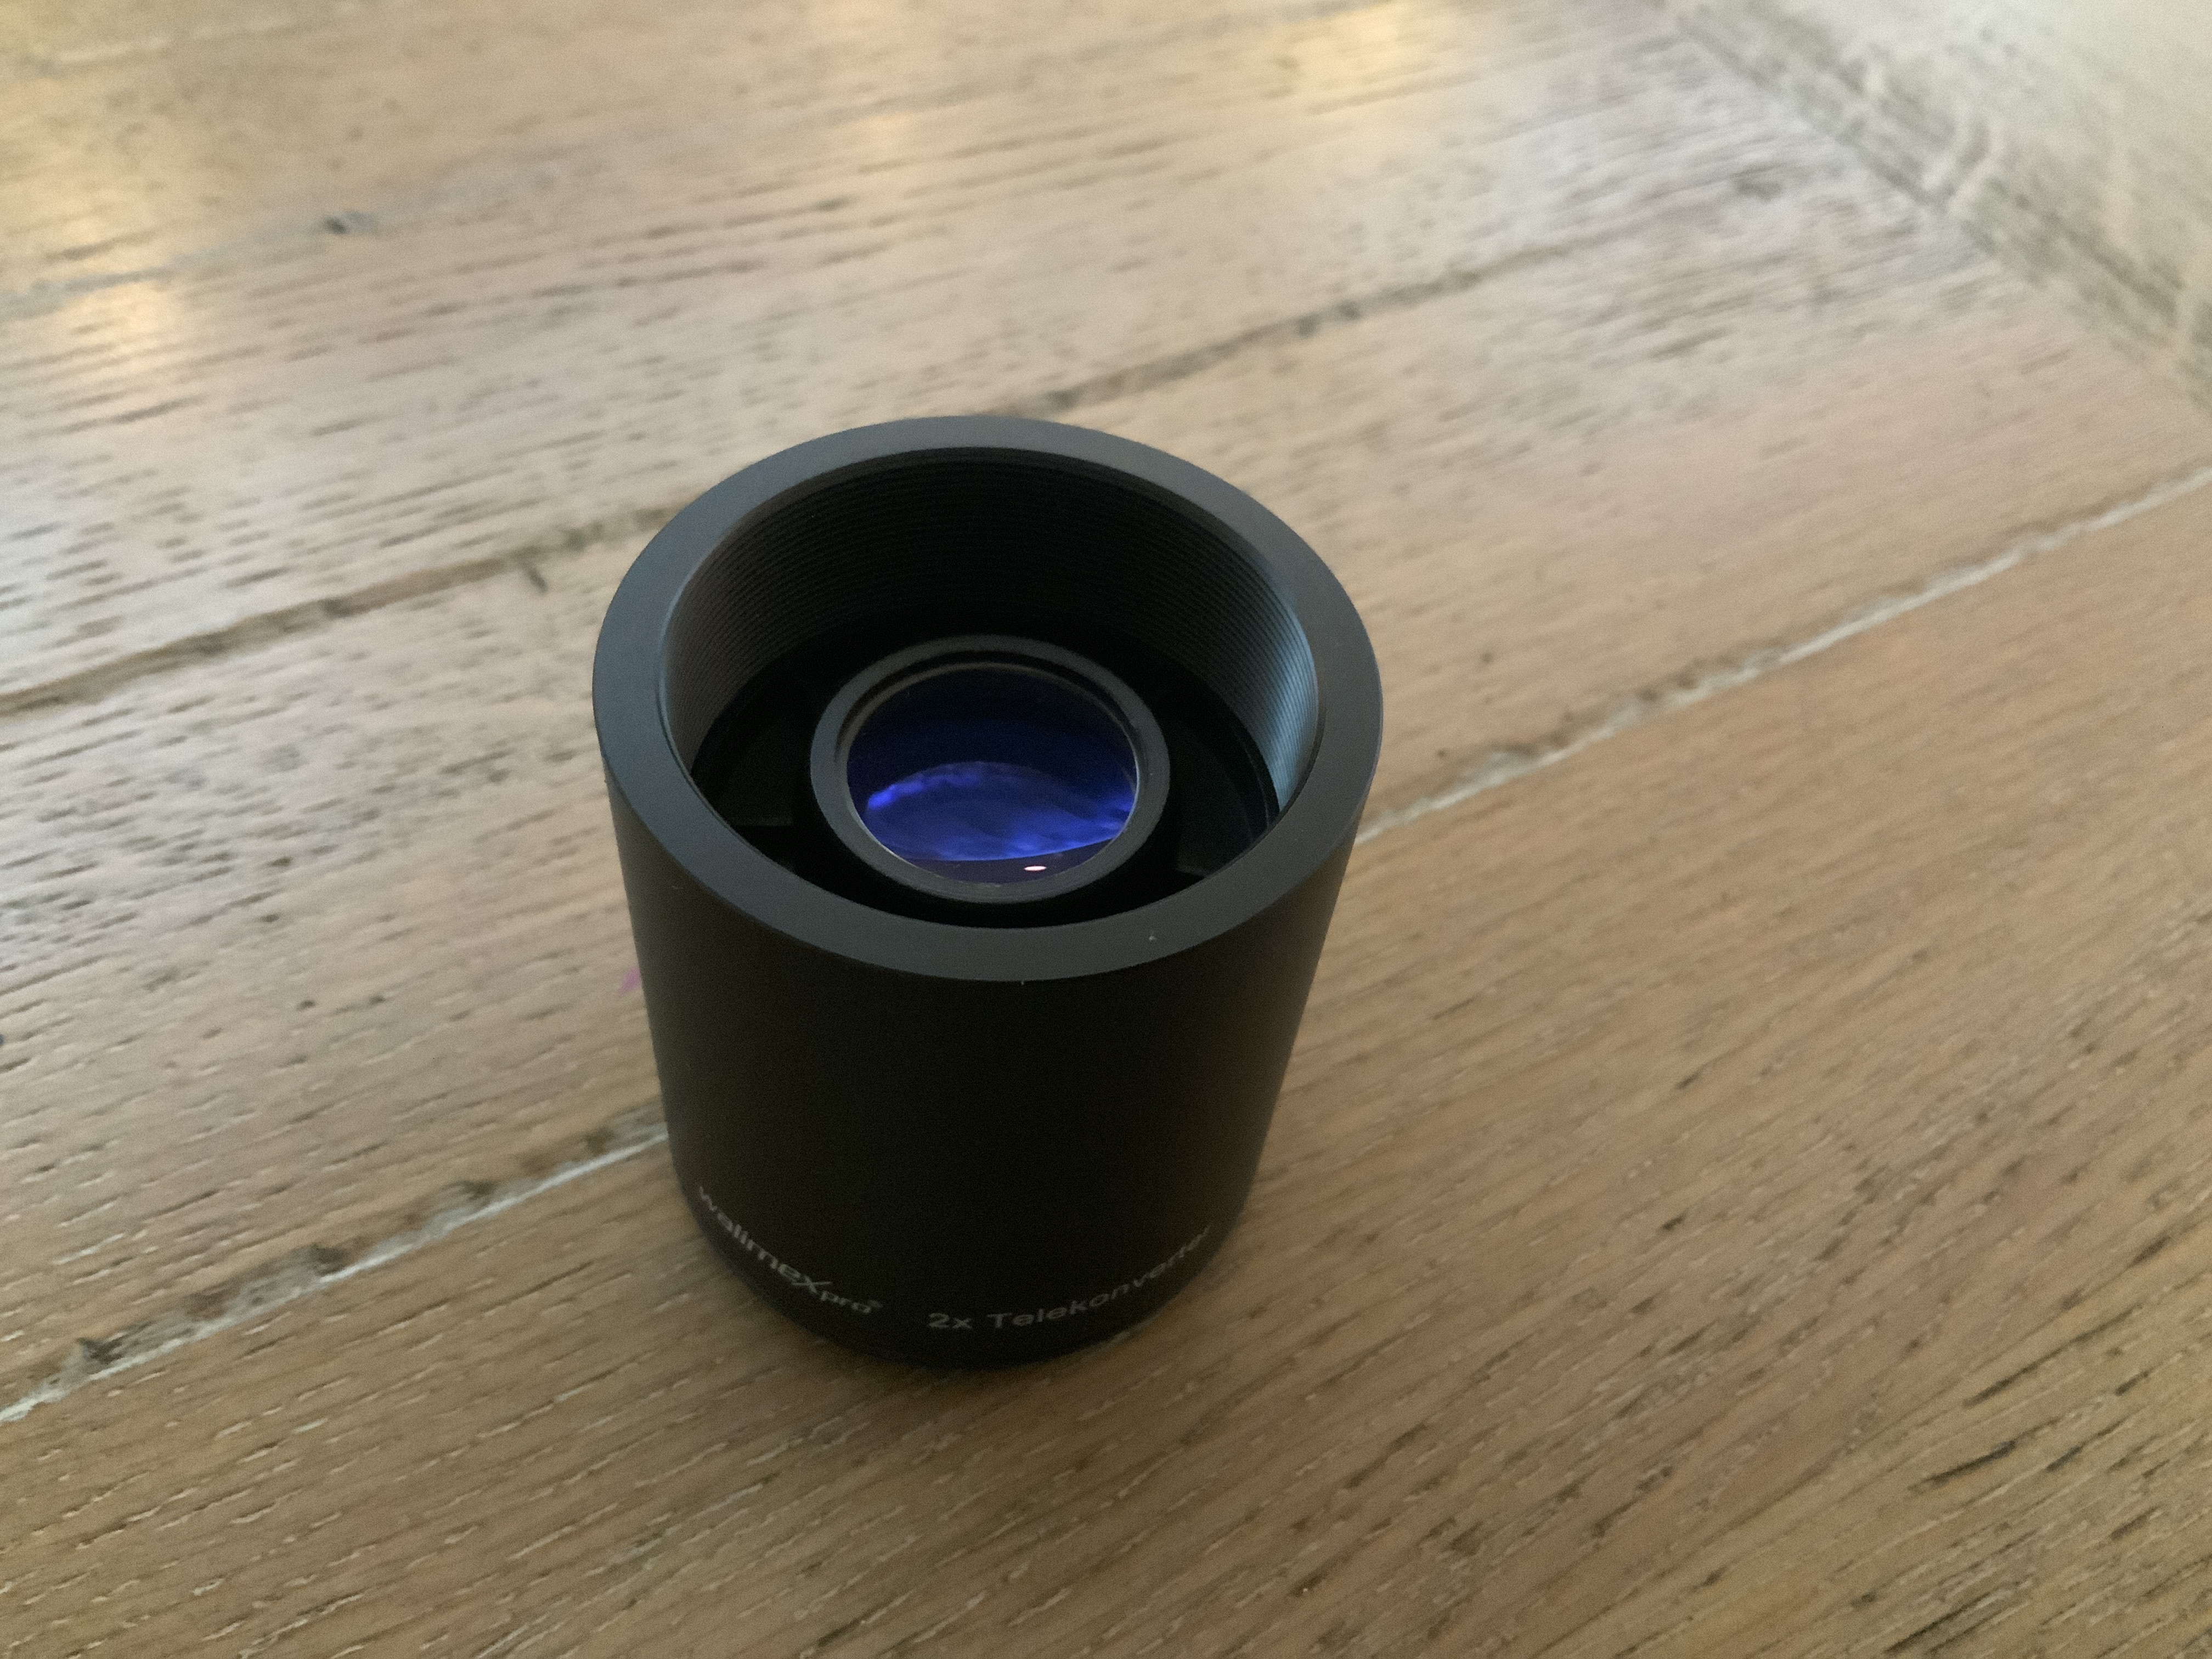
First off, I confirm the optical system that issued these flats has flaws : I have a quadruplet that has an integrated corrector to get a flat field and is « made » for astrophotography (M48 thread at the rear), on which I connected a M42 very cheap Walimex x2 teleconverter (originally sold with their cheap catadioptic lenses), on which I connected a M42 filter drawer, with small 1.25inch filters (in this case the SII 6nm). And then the camera that has the sensor 17,5mm away (if I remember correctly). It is a very small sensor (asi183mm pro, sensor is about 13,2 x 8mm).
I suspect the diameter of the Walimex introduce some vignetting. As suspect as well the filter is too far from the sensor : I just bought a filter whell, and I could see that ZWO has built it so that the sensor plane is much closer to the filter than it is with a filter drawer. Not to mention the possible reflection of the ring of the filter, the coating of the Walimex teleconverter that is quite reflective I guess... so in my opinion I am multiplying the flaw possibilities.
That being said : I used this setup only once to be able to shoot the Bubble Nebula that was quite small without the teleconverter 
The lights were as badly vignetted than the flat you have seen, even 1 sub... but twice less contrasted than the flat. Here is the final result using my method : https://astrob.in/u8xmhp/0/
My method alone could help get most of vignetting problem, but my calibration being done by hand, if was not perfect after stacking of the subs, then I had to run a dynamic background to finish it anyway. So it works but is not a great solution.
Last but not least, I also did pictures without the Walimex, and the vignetting is really smooth, as you said, and really less severe. But still more contrasted than the subs. Thus overcorrecting my lights during calibration. But this time my measurements where closer and I did not need to use DBE in Pixinsight to « finish » the correction. I suspect the diameter of my filters to be too small given the distance to the sensor. And it is so expensive I won’t change them, but I will put the sensor closer once I can use my filter wheel (I can’t use it : my Skyguider Pro will be killed if I add one more thing on it.... 😂). I am waiting for my CEM70.
Thanks again for your input John, very instructing.
|
You cannot like this item. Reason: "ANONYMOUS".
You cannot remove your like from this item.
Editing a post is only allowed within 24 hours after creating it.
You cannot Like this post because the topic is closed.
@John Hayes : forgot to mention that this is also for this teleconverter that I was looking for a solution to reduce the come using deconvolution :-) It is small, but can generate lots of troubles and discussions !
Thanks again, I am really going to check how to mount my setup (filter / sensor distance first, but maybe also backfocus and this sort of things... I bought the quadruplet with integrated corrector thinking I wouldn’t have to worry about that, but it seems that I need to).
|
You cannot like this item. Reason: "ANONYMOUS".
You cannot remove your like from this item.
Editing a post is only allowed within 24 hours after creating it.
You cannot Like this post because the topic is closed.
Here is the guilty... Now, looking at it, the lens seems small in comparison to the M42 thread, knowing it is screwed directly after the M48 thread of the refractor (with very very thin adapter ring. So pretty sure it reflect large amount of light all over inside the. Optical train when lit with « intense » light source (though I don’t know if the law of reflection and refraction are also functions of intensity in « real life »... for me they were just depending on wavelength, indice of refraction..). Maybe I should have used larger rings to put it backward ?
Concerning stray light : I have doubts... all is « screwed » with threads, so in theory no stray light. Maybe the filter drawer ? But it is well made.
And again, everything was worse with this teleconverter - I probably badly illustrated my problem with it - but the overcorrection happens as well with a more standard setup.
So it may still be light stray with filter drawer (but I take my flats at night so it should also affect my lights - maybe not with the same intensity ?), or again a sensor / 1.25inch filter distance.
I will have to test that.
 |
You cannot like this item. Reason: "ANONYMOUS".
You cannot remove your like from this item.
Editing a post is only allowed within 24 hours after creating it.
You cannot Like this post because the topic is closed.
This may not be of more use than what has already been said, but I will post it anyways in case it proves to be of any help, as I've also spent many hours getting flat frames perfected. It wasn't until recently that I got the last little details worked out, and that was after months of different techniques and tricks.
1) The only times I ever got under- or over-correction with my flat frames was when I didn't bias-calibrate them. Once I subtracted the bias signal from the flats themselves, they corrected the lights almost perfectly. I use a DSLR, which I know isn't your setup, but this still matters. I assume you've been rigorous enough to already be doing this, so explore your bias frames in more detail. I can't tell you what you should look for, but I know it's a valid road to travel down.
2) I agree entirely with John, your flat frame shows way too much variance on a small scale. In my experience, getting flats to calibrate the frame properly is almost impossible if the illumination of the sensor is heavily variant over such short distances, such as with your super bright spot in the middle. The only times I've seen this in my (altogether different) setup (an SCT), is when I had the backfocus distance completely incorrect by placing the camera way too far away from the tube, in an attempt to artificially decrease my focal length. I don't do this anymore because I know how harmful it is to the image, however it looked exactly like yours; super bright in the middle with a steep falloff afterwards.
3) I spent many, many hours screwing with flats, and it wasn't usually pleasant. I learned probably 10 critical aspects to the process that were all required to get good data. But when I had this problem, I also decided to change the contrast of the flats to get the correction best, in a trial and error fashion. There's nothing wrong with that if you'd rather spend your time imaging. However, probably like you, I was insatiable and wanted it to work...
|
You cannot like this item. Reason: "ANONYMOUS".
You cannot remove your like from this item.
Editing a post is only allowed within 24 hours after creating it.
You cannot Like this post because the topic is closed.
Looks like I see glass being taken out of your imaging train; definitely do this. My focal reducer for my SCT absolutely butchered my images (until I spent $400 on one....) and flats absolutely couldn't fix it, no matter how perfectly taken (long story short, the deviations themselves depend on the brightness and distribution of light on the imaging sensor...)
Definitely reduce your system to have as few elements and pieces of glass as possible, and work from there. My flats always worked well until I added the focal reducer, which was another problem I faced in this. Then gradually add them back in, one by one.
|
You cannot like this item. Reason: "ANONYMOUS".
You cannot remove your like from this item.
Editing a post is only allowed within 24 hours after creating it.
You cannot Like this post because the topic is closed.
|
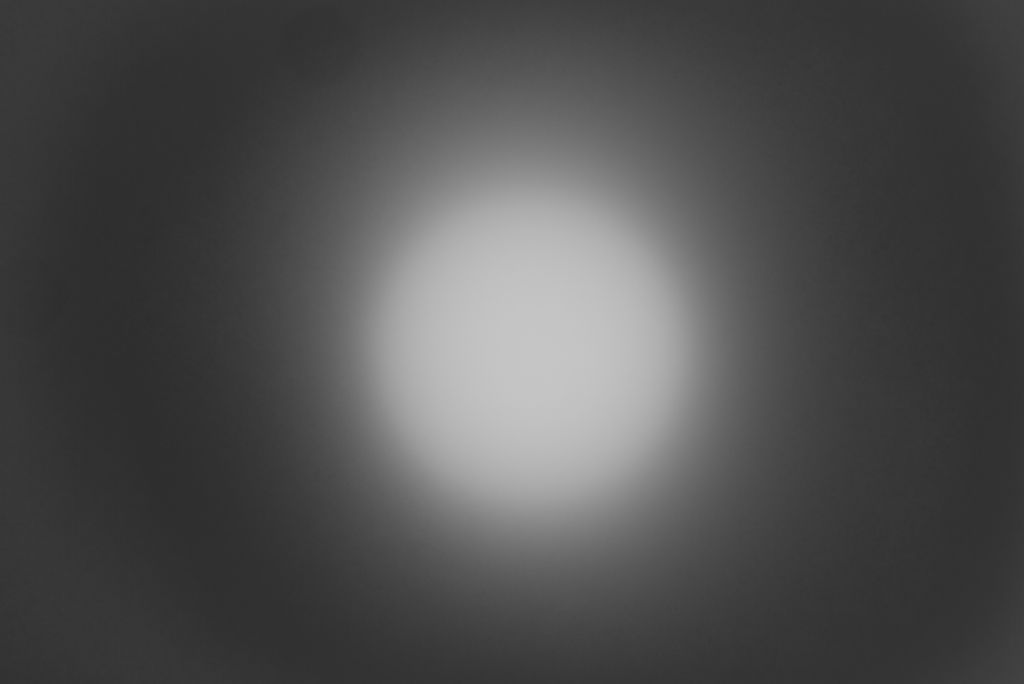
I should mention that the pictures of flats I posted are heavily stretched to show you the patterns, for illustration purpose.
|
You cannot like this item. Reason: "ANONYMOUS".
You cannot remove your like from this item.
Editing a post is only allowed within 24 hours after creating it.
You cannot Like this post because the topic is closed.
|
Did You tryed use DarkFlat like Bias?
|
You cannot like this item. Reason: "ANONYMOUS".
You cannot remove your like from this item.
Editing a post is only allowed within 24 hours after creating it.
You cannot Like this post because the topic is closed.
Tayson:
Did You tryed use DarkFlat like Bias?
Yes, I did
|
You cannot like this item. Reason: "ANONYMOUS".
You cannot remove your like from this item.
Editing a post is only allowed within 24 hours after creating it.
You cannot Like this post because the topic is closed.
Quite some progress on this post!
I agree that the flat has some untypical brightness distribution, and reading about the optical system I can easily understand why . .
Still I do not think this is the main problem since if it is consistenly funky, it would calibrate out. I do not see how this could lead to an overcorrection of the flats. Getting freaky patterns after calibration would be logical but not that amount of overcorrection.
One last saviour could also be to use an artificial flat, which can work quite well if the outside of the picture contains only starfield and no nebula. If you like I could explain how to do this in pixinsight.
CS,
Ray
|
You cannot like this item. Reason: "ANONYMOUS".
You cannot remove your like from this item.
Editing a post is only allowed within 24 hours after creating it.
You cannot Like this post because the topic is closed.
Artificial flat from sky shots, interesting !
I guess you aim somewhere wher there are no nebula and get rid of the stars with median filter or multiscale median ? If you can explain, go ahead ! We should pin some posts somewhere for people to find a kind of « bible » here in Astrobin - once the method is validated by peer review.
That being said, my method of recalibrating the master flat to match the contrast of the image is in my opinion more or less similar : except in your case the contrast is ok, but the stars are not.
Anyway I am pretty sure there maybe non linear phenomenons happening that makes my contrast higher in flats - when shot with an iPad screen - than on my lights... that being said again, I got the same problem with sky flats taken at dusk or dawn (don’t remember which one is in the morning - english is not my first language :-)
I have many trails to follow following those discussions , and so little clear sky time... I will first recheck my optical system, but I am not good enough to spot misuse I can make of my gear, particularly on the optical side. Once my filter wheel is operational, I will see having the sensor closer to the filter generates less vignetting and makes better flats.
Have a nice evening - or afternoon if you’re « West » :-)
|
You cannot like this item. Reason: "ANONYMOUS".
You cannot remove your like from this item.
Editing a post is only allowed within 24 hours after creating it.
You cannot Like this post because the topic is closed.
Hi Jérémie,
The best way to approach this kind of problem is to first reduce the system to its most basic elements. Take out reducers and everything that isn't absolutely essential. You should configure the system with the best mechanical spacings between the components. In general, you want the filters to be relatively close to the sensor and you want to make sure that any guiding prisms or mirrors are not cutting into the off-axis marginal ray bundles (this is appears to be a very common problem). Getting the system properly configured takes patience and attention to detail--and sometimes it requires ordering new parts so don't skimp on parts or short cut this step. To be honest, this is where I screwed up configuring my new 20" scope and it is taking months to fix it. I hate to admit it but I'm an optical engineer...and I still screwed it up! So, trust me, I understand the challenges of getting this stuff right.
Once you have it configured, look backwards through your system from the corners of your sensor to make sure that: A) nothing is in the way so that you can see the entire exit pupil and B) there are no stray reflections. You may have to increase the size of some of the adapters and you may have to apply black paint or flocking to eliminate strays. Paying close attention to details is important! Then take the scope out and shoot some images and some flats to determine if your calibration process works. At that point, first look at your flats to make sure that they look correct with smoothly varying brightness from center to edge. Any variations that appears "sharp" in your flat data may signal a potential problem. Next, do some calibration runs to establish that your processing steps and settings are correct. Once everything is working, you'll see perfectly calibrated images at the output. Then (and only then) start adding other optical components to your system such as reducers or compressors. You will still need to look for vignetting and strays so don't skip that step. In general, my advice is to keep your system as simple as possible--for a lot of reasons; but, sometimes there are good reasons to include additional components.
Good luck with it and let us know how it goes.
John
|
You cannot like this item. Reason: "ANONYMOUS".
You cannot remove your like from this item.
Editing a post is only allowed within 24 hours after creating it.
You cannot Like this post because the topic is closed.
Hi Jérémie,
I use artificial flats in the case where for one reason or another the flats I made are not working (e.g. mirror flop caused havoc or camera was accidentally slightly rotated).
A friend of mine came up with this procedure after having a troublesome dataset that we did not want to give up on.
In that case I actually try to extract flats from the lights - this will work reasonally well under 2 conditions:
* the 'subject' of the image is centered and is delimited well from the pictures edges
* there is only a reasonable amount of vignetting. (sometimes I do this procedure also after using the not-so-good flat correction)
I apply this correction after the image integration - not on all individual lights.
The procedure goes as follows:
* make a copy (c1) of the image
* on this copy, run an MMT with 5 layers, removing layer 5. This will yield an image with only stars and other high frequency stuff
* make another copy (c2) of the image
* using pixelmath, substract c1 from c2. This yields an image with only low frequency stuff
* then use a MMT as aggressive as needed (try out what works for you, I usually end op with just leaving layer 8 and removing the rest)
* c2 is now your "artificial flat".
* you might need to futher work on c2 with clonestamp or pixel math to remove leftover artifacts
* you can correct your image with pixelmath formula (assuming 'image' is your integrated light): image * mean(c2) / c2
Have a nice evening (I am located in the Netherlands by the way).
|
You cannot like this item. Reason: "ANONYMOUS".
You cannot remove your like from this item.
Editing a post is only allowed within 24 hours after creating it.
You cannot Like this post because the topic is closed.
Thanks @John Hayes and @rayp !
John, I have seen your setup on the pictures you posted and read some of your tribulations, so I understand what you mean 😂. I hope you will succeed with your dreamy setup, and eager to see what you can get from it. Your current pictures are already fantastic.
Fortunately for me (or unfortunately ?) I have a modest setup with no off axis guider nor reducer (well it is built-in I guess), just a small flat field 71/347 quadruplet from TS Optics, so I should quickly identify the guilty part. That’s why I am pretty sure now that it may comes from the filter to sensor distance and reflections from the threaded ring of the filter. I should have bought the 2inches filter instead of the 1,25... If it is not that, I am defeated :-)
Ray, thanks for the tips ! Where are you in NL ? I have some friends from Utrecht and Amsterdam of course, former colleagues. Christmas is already behind you, but I wish you a good Sinterklaas anyway :-)
|
You cannot like this item. Reason: "ANONYMOUS".
You cannot remove your like from this item.
Editing a post is only allowed within 24 hours after creating it.
You cannot Like this post because the topic is closed.
Hi Jérémie,
I am all the way down south in the Netherlands, near Maastricht.
Have a nice Christmas!
CS,
Ray
|
You cannot like this item. Reason: "ANONYMOUS".
You cannot remove your like from this item.
Editing a post is only allowed within 24 hours after creating it.
You cannot Like this post because the topic is closed.
Hi All,
I have read a post of some guy having the same flat overcorrection problem, and @Adam Block gave a link to a video talking about that same subject.
I thought it was worth sharing it here, as he presents some guidelines to check a few thing that can cause that, and shows an « iterative » workaround in Pixinsight if you can’t do your flats all over again, in order not to lose your lights.
That’s kind of similar to the method described at first above in this post, but simpler, and therefore better imo, though it may require more iterations with trial and error to offset the flat dark (or electronic signature), while I have tried to measure the contrast.
There are 3 videos of 15-25 minutes each to watch. That’s very well explained. Totally worth spending some time on it if you’re a beginner like me :
https://www.youtube.com/watch?v=Kkg441UBNpo&list=PLAzMa9eIVQkA1njWxOhFuETrQ_spYV51r&index=1 |
You cannot like this item. Reason: "ANONYMOUS".
You cannot remove your like from this item.
Editing a post is only allowed within 24 hours after creating it.
You cannot Like this post because the topic is closed.
to create to post a reply.