It took me about 9 months to more or less tame my TS PowerNewt (a carbon fiber F4 Newtonian with a 0.73x focal reducer). The key insights I got from others were
1. That you can't diagnose tilt or really even corrector spacing until you have the collimation dead on, and
2. That the peep hole of your autocollimator should be the same distance from the secondary mirror as your camera's detector to avoid parallax error.
I've got these mostly under control now but still have a little residual problem with getting round stars. In the attached, the stars coma "around" the upper corners of the picture, toward the center of the picture in the lower right, and are pretty round in the lower left.
I've tried to fine tune this with the "defocused star" method described by many (and which works well for my SCT), but it invariably gives me worse results than sticking with the collimation determined with my autocollimator. So when I take my first image for the night, there is no way to "fine tune" except to try the autocollimator again, which is difficult to do with a flashlight.
I was wondering how others handle this. I'm using the autocollimator very carefully and lining up the multiple reflections of the triangle on my mirror very carefully, but the method doesn't seem quite precise enough for F2.8. How would I know if the residual issues are tilt or inadquate collimation? And are those really two different things or just different ways of saying that the plane of the sensor isn't parallel to the plane of the mirror? Is a tilt corrector really just a method for fine tuning collimation from the other end of the optical train?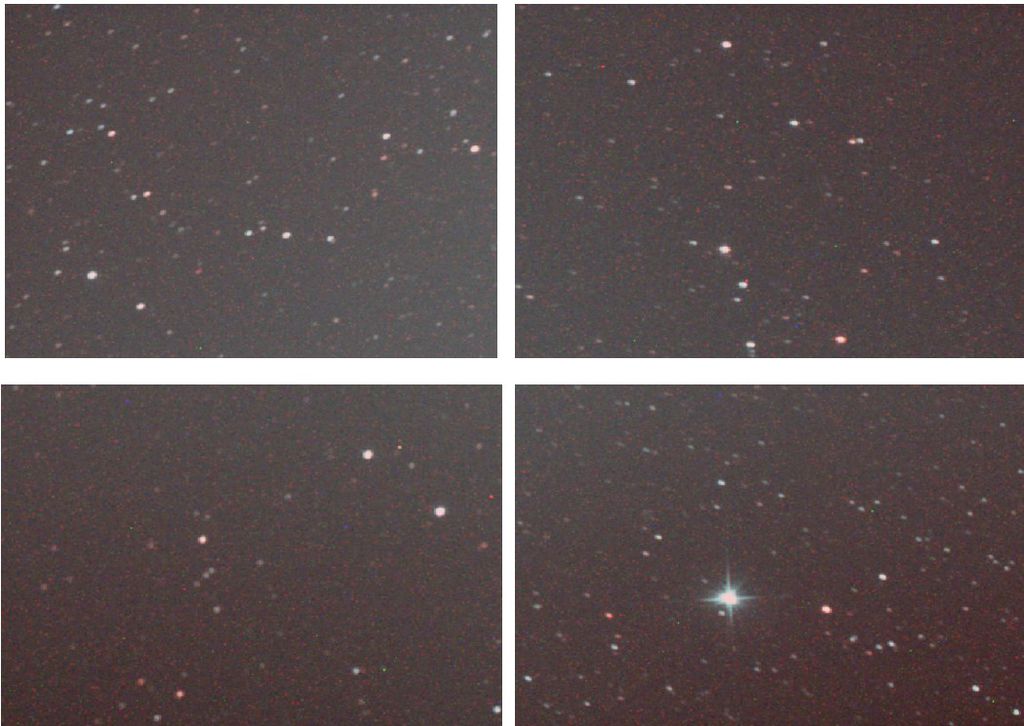 |
You cannot like this item. Reason: "ANONYMOUS".
You cannot remove your like from this item.
Editing a post is only allowed within 24 hours after creating it.
You cannot Like this post because the topic is closed.
|
I know this post is over 2 years old but did you ever get this sorted. I can provide some insights with regard to my Skywatcher 250 F4 newtonian if your interested.
|
You cannot like this item. Reason: "ANONYMOUS".
You cannot remove your like from this item.
Editing a post is only allowed within 24 hours after creating it.
You cannot Like this post because the topic is closed.
Hi Jacob -
I am not the original poster, but would certainly be interested in a response.
FYI, the point about making sure the autocollimator is at the focal point seems correct. I tried the Black Cat yesterday, and it seems that unless I am exactly at the focal point, each pair of reflections in the offset pupil also has a second fainter pair associated with it. Those seem to disappear as I move the collimator closer to the focal point.
|
You cannot like this item. Reason: "ANONYMOUS".
You cannot remove your like from this item.
Editing a post is only allowed within 24 hours after creating it.
You cannot Like this post because the topic is closed.
John Tucker:
1. That you can't diagnose tilt or really even corrector spacing until you have the collimation dead on, and
2. That the peep hole of your autocollimator should be the same distance from the secondary mirror as your camera's detector to avoid parallax error
First point is true that without excellent collimation little point diagnosing tilt. Tilt is more likely to originate in the optical train components placed in the focuser (CC, FW, OAG, spacers, etc) as they may not be made perfectly flat so the plane of the sensor may be tilted relative to the plane of collimation.
As for the second point, it's best to place the autocollimator on the focal plane (within a cm or two at most) otherwise the reflections in the offset pupil have parallax and the higher order reflections become larger so never fully disappear when perfect collimation is achieved.
|
You cannot like this item. Reason: "ANONYMOUS".
You cannot remove your like from this item.
Editing a post is only allowed within 24 hours after creating it.
You cannot Like this post because the topic is closed.
John Tucker:
I've tried to fine tune this with the "defocused star" method described by many (and which works well for my SCT), but it invariably gives me worse results than sticking with the collimation determined with my autocollimator. So when I take my first image for the night, there is no way to "fine tune" except to try the autocollimator again, which is difficult to do with a flashlight.
Collimating on a defocused star with fast newts, or newts in general, is a bad idea. I'm not even sure how you would do that as there are two mirrors to adjust and any secondary mirror offset will mean the secondary shadow will never be centered with the primary on an image of a defocused star.
I always collimate before dark but like to wait until the scope has been in the shade for while as the autocollimator can pick up miscollimation from thermal expansion when sitting in the sun.
|
You cannot like this item. Reason: "ANONYMOUS".
You cannot remove your like from this item.
Editing a post is only allowed within 24 hours after creating it.
You cannot Like this post because the topic is closed.
John Tucker:
I was wondering how others handle this. I'm using the autocollimator very carefully and lining up the multiple reflections of the triangle on my mirror very carefully, but the method doesn't seem quite precise enough for F2.8. How would I know if the residual issues are tilt or inadquate collimation? And are those really two different things or just different ways of saying that the plane of the sensor isn't parallel to the plane of the mirror? Is a tilt corrector really just a method for fine tuning collimation from the other end of the optical train?
I personally wouldn't use the reducer on an already fast newt. The tolerances become so tight that any tiny bit of miscollimation, tilt, flexure becomes very obvious. Remember that collimation tolerances are proportional to the F#^3. So going from F4 to F3 decreases tolerances by a factor of 2.4. If the OTA is built for such speeds then great otherwise it can be a real headache. Ensuring you have a threaded connection to the focuser goes a long way towards eliminating tilt that's introduced when using a 2" compression ring. I personally can testify to this.
The other thing is, are you also using a cheshire for centering the primary?
You're right in saying that miscollimation and tilt both cause the focal plane to be non-parallel to the sensor but how that comes about is different for each. Tilt, as we understand it, tends to be physically introduced somewhere in the hardware but miscollimation is optical.
|
You cannot like this item. Reason: "ANONYMOUS".
You cannot remove your like from this item.
Editing a post is only allowed within 24 hours after creating it.
You cannot Like this post because the topic is closed.
Hi Jacob -
I am not the original poster, but would certainly be interested in a response.
FYI, the point about making sure the autocollimator is at the focal point seems correct. I tried the Black Cat yesterday, and it seems that unless I am exactly at the focal point, each pair of reflections in the offset pupil also has a second fainter pair associated with it. Those seem to disappear as I move the collimator closer to the focal point.
No worries mate. I think I addressed your question in the first response but let me know otherwise.
|
You cannot like this item. Reason: "ANONYMOUS".
You cannot remove your like from this item.
Editing a post is only allowed within 24 hours after creating it.
You cannot Like this post because the topic is closed.
Thank you, Jacob.
I assume you collimate with the Paracorr removed. How do you determine the exact focal plane? I am planning to go off of the Paracorr diagram, which shows the focal plane to be 9mm above the top surface of the Paracorr. Hence, if I remove the Paracorr and rack the focuser outward by 9mm, the end of the focuser should be at or close to the focal plane of the mirror. Is there a better method?
Hi Arun. According to the televue website, the original focal plane of the telescope is 9mm in front of the paracorr as you mentioned. My paracorr screws directly into, and is flush with, my 3" feathertouch focuser (with an adapter) so when I focus for the first time, I know the native focal plane is 9mm in front of the focuser. To perform collimation, I have an M68 to 2" compression ring adapter that places the cheshire/autocollimator about 1cm in front of the focuser. Note: I don't clamp the cheshire/autocollimator in the compression ring as this will tilt them. I just hold them flush up against the M68-2" adapter.
And yes, I don't collimate with the paracorr in the focuser. My paracorr is permanently fixed to the OAG/FW/camera setup, which has the added bonus of being completely sealed so no dust can get in and I never see new dust motes appearing on the sensor.
Even if you just put the cheshire/autocollimator directly into the focuser (if the focuser natively has a 2" compression ring), the 9mm error is unlikely to be noticeable.
Hope this helps!
Jacob
|
You cannot like this item. Reason: "ANONYMOUS".
You cannot remove your like from this item.
Editing a post is only allowed within 24 hours after creating it.
You cannot Like this post because the topic is closed.
|
Thank you, Jacob. My 2 inch feathertouch focuser does not, unfortunately, have a threaded connection so I am stuck with the compression fitting for the Paracorr but otherwise the procedure I plan is similar. I will just have to be careful not to overtighten the fitting which will introduce tilt in the corrector or potentially result in pinched optics. In retrospect, I should have chosen a focuser with a threaded connection possiblity but for now will make do with what I have.
|
You cannot like this item. Reason: "ANONYMOUS".
You cannot remove your like from this item.
Editing a post is only allowed within 24 hours after creating it.
You cannot Like this post because the topic is closed.
Thank you, Jacob. My 2 inch feathertouch focuser does not, unfortunately, have a threaded connection so I am stuck with the compression fitting for the Paracorr but otherwise the procedure I plan is similar. I will just have to be careful not to overtighten the fitting which will introduce tilt in the corrector or potentially result in pinched optics. In retrospect, I should have chosen a focuser with a threaded connection possiblity but for now will make do with what I have.
Funny enough I also had a 2" r/p feathertouch focuser before I got the 3" with a threaded connection. I immediately noticed a difference. Perfect stars in every corner due to lack of tilt and pinching of the corrector. A lesson I learnt is that it's not ideal to have the coma corrector also acting as a mechanical support for the camera/FW/OAG (bit under 2kg) as the strain causing some pinching and it's hard to keep to perfectly flush with the focuser as there is always a little wiggle between the CC and the focuser tube. With the threaded connection, the CC is free floating inside the focuser and the focuser takes the weight.
A trick I did to help reduce tilt in the 2" focuser, is to wrap sticky tape around the CC a few times to tighten the tolerance.
|
You cannot like this item. Reason: "ANONYMOUS".
You cannot remove your like from this item.
Editing a post is only allowed within 24 hours after creating it.
You cannot Like this post because the topic is closed.
Jacob Heppell:
I know this post is over 2 years old but did you ever get this sorted. I can provide some insights with regard to my Skywatcher 250 F4 newtonian if your interested.
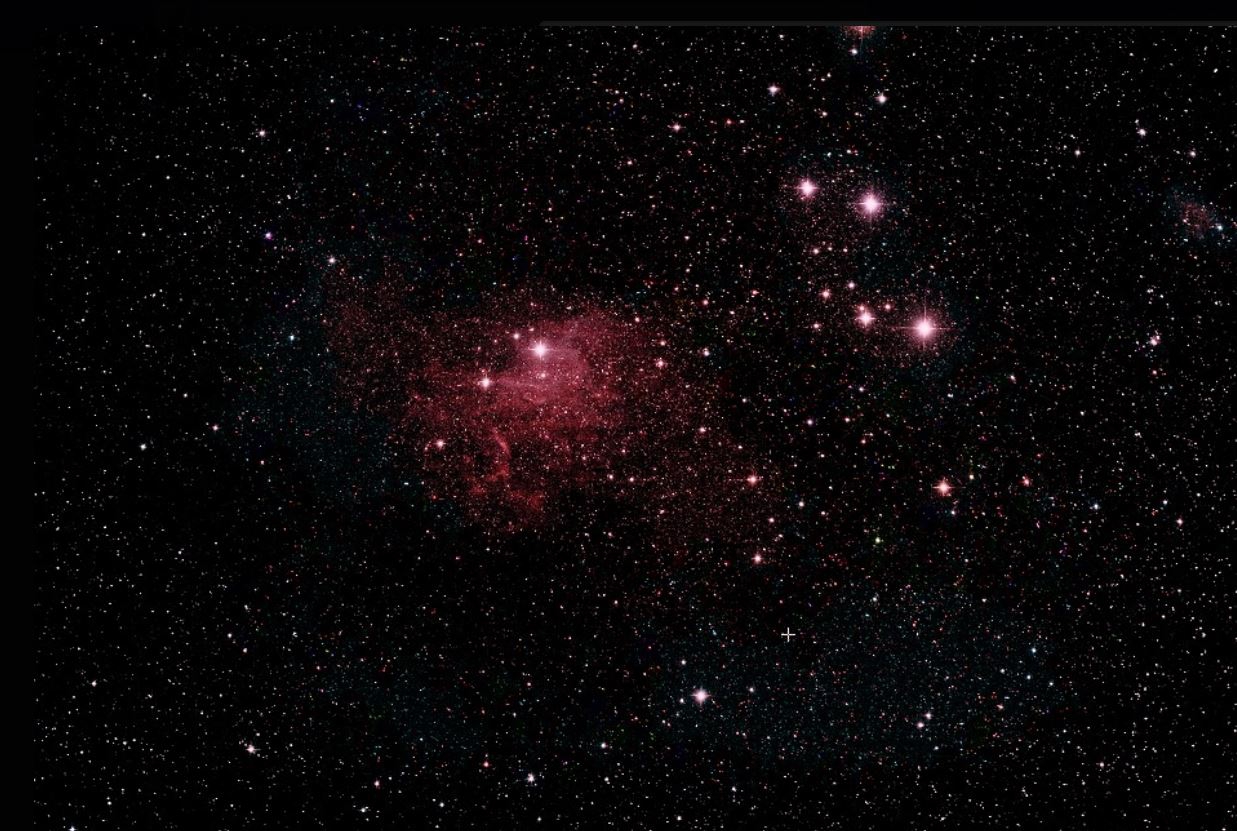
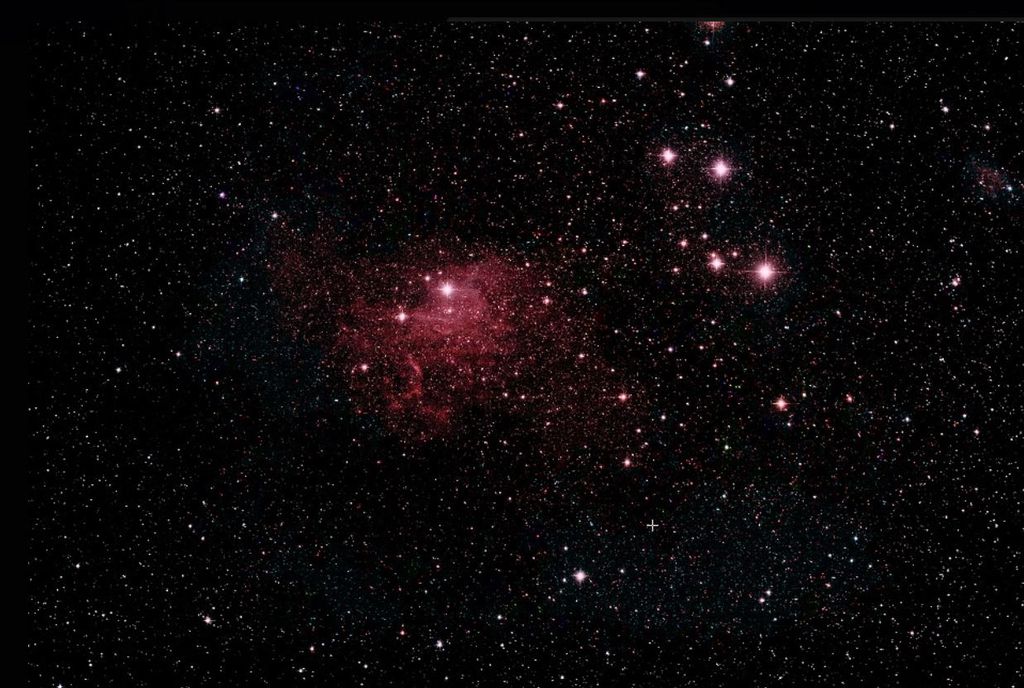
Thank you Jacob. I eventually sold the 0.73 reducer as I was never really able to get the collimation under control. Shooting at F2.8 was simultaneously a blast (see my single 90 sec exposure picture of the flaming star nebula below) and a disappointment. At F4 I get round stars all the way to the corners every time, while F2.8 was always a crapshoot. I ended up with acceptable quality images about 20% of the time, and with time at dark sites so limited...
I think flex in the system might have been an issue as well. If there were some way to collimate in real time it would be great, but lacking that its just too hard for me.
F4 is no problem.
 |
You cannot like this item. Reason: "ANONYMOUS".
You cannot remove your like from this item.
Editing a post is only allowed within 24 hours after creating it.
You cannot Like this post because the topic is closed.
John Tucker:
Jacob Heppell:
I know this post is over 2 years old but did you ever get this sorted. I can provide some insights with regard to my Skywatcher 250 F4 newtonian if your interested.
Thank you Jacob. I eventually sold the 0.73 reducer as I was never really able to get the collimation under control. Shooting at F2.8 was simultaneously a blast (see my single 90 sec exposure picture of the flaming star nebula below) and a disappointment. At F4 I get round stars all the way to the corners every time, while F2.8 was always a crapshoot. I ended up with acceptable quality images about 20% of the time, and with time at dark sites so limited...
I think flex in the system might have been an issue as well. If there were some way to collimate in real time it would be great, but lacking that its just too hard for me.
F4 is no problem.
Well I can see the appeal of F2.8 so won't hold that against you! Considering the CFZ would be about 20 microns, it's not surprising that flexure comes into play. What coma corrector did you end up going for?
Maybe you need to buy a fast ASA scope like the 10" F3.6 astrograph!
|
You cannot like this item. Reason: "ANONYMOUS".
You cannot remove your like from this item.
Editing a post is only allowed within 24 hours after creating it.
You cannot Like this post because the topic is closed.
Yeah, there are some real nice scopes out there! But $20K here and $20K there and pretty soon you're talkin' real money!
I can't tell you how many hours I put into trying to master than 0.73 focal reducer! It was just stunning to get nicely exposed pictures in 3 hours.
The current fleet consists of f
1. The 6" carbon fiber Newt (flagship). I bought the TS "Superflat" corrector and its quite good.
2. An Askar 180mm refractor. Its supposed to be APO, but has a lot of fringing so I mainly shoot nebulas with a filter
3. A Celestron C6. Lots of vignetting and coma but OK for bright objects if I crop a lot.
Mounts include an EQ6R and a CEM25P. The latter has some issues.
I am playing with the idea of adding a GSO 6" (F6) or 8" (F5) Newt. I'd expect a lot of flex issues with these cheap steel Newts but the reviews are surprisingly good. Not sure how good the tracking will be with an 8" Newt on my EQ6R.
|
You cannot like this item. Reason: "ANONYMOUS".
You cannot remove your like from this item.
Editing a post is only allowed within 24 hours after creating it.
You cannot Like this post because the topic is closed.
I can imagine you would have given the reducer a good go before selling it.
Does seem like newts very quickly get expensive once you go past about the <$2-3k range!
Well I see you've got yourself setup nicely. If your going to upgrade the newt I'd recommend the 8" or 10" if you can manage. More light gathering, greater resolution and higher surface area to circumference ratio (less diffraction).
An 8" newt on an EQ6R will be fine. I have my 10" newt on an NEQ6 and it copes just fine. Although my mount has been hypertuned and belt modified, which dramatically improved guiding.
|
You cannot like this item. Reason: "ANONYMOUS".
You cannot remove your like from this item.
Editing a post is only allowed within 24 hours after creating it.
You cannot Like this post because the topic is closed.
Is that a carbon Newt or a steel one?
I'm torn because I suspect these bottom-of-the-line Newts are going to have a lot of flex, which will be magnified by the greater weight of the 8" tube. This F/5 from GSO looks interesting and hopefully will be less senstive to flex than an F/4. But the tube alone weighs 22 lb. https://agenaastro.com/gso-8in-f5-newtonian-reflector-ota-focuser-upgrade.html |
You cannot like this item. Reason: "ANONYMOUS".
You cannot remove your like from this item.
Editing a post is only allowed within 24 hours after creating it.
You cannot Like this post because the topic is closed.
John Tucker:
Is that a carbon Newt or a steel one?
I'm torn because I suspect these bottom-of-the-line Newts are going to have a lot of flex, which will be magnified by the greater weight of the 8" tube. This F/5 from GSO looks interesting and hopefully will be less senstive to flex than an F/4. But the tube alone weighs 22 lb. https://agenaastro.com/gso-8in-f5-newtonian-reflector-ota-focuser-upgrade.html
I have the Skywatcher 10" F4 Quattro in steel tube but I have friends who use the 8" quattro with great success. There's 2.1kg of weight on my focuser and I'm yet to see any evidence of OTA flexure when I look at my subs. I'd imagine the longer slower tube you're looking at would flex more easily but I don't know how much the slower F# makes up for that. Generally, I doubt OTA flexure is going to be a problem unless you add lots of weight to the focuser.
I personally don't see the value in upgrading to carbon fibre as it would only shave about 1kg off a ~13kg OTA plus I'm not worried about thermal expansion/contraction from temperature change as I have an autofocuser (sesto senso). I'd estimate that for the price of a carbon tube you could probably get a steel tube plus an autofocuser. Nonetheless, carbon fibre has its place.
|
You cannot like this item. Reason: "ANONYMOUS".
You cannot remove your like from this item.
Editing a post is only allowed within 24 hours after creating it.
You cannot Like this post because the topic is closed.
Note: I don't clamp the cheshire/autocollimator in the compression ring as this will tilt them. I just hold them flush up against the M68-2" adapter.
I can absolutely confirm that clamping the compression fitting of the eyepiece holder will introduce tilt. Even with just the autocollimator, what I am finding is that the manner in which I clamp - which screw I tighten first, even repeatability of tightening the same screw, messes with the collimation. I'll have to try the tape idea to improve the consistency.
Yep I know the struggle. That was my life with a compression ring. The tape helped reduce tilt and gave more grip with the compression ring but its not a perfect solution. Got me by though.
|
You cannot like this item. Reason: "ANONYMOUS".
You cannot remove your like from this item.
Editing a post is only allowed within 24 hours after creating it.
You cannot Like this post because the topic is closed.
Jacob Heppell:
Note: I don't clamp the cheshire/autocollimator in the compression ring as this will tilt them. I just hold them flush up against the M68-2" adapter.
I can absolutely confirm that clamping the compression fitting of the eyepiece holder will introduce tilt. Even with just the autocollimator, what I am finding is that the manner in which I clamp - which screw I tighten first, even repeatability of tightening the same screw, messes with the collimation. I'll have to try the tape idea to improve the consistency.
Yep I know the struggle. That was my life with a compression ring. The tape helped reduce tilt and gave more grip with the compression ring but its not a perfect solution. Got me by though.
I'm not particularly surprised that the compression ring introduces tilt. But I am a little surprised to hear that the actually put the thread on the threaded connections on there so precisely that its any better.
I get a very modest amount of what I believe is tilt at F4. I have a threaded connection that I never use (because I can't adjust the camera rotation easily) but I will give it a try next time out.
|
You cannot like this item. Reason: "ANONYMOUS".
You cannot remove your like from this item.
Editing a post is only allowed within 24 hours after creating it.
You cannot Like this post because the topic is closed.
Actually, I should mention that I have made some improvements since I wrote these posts that have been helpful.
First, I have the focuser on top of the scope rather than the bottom, so gravity helps keep things flush with the top surface of the focuser. This is not ideal from a moment of inertia standpoint, but my mount can easily handle it.
Second I attach the Tublug to the Paracorr and do the primary collimation with the Paracorr in place. That seems to help in reducing whatever tilt may have been introduced by the Paracorr.
Third, I have been using the Catseye autocollimator making sure the focuser was racked out to the correct focal plane.
With all these, I've been able to get eccentricities of ~ 0.35 consistently across multiple nights even with the compression fitting connection.
|
You cannot like this item. Reason: "ANONYMOUS".
You cannot remove your like from this item.
Editing a post is only allowed within 24 hours after creating it.
You cannot Like this post because the topic is closed.
John Tucker:
I'm not particularly surprised that the compression ring introduces tilt. But I am a little surprised to hear that the actually put the thread on the threaded connections on there so precisely that its any better.
I get a very modest amount of what I believe is tilt at F4. I have a threaded connection that I never use (because I can't adjust the camera rotation easily) but I will give it a try next time out.
With the threaded connection my optical train is always flush up against the focuser so the images I get are representative of the collimation. From here I can safely look at any residual tilt knowing that it's not caused by the collimation.
I recommend you give the threaded connection a go. As for camera rotation, I'm able to rotate my 3" feathertouch focuser but if you can't rotate your focuser then, yes, you have to use whatever angle it's at when you thread it in. Although if you put spacer rings over the thread (usually buy as 0.5, 0.8, 1mm) then you might be lucky enough to land on a desirable angle.
|
You cannot like this item. Reason: "ANONYMOUS".
You cannot remove your like from this item.
Editing a post is only allowed within 24 hours after creating it.
You cannot Like this post because the topic is closed.
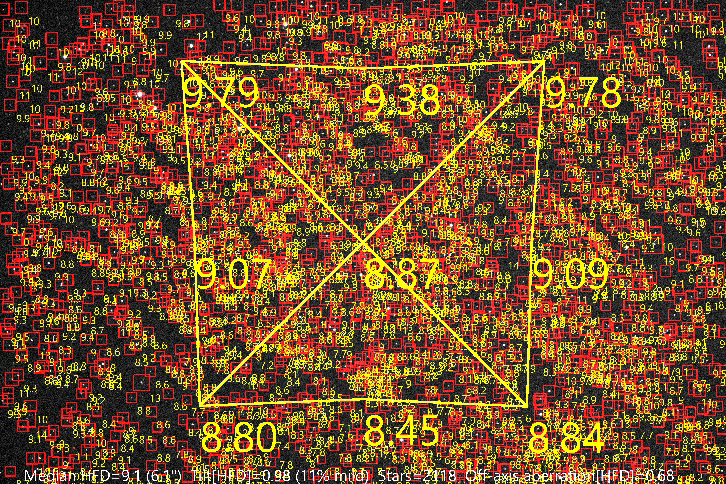
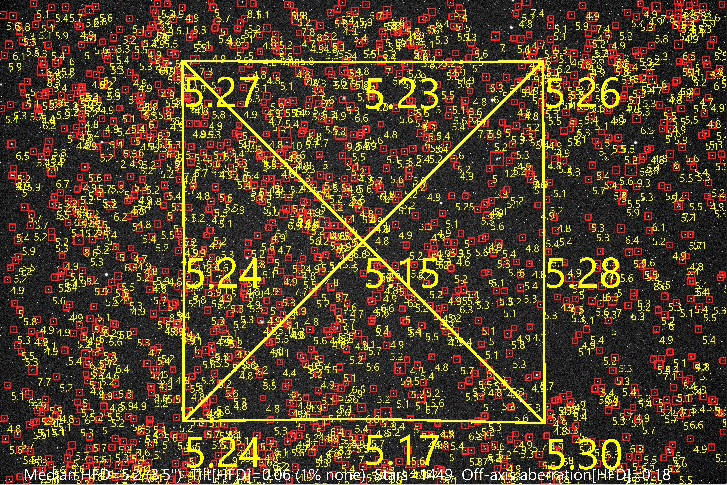
While we're on the topic of tilt, I decided to have a closer look at any residual tilt that may exist in my system. I used ASTAP for the HFD calculation of the regions. Basically I focused on a patch of sky that had a fairly homogeneous distribution of similar sized stars and took a 30 sec sub then analysed it with ASTAP. This was the result.
As is, I'd be pretty happy with that as the difference between the highest and lowest value is 0.24. However, tilt must be diagnosed on a defocused image to be representative (see my quick Paint sketch below of a sensor cross section).

Indeed, this is what I saw as I moved from under-focus to over focus.
Under-focus image (~4x CFZ)

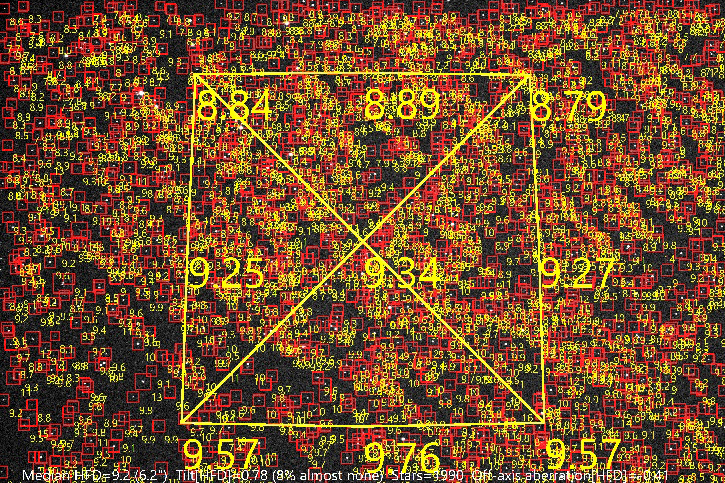
Over-focus image (~4x CFZ)
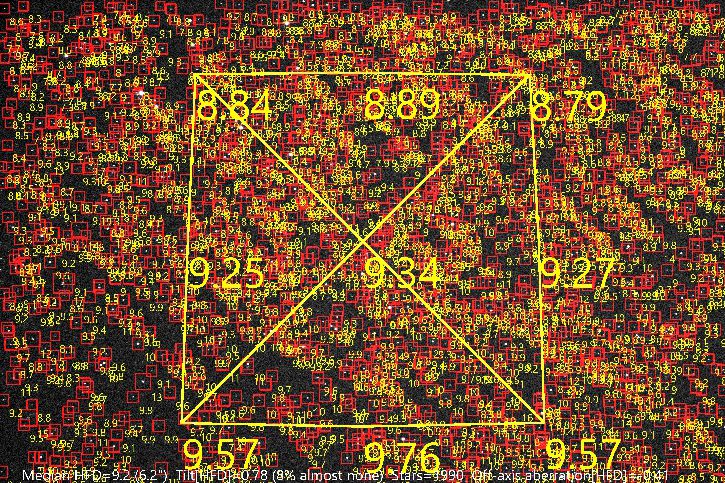
Clearly there is some level of tilt.
I'll use the over focus as my reference. The max-min difference here is 0.97. The side with higher HFD must be moved closer to the OTA or the side with the lower HFD must be moved away from the OTA to be coplanar with the focal plane.
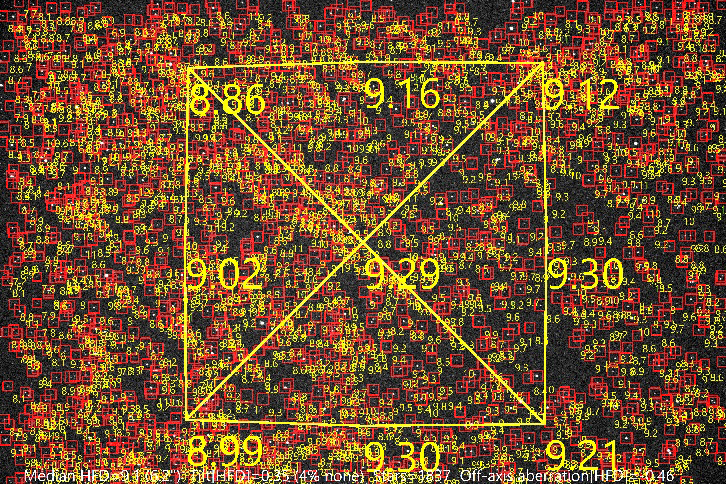
I have since figured out which side of the image corresponds to what side of the sensor so I know where to make an adjustment. Rather than buy an expensive tilt adjuster (I really don't have the backspace for one anyway), I simply placed ~1cm strip of sticky tape between the spacers (~50mm from the optical center). I had tape that was ~100uM and ~50uM according to the calipers. After a few attempts, I got good results with one piece of both tap so around ~150uM in total but the tape compresses when clamped together so likely closer to ~100uM.
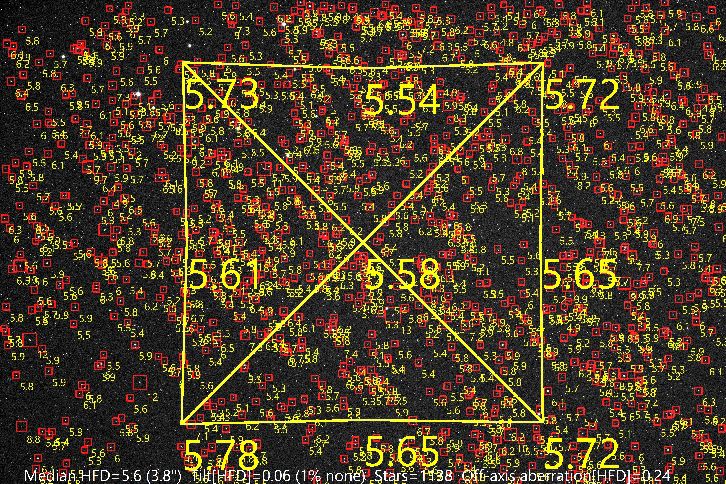
The new over-focused image is as follows.
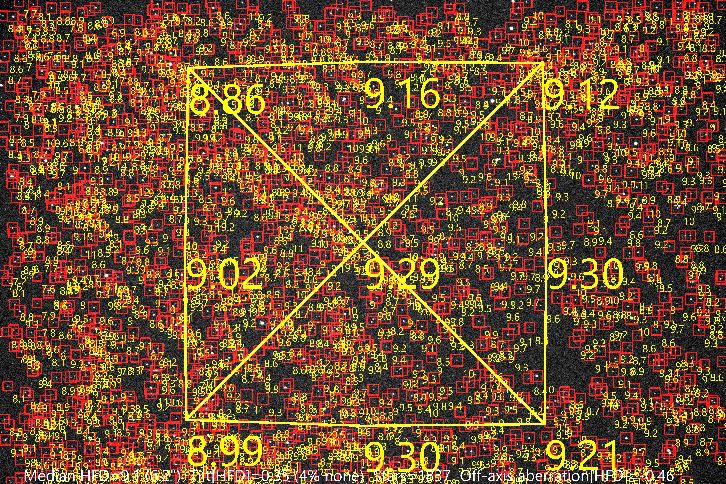
The min-max difference is now 0.44 down from 0.97 (55% reduction).
When focused I get the image below.

The min-max difference is now 0.15 (down from 0.24)(38% reduction). Might be possible to tweak further but quite frankly, If 0.15 is the difference between the best and worst then I don't have much to complain about.
On another note, if the objective is to refine the backspacing, then this is something that needs to be done in focus.
Hope this helps and makes some sense.
|
You cannot like this item. Reason: "ANONYMOUS".
You cannot remove your like from this item.
Editing a post is only allowed within 24 hours after creating it.
You cannot Like this post because the topic is closed.
Jacob Heppell:
Hope this helps and makes some sense.
Nicely presented. Part of the reason I got rid of the reducer was because I spent a couple of nights until 3 am trying to diagnose and correct the tilt, and it seemed like a random search process. Its particularly awful using a standard tilt corrector given that you end up removing the camera assembly in order to be able to reach the tilt adjustment screws and then refocusing for each adjustment attempt. F2.8 would be a real blast if I could make it work, and I gave it up reluctantly after spending hundreds of dollars on tilt adjusters and software and scores of hours outside after bedtime.
I was not familiar with ASTAP but it looks interesting. Learning software is not my idea of recreational time and so I've always been very resistant to complicated programs that don't even have a user manual (Lookin' at you PixInsight!). I've mostly used DSS then ported over to AstroArt to set the histogram and star reduce, then do everything else in Adobe Lightroom Classic.
|
You cannot like this item. Reason: "ANONYMOUS".
You cannot remove your like from this item.
Editing a post is only allowed within 24 hours after creating it.
You cannot Like this post because the topic is closed.
John Tucker:
Jacob Heppell:
Hope this helps and makes some sense.
Nicely presented. Part of the reason I got rid of the reducer was because I spent a couple of nights until 3 am trying to diagnose and correct the tilt, and it seemed like a random search process. Its particularly awful using a standard tilt corrector given that you end up removing the camera assembly in order to be able to reach the tilt adjustment screws and then refocusing for each adjustment attempt. F2.8 would be a real blast if I could make it work, and I gave it up reluctantly after spending hundreds of dollars on tilt adjusters and software and scores of hours outside after bedtime.
I was not familiar with ASTAP but it looks interesting. Learning software is not my idea of recreational time and so I've always been very resistant to complicated programs that don't even have a user manual (Lookin' at you PixInsight!). I've mostly used DSS then ported over to AstroArt to set the histogram and star reduce, then do everything else in Adobe Lightroom Classic.
Yes those are the frustrations with using tilt adjusters. Although you wouldn't need to refocus after every adjustment as you want to be defocused. The Baader M68 tilt adjuster looks attractive as you adjust from the sides so can stay connected to the optical train. For me, I simply don't have enough tilt to bother with these gadgets. Some sticky tape did the job!
As for ASTAP, it's primarily used as a plate solver (For me, SGP uses it for plate solving) but it can do a lot more. Here I simply opened the image, opened the image inspection tool, and pressed the tilt button and the HFD distribution is shown.
F2.8 could work if great consideration was given to the optical needs of such a scope when building the mechanical hardware. Tough gig to get right.
|
You cannot like this item. Reason: "ANONYMOUS".
You cannot remove your like from this item.
Editing a post is only allowed within 24 hours after creating it.
You cannot Like this post because the topic is closed.
to create to post a reply.