Hey Chris,
1. Yes, some sort of opaque pouch or rubber bellow might work. This may be causing your gradient.
2. A homemade light box could work. The key is even illuminations with no light leakage. My optimal flat exposure time varies between 6 seconds (L filter) and 70 seconds (Ha filter). I could not do good flats during the day. It was too bright.
3. Not sure if your mount backlash can be minimized by offsetting the balance to load the gears. I have to do that with the G-11.
4. Understood. For me, the fun is in the challenge. A good image from your situation should get extra credit.
|
You cannot like this item. Reason: "ANONYMOUS".
You cannot remove your like from this item.
Editing a post is only allowed within 24 hours after creating it.
You cannot Like this post because the topic is closed.
I made a homemade redneck lightbox. It probably cost 20-30 bucks or so. I just bought some foam board from the grocery store and cut and glued it so it formed a box a little wider than the diameter of my scope. I have an 8inch SCT so it's maybe 1 foot wide by 2 feet long. One end has a hole in it just big enough to go around the end of my telescope and the other end I glued some bright LED lights to the back that I bought off Amazon. In the middle is a couple of pieces of tissue paper to spread the light out. After shooting I go inside, put the box on the end, plug in the lights and take my 20 flats. Takes all of 45 seconds. It improved my pictures 100% immediately. The box may not look nice, but it sure works. No vignetting and no dust motes and I don't have to wait until the next morning to take t-shirt flats!
I can send the measurements/pictures if need be.
|
You cannot like this item. Reason: "ANONYMOUS".
You cannot remove your like from this item.
Editing a post is only allowed within 24 hours after creating it.
You cannot Like this post because the topic is closed.
You cannot like this item. Reason: "ANONYMOUS".
You cannot remove your like from this item.
Editing a post is only allowed within 24 hours after creating it.
You cannot Like this post because the topic is closed.
|
Ha, ha, I don't know about that. But I'm sure Macgyver would be proud. ;)
|
You cannot like this item. Reason: "ANONYMOUS".
You cannot remove your like from this item.
Editing a post is only allowed within 24 hours after creating it.
You cannot Like this post because the topic is closed.
I made a homemade redneck lightbox. It probably cost 20-30 bucks or so. I just bought some foam board from the grocery store and cut and glued it so it formed a box a little wider than the diameter of my scope. I have an 8inch SCT so it's maybe 1 foot wide by 2 feet long. One end has a hole in it just big enough to go around the end of my telescope and the other end I glued some bright LED lights to the back that I bought off Amazon. In the middle is a couple of pieces of tissue paper to spread the light out. After shooting I go inside, put the box on the end, plug in the lights and take my 20 flats. Takes all of 45 seconds. It improved my pictures 100% immediately. The box may not look nice, but it sure works. No vignetting and no dust motes and I don't have to wait until the next morning to take t-shirt flats!I can send the measurements/pictures if need be.
That would be absolutely awesome. I know I need something like that. I got my image of the Crab Nebula to work yesterday, but I had to do at least four passes with GradientXterminator to get it to work. Since I have to pull teeth to get permission to buy M42 spacers, building my own lightbox is my only option. If you have those plans, I'd love to have them!!
|
You cannot like this item. Reason: "ANONYMOUS".
You cannot remove your like from this item.
Editing a post is only allowed within 24 hours after creating it.
You cannot Like this post because the topic is closed.
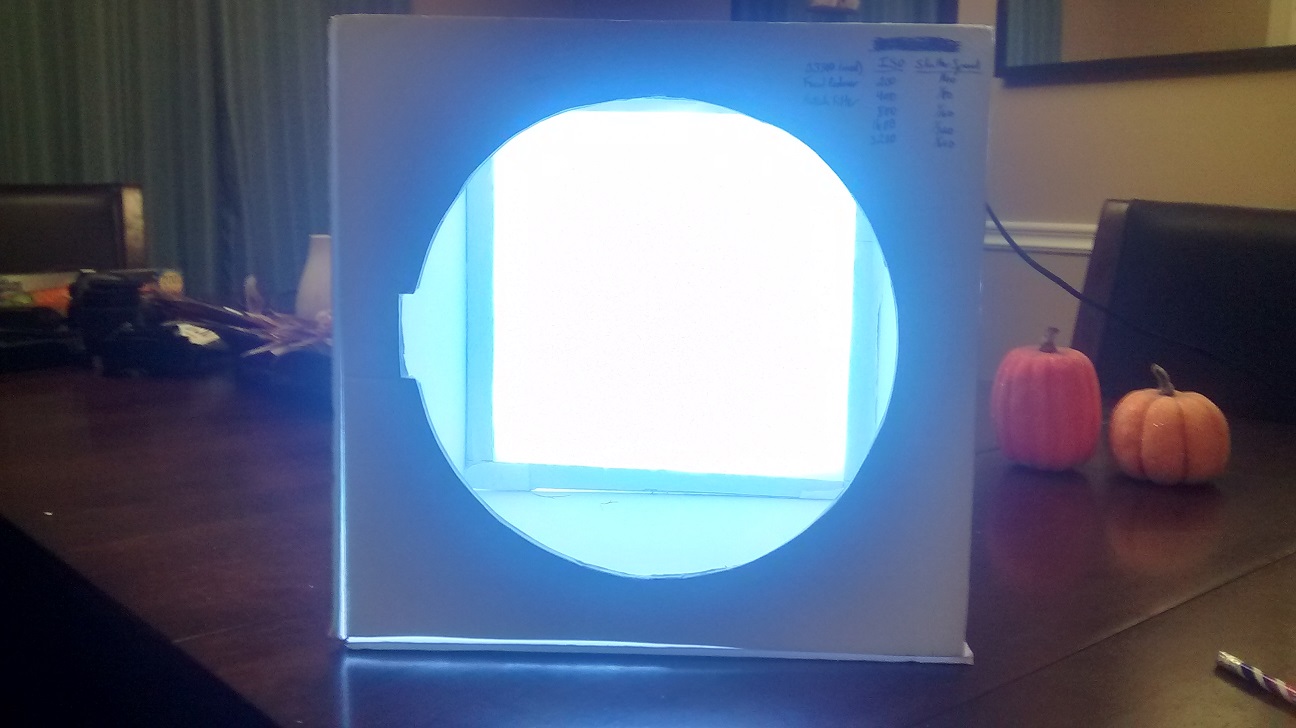
Ok, here ya go:
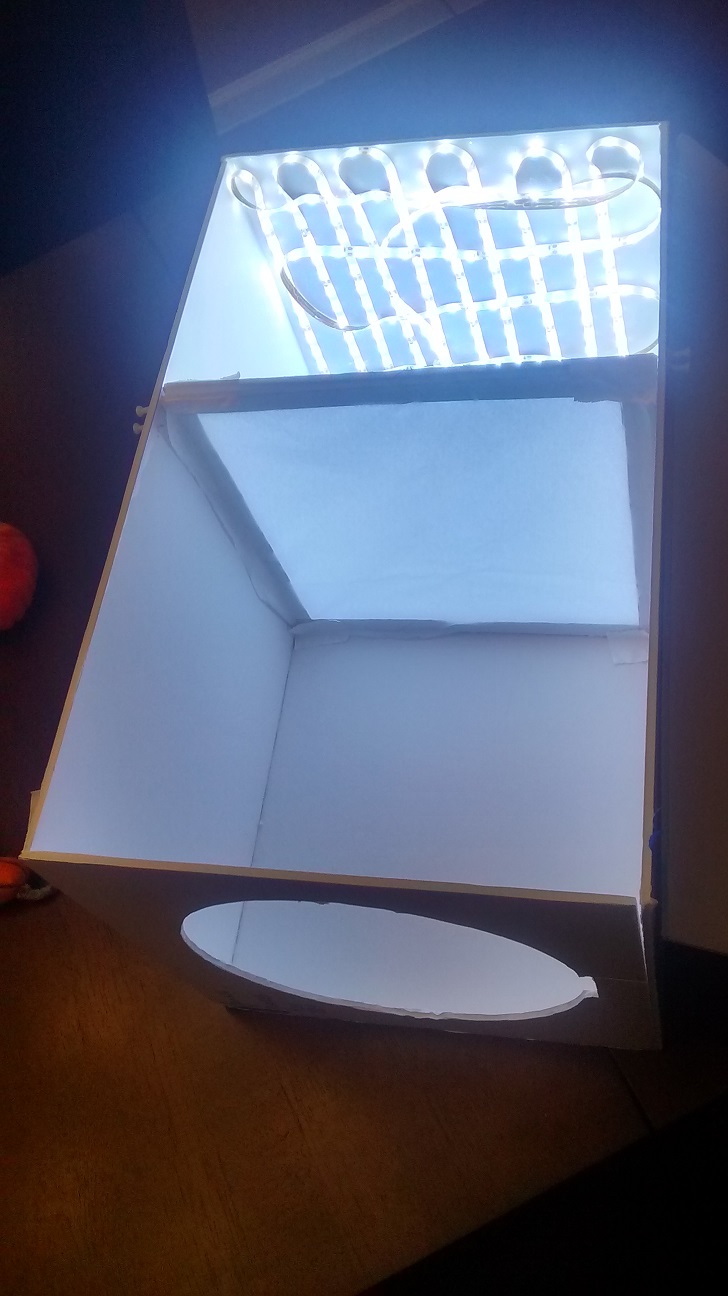
The box is 12" x 12" x 20" with a 9" hole cut out of the front. I made 2 back to back 12in x 12in frames for the middle and glued tissue to the outside of both of them. I glued some LED lights to the back and viola.
Buy:
1) A few pieces of white foamboard
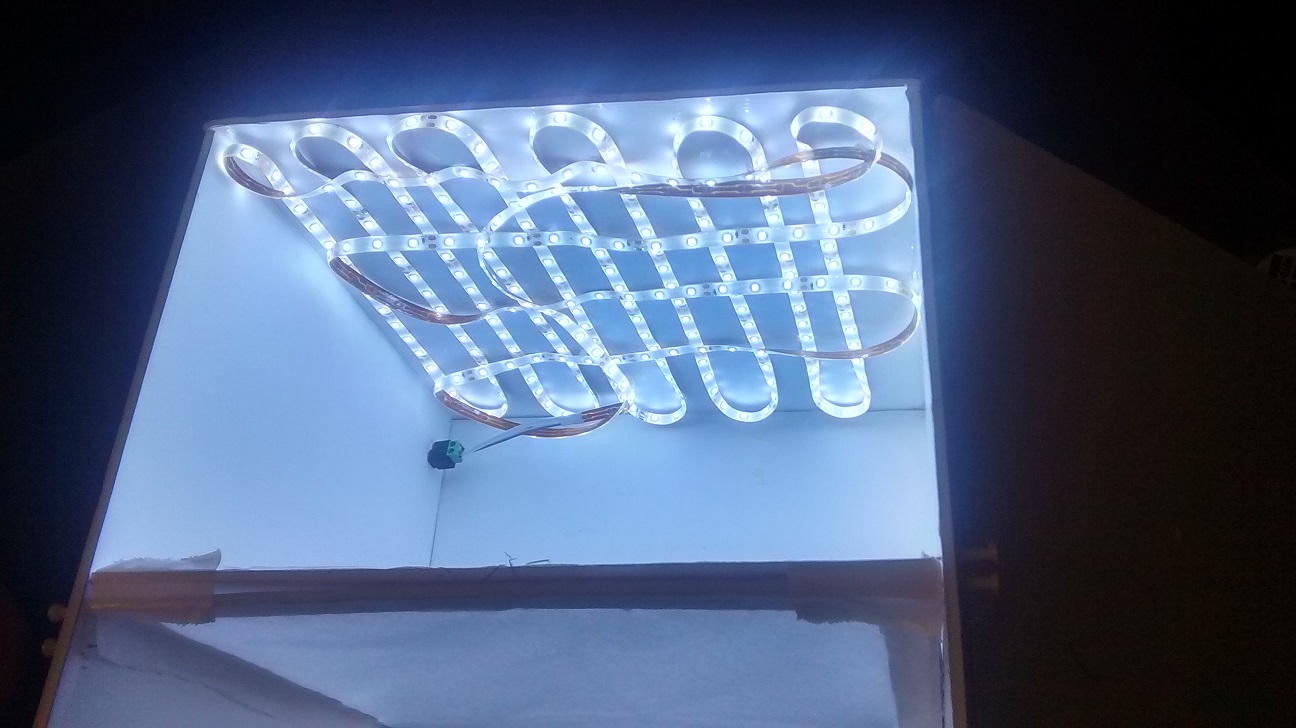
2) LED strip lights ($10) and power adapter ($10)
3) Glue, tape, exacto-knife, tissue paper
Plans (sizes for 8SE):
1) Cut 4 - 12" x 20" rectangles from the foamboard. These will be the sides.
2) Cut 4 12" x 12" squares from the foamboard. These will be the front and back and the frames that hold the tissue paper.
- Leave one of these alone, this will be the back
- Cut a 9" hole in the middle of one of these (or whatever fits over the front of your scope), this will be the front
- For the other two, cut an 11" x 11" square in the middle that will make a 1"frame for the tissue paper
3) Glue 12" x 12" tissue paper to the frames
4) Glue all of the sides together, but leave one unglued so you can get into it and make adjustments. I used painters tape on one of the sides.
5) Glue (or attach somehow) the LED lights to the back and cut a hole in one of the sides to allow connection to the power.
6) Plug the lights in and move the tissue paper frames back and forth looking through the front to see what gives you the best evenly illuminated field. Once found glue/attach the frames in those locations.
7) I think that's it.
I'm SURE there is a better solution and I could do something different/better, but this piece of crap works really well.
    |
You cannot like this item. Reason: "ANONYMOUS".
You cannot remove your like from this item.
Editing a post is only allowed within 24 hours after creating it.
You cannot Like this post because the topic is closed.
|
This is excellent - I think I even have the lights already from a deck lighting project (bought too many). Thanks so much for sharing these plans - I've got an 8" Newtonian, so even the sizes should work. Can't wait to see the results!
|
You cannot like this item. Reason: "ANONYMOUS".
You cannot remove your like from this item.
Editing a post is only allowed within 24 hours after creating it.
You cannot Like this post because the topic is closed.
You cannot like this item. Reason: "ANONYMOUS".
You cannot remove your like from this item.
Editing a post is only allowed within 24 hours after creating it.
You cannot Like this post because the topic is closed.
You cannot like this item. Reason: "ANONYMOUS".
You cannot remove your like from this item.
Editing a post is only allowed within 24 hours after creating it.
You cannot Like this post because the topic is closed.
I think that one is slightly too small for me - my mirror is 208 mm. But what do you guys think of this one?
https://www.amazon.com/dp/B01F5BV03E/ref=psdc_2314207011_t2_B00HDE0Z38
The "assembled height/length" is 8.86 inches and the edge looks pretty thin, so I'd guess it'd fit, wouldn't you? Do you think I'd run into any problems with the color temperature being 5500 K?
|
You cannot like this item. Reason: "ANONYMOUS".
You cannot remove your like from this item.
Editing a post is only allowed within 24 hours after creating it.
You cannot Like this post because the topic is closed.
|
Looks like it'd work to me. From everything I've read the color of the light doesn't matter for flats. You just have to make sure that the exposure is correct so that the spike in histogram is around 51% (just past the middle a bit) so that it isn't overexposed. Let us know if you try this. I think we'd all be interested.
|
You cannot like this item. Reason: "ANONYMOUS".
You cannot remove your like from this item.
Editing a post is only allowed within 24 hours after creating it.
You cannot Like this post because the topic is closed.
Okay, I went ahead and ordered it. I actually continued to research various iterations of of square and circular light panels last night, but this one appears to be the only one that comes with an AC adapter and its "punch" (I'm guessing the light fixture itself?) measures 215 mm x 215 mm (whereas the item itself measures 225 x 225 x 20 mm). Drivingcat: I'm still interested in building this box though - I know it adds heft and takes up space, but I do my imaging from indoors - I polar align, balance, focus, and focus my guide scope on my roof and then head inside and control my mount and cameras from my office. I'd prefer to be able to slip something on to the scope and take flats from inside.
KuriousGeorge: I also wanted to mention that I cut apart on old black pouch for my minidisk player and slipped it over my focuser. I won't know until Wednesday at the earliest, but I'm hopeful that it will get rid of my light leak. If that doesn't work, I also have some Protostar flock board on the way (although I'm expecting that to take some time to arrive), but if the focuser hole doesn't come precut (and I don't think it will), then I ought to be able to cut it in a way that hugs the focuser tube so that it blocks my light leak.
|
You cannot like this item. Reason: "ANONYMOUS".
You cannot remove your like from this item.
Editing a post is only allowed within 24 hours after creating it.
You cannot Like this post because the topic is closed.
|
Thanks Chris for the update. I look forward to learning about your results.
|
You cannot like this item. Reason: "ANONYMOUS".
You cannot remove your like from this item.
Editing a post is only allowed within 24 hours after creating it.
You cannot Like this post because the topic is closed.
|
FYI: I printed the return shipment label for that light about 2 minutes after receiving it. The light itself is actually only 6.75" across and it didn't come with an AC adapter as indicated (admittedly, not in the product description, but in the Q&A section). Oh well - I'm disappointed, but I still have those rope lights and DrivingCat's plans.
|
You cannot like this item. Reason: "ANONYMOUS".
You cannot remove your like from this item.
Editing a post is only allowed within 24 hours after creating it.
You cannot Like this post because the topic is closed.
|
There is another alternative which may or may not fit your interests and/or budget. An alternative to spending $$s on gear is to sign up at someplace like Deep Sky West and join a team. IIRC the house 106FSQ team membership is around $1000/yr. They have SQM 21+ skies and image whenever the skies allow. I was a member of the house FSQ team last year and got 47 completed images IIRC. All team members suggest targets and each quarter a target list is agreed to (I did not even bother to participate in that since I'm fairly new and felt I would be happy with whatever targets the other members suggested -- and I was). All team members get the raw data and the processing is all ours. It may feel like money down a rat hole, but you get data from a much more expensive system than you are likely to buy for yourself (Takahashi scope, QSI imager, Astrodon filters, Ap Mach 1 mount), it gets run by a set of experienced folks and the skies (when clear) are wonderful. I am temporarily in Kansas for a year and have SQM 21+ skies 20min north of me and I gotta tell you the difference between what I can image there and what I can image in my back yard north of Dallas in SQM 18 skies is worth some significant dollars to me. I am blessed to be able to afford to image on my own and remotely, but if I were cash constrained I would not hesitate to use a remote site.
|
You cannot like this item. Reason: "ANONYMOUS".
You cannot remove your like from this item.
Editing a post is only allowed within 24 hours after creating it.
You cannot Like this post because the topic is closed.
Hi Richard,
I totally understand that and part of me would like to do something like remote imaging eventually, but when I think back to what got me into astronomy in the first place, it was the realization that I could see things like Saturn and Andromeda from my own backyard with a relatively inexpensive 130 mm Newtonian. The fact that you DON'T have to travel somewhere special or own super expensive equipment to be able to capture photons that have been traveling for upwards of 30 million years - i.e., that space is accessible to everyone on the planet in one form or another - is one of the main draws for me. When you point your mount somewhere, take an exposure and see a galaxy on your screen - for me it's like 'wow - that thing is right up there'. I might not be able to see it in a scope (even a large one), but that photographic evidence is what wows me every time. I can't tell you how blown away I was a year or two ago when I realized that people with relatively modest equipment were capturing what looked to me like Hubble-style photographs. Of course, my eye is a bit more discerning now, but the principle is the same. I'll complain about it, of course, but on some level, I do really enjoy setting up my equipment in the freezing cold and struggling with polar alignment for an hour. It's all part of the adventure - and I definitely enjoy the equipment struggles and capturing aspect more than the processing struggles. Does that make me weird? ;)
Chris
|
You cannot like this item. Reason: "ANONYMOUS".
You cannot remove your like from this item.
Editing a post is only allowed within 24 hours after creating it.
You cannot Like this post because the topic is closed.
|
Nope. Doesn't make you in the least weird -- or no weirder than I. Despite having a remote image feed I still drive to a dark site, spend almost two hours setting up and aligning the mount and then climb into a sleeping bag in my car for the duration of the night almost every time there are clear skies. Last time I was out a bit over a week ago it was 11F and somehow even the frozen toes did not erase the magic. I too was blown away when I realized that I too could take Hubble-adjacent images.
|
You cannot like this item. Reason: "ANONYMOUS".
You cannot remove your like from this item.
Editing a post is only allowed within 24 hours after creating it.
You cannot Like this post because the topic is closed.
|
Chris Westphal - that's ingenious! I'm going to have to take some measurements of my tube to see if the A4 size is enough for me. The size of my mirror is 208 mm, but I suspect the tube diameter is a bit too big, so I'll have to move up to an A3 size. Wish I could have put this on my Christmas list!
|
You cannot like this item. Reason: "ANONYMOUS".
You cannot remove your like from this item.
Editing a post is only allowed within 24 hours after creating it.
You cannot Like this post because the topic is closed.
|
If you have the same scope and the A4 size works for you, then I guess I don't have to take any measurements, huh?
|
You cannot like this item. Reason: "ANONYMOUS".
You cannot remove your like from this item.
Editing a post is only allowed within 24 hours after creating it.
You cannot Like this post because the topic is closed.
|
Just a note. I use a similar light box for my refractor. The one thing I found to watch out for is if you decide to power it off a small hand held LiPo battery (I was using an electric hand warmer/USB backup battery) it might just shut down on you The current draw was so small my battery decided there was nothing connected and just powered down! The quick work around since my unit has 2 USB ports was just to let it also charge my iPhone while the light box was running. Now I just use a cheapo 12V to 5V DC-DC converter from amazon. BTW the primary use of this device for me is when I am camping out in the cold while imaging. Turn it on hand warmer mode and toss it in the bottom of the sleeping bag. For me warm toes makes all the difference in the world in how comfortable I am. (I guess this is not for our German friends ;-)
|
You cannot like this item. Reason: "ANONYMOUS".
You cannot remove your like from this item.
Editing a post is only allowed within 24 hours after creating it.
You cannot Like this post because the topic is closed.
Hi, my situation grants me on the SQM-L around 18.50 in average (record night ever is 19.05). I have an OSC ATIK 460 with an IDAS D1 QRO filter, that even if only atenuates the LP, keeps a good color balance apparently. I try to shoot not to low, and also when possible do several full nights on the same object.
When I integrate more than 20h, results are quite satisfactory. I went to a dark site in my holidays (21.30), I got in two hours the same quality as at home, but with about 20h integration. So it is possible to have fun with OSC in suburbs, but takes time and lucky weather.
I try to shoot with my Newton (f4) at f3 with an ASA reducer, but for smaller galaxies I use the Paracorr (f4.5). I am testing also a smaller secondary (63 instead of 75mm) to see if it impacts positively the signal.
So speed and countless hours of integration is the way I’m trying to invest in to get better processable images.
No clear nights since more than a month though...fantastic plan completely ruined !
Stevan
|
You cannot like this item. Reason: "ANONYMOUS".
You cannot remove your like from this item.
Editing a post is only allowed within 24 hours after creating it.
You cannot Like this post because the topic is closed.
|
1 year and 3 months, what is the solution for heavy light pollution?!!
|
You cannot like this item. Reason: "ANONYMOUS".
You cannot remove your like from this item.
Editing a post is only allowed within 24 hours after creating it.
You cannot Like this post because the topic is closed.
Hi Tareq!
The solution for me is:
1. Go monochrome. If you can't, at least use something like the Astronomik CLS, Orion Skyglow AP Filter, Optolong L-Pro, IDAS LPS P2, etc.
2. If using monochrome, use narrowband filters when you can.
3. If you're doing broadband, stack lots and lots of exposures. I image from a 'light gray' zone according to Dark Site Finder. If I'm doing a galaxy, I've got to give it at least 15 hours to get anything worthwhile - and preferably up to 20 or even 25 hours if possible. Anything under 10 hours just looks washed out and noisy. I also use a Baader Neodymium "Moon & Skyglow" filter in lieu of a regular luminance filter. It seems to help a lot with my lum subs.
Good luck!
Chris
|
You cannot like this item. Reason: "ANONYMOUS".
You cannot remove your like from this item.
Editing a post is only allowed within 24 hours after creating it.
You cannot Like this post because the topic is closed.
Hi Tareq,
Here is at least the direction I am pursuing with my SQM-L 18.50 mag/arcsec sky.
I just purchased an ASI183 Mono and filters to gain sensitivity, control on the gain and binning. So far I only had 2.5 hours of good weather in more than a month. But it looks promising with a first light at 0 gain. I will purchase later on a 3nm Ha, to enhance a bit RGB images. But I am still not very fond of NB color palettes.
Next session I would like to try an extreme binning 4 with gain at 100, things I couldn’t do with my previous color camera ATIK460.
Let’s see how much signal I get over the sky glow (forgetting resolution for now). I should get much more signal than with my OSC in a normal night.
Anyway, low f ratio scope and extended integration time (>10hrs) seems to be the best way (I can’t really quantify the effect of the LP filter, but I keep it in as a Talisman).
Clear Skies,
Stevan
|
You cannot like this item. Reason: "ANONYMOUS".
You cannot remove your like from this item.
Editing a post is only allowed within 24 hours after creating it.
You cannot Like this post because the topic is closed.
Hi Tareq,
There is no magic solution to imaging under heavy light pollution skies ... Chris Sullivan is right: go monochrome and use narrowband filters. I imagine from the city of Barcelona (Spain) itself and I use Astronomic UHC and h-alpha 6-nm narrowband filters. With the UHC filter I use to take pictures up to 30 s of exposition while with the 6-nm filters I can take pictures up to 180 s of exposition. And, obviously, as Chris has recommended you, you will need to stack a lot of lights to get a reasonable image. I use to stack about 4 h for an h-alpha image.
Hope this helps,
Santiago.
|
You cannot like this item. Reason: "ANONYMOUS".
You cannot remove your like from this item.
Editing a post is only allowed within 24 hours after creating it.
You cannot Like this post because the topic is closed.
to create to post a reply.


