Dear fellow star processors,
I recently turned unsatisfied with the faint halos I get on medium stars, between the diffraction spikes. See the following crop :

Thinking that this was an acquisition issue, I hopened a thread in the corresponding forum. However, we concluded (thanks to all participants, especially @andrea tasselli) that my optics calibration is at least acceptable and that processing is the main issue. Now comes the problem : try to google "star processing" or anything alike, and most of what you get are resources target the general activity of processing astrophotography. However, it is hard to identify anything really good on star (as opposed to starless) processing.
If anyone is aware of some good online ressources to improve the processing of the RGB star layer of astrophotographies, I am very happy to look at it in details.
EDIT 1: as per request below, please find here a link to the unprocessed stack of the above image: https://www.dropbox.com/scl/fi/6s9ecexv204tnu97sdmrh/result_30300s.fit?rlkey=odf72fhshvpe2u2opz6w8wsgg&dl=0
EDIT 2: My processing steps for stars include the following line
- linear process the stack (crop, DBE, PMCC, BlurX, NoiseX)
- extract star layer with starnet;
then on the star layer
- medium stretch with GHS
- adjust saturation
- extract a lightness mask using ACDNR
- blur the mask
- dilate the mask using morphological transformation
- apply the mask to the star layer
- erode stars using morphological transformation
- optional : deconvolution (depends on the outcome at this stage, blurX was applied anyway before extracting stars)
- finalize the stretch
Clear skies !
|
You cannot like this item. Reason: "ANONYMOUS".
You cannot remove your like from this item.
Editing a post is only allowed within 24 hours after creating it.
You cannot Like this post because the topic is closed.
@patrice_so Hi,
I don't have any online resource but my workflow for the star layer processing is this one (assuming you have PixInsight):
- Stretch the stars with GeneralizedHyperbolicStretch. The higher the Stretch Factor, the more stars you will see (I usually leave the Simmetry Point at 0 and adjust the Local Intensity to avoid clipping data)
- Use SCNR at 0.6 to eliminate the little residue of green in the stars
- Increase general saturation with CurvesTransformation
- Increase selective saturation with ColorSaturation (especially on the yellows and the blues)
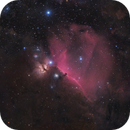
This is my workflow for the star layer processing, with the Samyang 135mm I don't have big halos and they don't stand out a lot in the final image. Take for example this image of the Orion's Belt with very bright stars like Alnitak:
Daniele
|
You cannot like this item. Reason: "ANONYMOUS".
You cannot remove your like from this item.
Editing a post is only allowed within 24 hours after creating it.
You cannot Like this post because the topic is closed.
While I have no idea of any on-line resources specific to star treatment I'd consider you make available (via Google drive or equivalent) to process one of those of your images (the final un-stretched stacked up light) you're not happy with and let us do our thing with the provision that the results should be posted here and full disclosure of the processing steps be given.
Just an idea...
|
You cannot like this item. Reason: "ANONYMOUS".
You cannot remove your like from this item.
Editing a post is only allowed within 24 hours after creating it.
You cannot Like this post because the topic is closed.
Hi Patrice,
without taking a look at a master of yours or some subs, it's hard to tell for sure, but I don't think it's a processing problem. I followed your first thread, and was interested in the answers, too. Now my opinions:
1. Possibility:
It's a seeing/cloud/stellar dust whatever thing in the data. In one of my latest images, there were slightly blue halos around all bright stars after stacking. I went back blinking through the subs, and realized there were some reeeally faint clouds passing through when I was capturing with the Blue filter. So faint, I didn't see them when looking at the subs before, but I noticed them after knowing there is a problem.
2. Possibility:
Collimation is a bit off. I don't know much about Newtonians, so please correct me if I'm writing nonsense. But I found this website, saying bad collimation can lead to halos on Newtonians:
 |
You cannot like this item. Reason: "ANONYMOUS".
You cannot remove your like from this item.
Editing a post is only allowed within 24 hours after creating it.
You cannot Like this post because the topic is closed.
andrea tasselli:
While I have no idea of any on-line resources specific to star treatment I'd consider you make available (via Google drive or equivalent) to process one of those of your images (the final un-stretched stacked up light) you're not happy with and let us do our thing with the provision that the results should be posted here and full disclosure of the processing steps be given.
Just an idea...
Dear Andrea. That is good and nice suggestion, thank you. Please find attached a link to the stack RGB (we don't need the DNB for this exercise).
https://www.dropbox.com/scl/fi/6s9ecexv204tnu97sdmrh/result_30300s.fit?rlkey=odf72fhshvpe2u2opz6w8wsgg&dl=0
I will update tonight with i) the link and ii) a description of my workflow.
Best,
Patrice
|
You cannot like this item. Reason: "ANONYMOUS".
You cannot remove your like from this item.
Editing a post is only allowed within 24 hours after creating it.
You cannot Like this post because the topic is closed.
@Daniele Borsari Hi
Thanks! I do have pixinsight indeed. Many thanks for sharing your workflow. I will give it a try.
I added my own star workflow to the main post and I copy it here:
- linear process the stack (crop, DBE, PMCC, BlurX, NoiseX)
- extract star layer with starnet;
then on the star layer
- medium stretch with GHS
- adjust saturation
- extract a lightness mask using ACDNR
- blur the mask
- dilate the mask using morphological transformation
- apply the mask to the star layer
- erode stars using morphological transformation
- optional : deconvolution (depends on the outcome at this stage, blurX was applied anyway before extracting stars)
- finalize the stretch
Any though much welcome.
Clear skies !
|
You cannot like this item. Reason: "ANONYMOUS".
You cannot remove your like from this item.
Editing a post is only allowed within 24 hours after creating it.
You cannot Like this post because the topic is closed.
@Johannes Möslein Hi
Thanks for sharing this. I will definitively try to run some tests with strong selection criteria for subs. This is a very credible lead.
After the discussion in the other thread, I am less convinced by the collimation issue. I do not pretend it is perfect, but the FWHM and excentricity data extracted from pixinsight suggest that I am in an acceptable range. I do neither see any pattern as the one you mentionned nor do I detect one with the exentricity map.
That having been said I will test some further data set and repeat basic star tests at the next opportunity.
Clear skies !
|
You cannot like this item. Reason: "ANONYMOUS".
You cannot remove your like from this item.
Editing a post is only allowed within 24 hours after creating it.
You cannot Like this post because the topic is closed.
I'm surprised no one mentioned an initial stretch with a modest application of a arcsinh stretch followed by GHS. I think it gives the star color a boost and keeps the star size under control.
George
|
You cannot like this item. Reason: "ANONYMOUS".
You cannot remove your like from this item.
Editing a post is only allowed within 24 hours after creating it.
You cannot Like this post because the topic is closed.
So here we go...
2 different processing streams, the first with deconvolution applied (BXT) the other without. Seeing pretty bad @ 4.4" integrated so probably full scale isn't going to pan out (unless BXT comes to the rescue, but more on this later).


So, which one goes closer to you intended aim, the first or the second? (note that processing is kept minimal and no saturation increase have been applied but a small correction toward the blue was deemed necessary).
Now, on the issue of the stars and BXT. I have noticed, after applying BXT, that the diffraction spikes are asymmetric with the horizontal being significantly brighter than the opposite. Also, the star are oval/cardiodidal in shape, revealing an underlying residual coma (which has nothing to do with collimation, rest assured). Me thinks this is the main issue here.
|
You cannot like this item. Reason: "ANONYMOUS".
You cannot remove your like from this item.
Editing a post is only allowed within 24 hours after creating it.
You cannot Like this post because the topic is closed.
andrea tasselli:
So here we go...
2 different processing streams, the first with deconvolution applied (BXT) the other without. Seeing pretty bad @ 4.4" integrated so probably full scale isn't going to pan out (unless BXT comes to the rescue, but more on this later).
[images deleted]
So, which one goes closer to you intended aim, the first or the second? (note that processing is kept minimal and no saturation increase have been applied but a small correction toward the blue was deemed necessary).
Now, on the issue of the stars and BXT. I have noticed, after applying BXT, that the diffraction spikes are asymmetric with the horizontal being significantly brighter than the opposite. Also, the star are oval/cardiodidal in shape, revealing an underlying residual coma (which has nothing to do with collimation, rest assured). Me thinks this is the main issue here.
Well, many thanks @andrea tasselli !
I tend to prefer the second one, but with a darker BG. The first one indeed that sharp that we can immediately notice that the quality isn't there. Would you mind sharing the steps of each processing flow ?
I know that the data quality is not great. I have much better one (see the other thread where I posted analysis of my WR134 with FHWM of 1.6-1.9). How do you explain and diagnose the residual coma ?
|
You cannot like this item. Reason: "ANONYMOUS".
You cannot remove your like from this item.
Editing a post is only allowed within 24 hours after creating it.
You cannot Like this post because the topic is closed.
Naturlich...
First, however, is a recommendation. If you have PI use it to pre-process your light frame as it might be slower than Siril but has a much tighter control on the outcome and possibly better outcome overall.
Second, your integrations are far too long for keeping the stars in good shape. Think 180s max and possibly 60s when a lot of bright stars are in the field.
First Stream (BXT usage).
1. Graxpert to remove gradient
2. Cropping to remove the border (didn't use normalization)
3. Star removal (used SN++ V2 this instance so I could get rid of diffused light from the brightest stars)
4. Application of HT to the star mask as shown below (to clip the exposed cores of the brighter stars):

5. ArcsinhStretch applied as follows:

6. 5% Increase in the B channel
7. PixelMath the star mask back in the (processed) starless image.
This basically should give you the main guidelines, which need to be adapted to your tastes and circumstances
That is your preferred choice, darkened in the BG.

If you need further info, just ask...
|
You cannot like this item. Reason: "ANONYMOUS".
You cannot remove your like from this item.
Editing a post is only allowed within 24 hours after creating it.
You cannot Like this post because the topic is closed.
andrea tasselli:
Naturlich...
If you further info, just ask...
Many thanks @andrea tasselli ! I will reproduce it right now. I also take good not of the advice of preprocessing with Pix. I still do that with SIRIL. I delayed learning that because one cannot get everything at the same time. I have pix since August though. I think it is time.
The bit about limiting exposure time for star is really interesting. Naively, I thought that I could simply go for 300s exposure when shooting RGB and take the stars right out from that. Wrong. Looking at my image, it is correct that those which have dedicated RGB stars with DNB data are, where stars are caputured using 60 to 180s exposure, are indeed much better. Thank.
Thank you very much for all of this !
|
You cannot like this item. Reason: "ANONYMOUS".
You cannot remove your like from this item.
Editing a post is only allowed within 24 hours after creating it.
You cannot Like this post because the topic is closed.
Dear @andrea tasselli,
Thanks again for your inputs. How do you like this new version : https://www.astrobin.com/g3nvbk/C/
I tried various methods and, whereas I succeeded using mostly arcsin stretch on other image, this one resisted and I worked with a composite stretch, i.e. once histogram transform, once arcsin and once GHS. Saturation was adjusted afterwards. BlurX was applied before starnet.
Clear skies,
Patrice
|
You cannot like this item. Reason: "ANONYMOUS".
You cannot remove your like from this item.
Editing a post is only allowed within 24 hours after creating it.
You cannot Like this post because the topic is closed.
Hello! I have a simple workflow when it comes to stars that might come in handy. Now, the file you uploaded seems to be deleted so I can't show this on your own data, but I'll do my best to show it on mine.
I use Pixinsight so the processing might be a bit different in other software.
(I do color callibration as well as DBE (using Graxpert) before processing)
1. Blurx sharpen only nonstellar - this helps fix most, but not all of the issues regarding bad collimation, tracking, etc. as well as sharpen the nebulosity

2. Starx - remove stars, but keep them as a separate layer

3. Process starless as you wish, afterwards perform a final stretch
4. Stretch the stars a bit less than what you'd stretch the starless to reduce them, keep in mind that if you don't stretch them enough they'll look too hard and, ironically, overexposed.

5. Saturate the stars a few times (I oversaturated them to see the difference better)

6. Run SCNR to remove the green from the stars

7. Invert the stars (CTRL+I) and run SCNR to remove the green showing up in the inverted image (this green is actually magenta in the original image which often shows up around blue stars), invert the image back


8. Combine starless and star layers using a screen technique of your choice

Voila! Sorry for all the images :c
Hope this helped,
Matija
|
You cannot like this item. Reason: "ANONYMOUS".
You cannot remove your like from this item.
Editing a post is only allowed within 24 hours after creating it.
You cannot Like this post because the topic is closed.
Dear @Matija Jakičević
Thanks a lot for sharing this. This indeed a very beautiful picture. Your page is wonderful.
Do I understand correctly that you stretch the stars only with histogram transformation ?
|
You cannot like this item. Reason: "ANONYMOUS".
You cannot remove your like from this item.
Editing a post is only allowed within 24 hours after creating it.
You cannot Like this post because the topic is closed.
Dear @andrea tasselli,
Thanks again for your inputs. How do you like this new version : https://www.astrobin.com/g3nvbk/C/
I tried various methods and, whereas I succeeded using mostly arcsin stretch on other image, this one resisted and I worked with a composite stretch, i.e. once histogram transform, once arcsin and once GHS. Saturation was adjusted afterwards. BlurX was applied before starnet.
Clear skies,
Patrice
I find it to have a weird color distribution, maybe too much purple and blue and a lot of chroma noise in M108. And M97 doesn't seem to tie up with expectations.
|
You cannot like this item. Reason: "ANONYMOUS".
You cannot remove your like from this item.
Editing a post is only allowed within 24 hours after creating it.
You cannot Like this post because the topic is closed.
Dear @Matija Jakičević
Thanks a lot for sharing this. This indeed a very beautiful picture. Your page is wonderful.
Do I understand correctly that you stretch the stars only with histogram transformation ?
Thank you so much for the kind words! I stretch using the ScreenTransferFunction until I'm happy with the levels. After which I bring the stretch from STF into HT and I stretch it from linear to nonlinear using the Histogram transformation process.
CS,
Matija
|
You cannot like this item. Reason: "ANONYMOUS".
You cannot remove your like from this item.
Editing a post is only allowed within 24 hours after creating it.
You cannot Like this post because the topic is closed.
Matija Jakičević:
I stretch using the ScreenTransferFunction until I'm happy with the levels.
It's not exclusively SFT, since I do use the Generalized Hyperbolic Stretch process on the starless layer to help bring out the fainter details
cs,
Matija
|
You cannot like this item. Reason: "ANONYMOUS".
You cannot remove your like from this item.
Editing a post is only allowed within 24 hours after creating it.
You cannot Like this post because the topic is closed.
Matija Jakičević:
Dear @Matija Jakičević
Thanks a lot for sharing this. This indeed a very beautiful picture. Your page is wonderful.
Do I understand correctly that you stretch the stars only with histogram transformation ?
Thank you so much for the kind words! I stretch using the ScreenTransferFunction until I'm happy with the levels. After which I bring the stretch from STF into HT and I stretch it from linear to nonlinear using the Histogram transformation process.
CS,
Matija
Well, I must say that I tried to "pass" the STF function to the histogram transformation, but without much success. I systematically end up with overstretched stars...
Here is the process, starting with the linear image on the left and the stars layer on the right and the recomposed stretch final image (NBGRBCombination+Star layer) at the bottom.
1. Use STF to visualize the content of the linear image with the STC autostretch
2. I pass the function to the histogram transmformation
3. I apply this function to stretch the star layer
4. I add the stretched stars to the starless final stretched image.

Of course saturation is missing. However, I do miss something, as the stars do not look in any respect as they looked in the initial linear image when the STF function is applied.
I believe I make something wrong but I don't know what exactly. Any hint is welcome.
CS
Patrice
|
You cannot like this item. Reason: "ANONYMOUS".
You cannot remove your like from this item.
Editing a post is only allowed within 24 hours after creating it.
You cannot Like this post because the topic is closed.
andrea tasselli:
Dear @andrea tasselli,
Thanks again for your inputs. How do you like this new version : https://www.astrobin.com/g3nvbk/C/
I tried various methods and, whereas I succeeded using mostly arcsin stretch on other image, this one resisted and I worked with a composite stretch, i.e. once histogram transform, once arcsin and once GHS. Saturation was adjusted afterwards. BlurX was applied before starnet.
Clear skies,
Patrice
I find it to have a weird color distribution, maybe too much purple and blue and a lot of chroma noise in M108. And M97 doesn't seem to tie up with expectations.
Well, I was indeed refering to stars only. I know that you don't like that kind of processing style.
But a list now I have a round dot at the center of each bright stars, which was not the case before. That's a first improvement.
|
You cannot like this item. Reason: "ANONYMOUS".
You cannot remove your like from this item.
Editing a post is only allowed within 24 hours after creating it.
You cannot Like this post because the topic is closed.
Matija Jakičević:
Dear @Matija Jakičević
Thanks a lot for sharing this. This indeed a very beautiful picture. Your page is wonderful.
Do I understand correctly that you stretch the stars only with histogram transformation ?
Thank you so much for the kind words! I stretch using the ScreenTransferFunction until I'm happy with the levels. After which I bring the stretch from STF into HT and I stretch it from linear to nonlinear using the Histogram transformation process.
CS,
Matija
Well, I must say that I tried to "pass" the STF function to the histogram transformation, but without much success. I systematically end up with overstretched stars...
Here is the process, starting with the linear image on the left and the stars layer on the right and the recomposed stretch final image (NBGRBCombination+Star layer) at the bottom.
1. Use STF to visualize the content of the linear image with the STC autostretch
2. I pass the function to the histogram transmformation
3. I apply this function to stretch the star layer
4. I add the stretched stars to the starless final stretched image.
Of course saturation is missing. However, I do miss something, as the stars do not look in any respect as they looked in the initial linear image when the STF function is applied.
I believe I make something wrong but I don't know what exactly. Any hint is welcome.
CS
Patrice
*What process did you use to remove the stars? It's possible, but I'm not sure, that the function that they were removed with, doesn't equal the same values the image started with.
When removing stars with starx I keep the "unscreen stars" checkmarked so I can later screen them back in using the "combine images" script in the toolbox.
One more thing you can do is try stretching the stars with STF themselves and kind of eye-ball it to fit it properly. I have to do this often as I either forget to use STF to stretch at first and just nuke the image directly from the toolbar which doesn't translate to HT or if I lose the stretch somehow.
Tinker around and I'm sure you'll find a point where it all works.
Hope this helps a bit, if not, I'm here to give it a shot if you would just send me the file.
Cs,
Matija
|
You cannot like this item. Reason: "ANONYMOUS".
You cannot remove your like from this item.
Editing a post is only allowed within 24 hours after creating it.
You cannot Like this post because the topic is closed.
But a list now I have a round dot at the center of each bright stars, which was not the case before. That's a first improvement.
Indeed it is, but the chroma noise and the colors in my comment are both referring to the stars and the NSOs. You can use HT as a first step and the colors intensity by increasing the strength of the hyperbolic sine transfer function. This for the star-only image.
|
You cannot like this item. Reason: "ANONYMOUS".
You cannot remove your like from this item.
Editing a post is only allowed within 24 hours after creating it.
You cannot Like this post because the topic is closed.
*What process did you use to remove the stars? It's possible, but I'm not sure, that the function that they were removed with, doesn't equal the same values the image started with.
When removing stars with starx I keep the "unscreen stars" checkmarked so I can later screen them back in using the "combine images" script in the toolbox.
One more thing you can do is try stretching the stars with STF themselves and kind of eye-ball it to fit it properly. I have to do this often as I either forget to use STF to stretch at first and just nuke the image directly from the toolbar which doesn't translate to HT or if I lose the stretch somehow.
Tinker around and I'm sure you'll find a point where it all works.
Hope this helps a bit, if not, I'm here to give it a shot if you would just send me the file.
Cs,
Matija
Thanks. I use Starnet2, where there is no such "unscreen star" option. I will continue to experiment and post results.
Thanks & clear skies
|
You cannot like this item. Reason: "ANONYMOUS".
You cannot remove your like from this item.
Editing a post is only allowed within 24 hours after creating it.
You cannot Like this post because the topic is closed.
andrea tasselli:
But a list now I have a round dot at the center of each bright stars, which was not the case before. That's a first improvement.
Indeed it is, but the chroma noise and the colors in my comment are both referring to the stars and the NSOs. You can use HT as a first step and the colors intensity by increasing the strength of the hyperbolic sine transfer function. This for the star-only image.
Thanks Andea. I corrected the chroma noise on the star layer and and the starless. That looks indeed much better. I will look on the other aspects whenever I have time.
CS
Patrice
|
You cannot like this item. Reason: "ANONYMOUS".
You cannot remove your like from this item.
Editing a post is only allowed within 24 hours after creating it.
You cannot Like this post because the topic is closed.
to create to post a reply.


