So with faster newtonians we all know how collimation permanence starts to get limited by flexure in the image train, mirror flop, and clamp attachments (e.g. paracorr in a 2” adapter)
I have read much of the magically mysterious threaded focuser which supposedly firmly holds the coma corrector in line with the light path/focuser. But… I haven’t really seen much in the way of which focusers have this ability and how exactly it “threads” onto the coma corrector. I have both a 2” Paracorr and a Starizona Nexus 0.75 and can’t really imagine how they would thread onto a focuser.
is there an adapter? Is it only for 3” focusers/coma correctors?
who out there uses a threaded connection, what focuser and coma corrector do you use, and how exactly does it work?
thanks
|
You cannot like this item. Reason: "ANONYMOUS".
You cannot remove your like from this item.
Editing a post is only allowed within 24 hours after creating it.
You cannot Like this post because the topic is closed.
I had a threaded connection on my baader steeltrack that connected to Baader cc via m48 but it pushed the focus tube into the ota so I took it off .
Dave
|
You cannot like this item. Reason: "ANONYMOUS".
You cannot remove your like from this item.
Editing a post is only allowed within 24 hours after creating it.
You cannot Like this post because the topic is closed.
|
Interesting. Did it thread in at the bottom of the focus tube? Like a connector that threads onto the bottom of the focuser and then the CC screws into that?
|
You cannot like this item. Reason: "ANONYMOUS".
You cannot remove your like from this item.
Editing a post is only allowed within 24 hours after creating it.
You cannot Like this post because the topic is closed.
Before upgrading your focuser yet again, I would suggest making really sure it is the FTF2015 that is causing the tilt. From my experience with that focuser, it is unlikely. I also wanted to go to a threaded focuser thinking that the FTF was introducing tilt (see other threads in the Fast Newtonian forum here) and enquired with TS Optics about possibilities. You can use the Paracorr with a threaded connection, but that requires that the focuser be a 2.5" Moonlite or a 3" Feathertouch, which requires tube modifications. Also make sure you are collimating correctly. What worked for me:
- Positioning the tube so the camera assembly is on the top rather than bottom of the tube. This way when I insert the Paracorr, I can use gravity and hand pressure to make sure full contact is maintained between the top of the focuser and the Paracorr when tightening the compression screws. Yes, this adds a small amount to the moment of inertia the mount has to handle, but with a good mount, this is no problem at all.
- Understand collimation - there are two elements, primary and secondary (more correctly, primary axial error, which is the centering of the coma free field on the focuser axis at point of focus, and focuser axial error, which is the tilt of the focal plane with respect to the focuser axis). Primary axial error I correct using a Tublug/Glatter laser which is inserted into the eyepiece holder of the Paracorr and then threaded to the optical element of the Paracorr. This allows the much more critical primary collimation to be done accommodating any tilt introduced by the Paracorr. Secondary or focuser axial collimations done using a Catseye autocollimator. I use a 1" extension version which allows for the fact that the focal plane with Paracorr removed is actually farther away from the primary than with the Paracorr in place.
You can take a look at my more recent images to see how well the Paracorr/FTF2015 combo works for me, with correct collimation. You can go to a threaded focuser, but if the tilt is actually being caused by the Paracorr, it is an unnecessary and expensive change. And you lose the framing latitude the FTF 2015 will give you.
|
You cannot like this item. Reason: "ANONYMOUS".
You cannot remove your like from this item.
Editing a post is only allowed within 24 hours after creating it.
You cannot Like this post because the topic is closed.
Dave B:
I had a threaded connection on my baader steeltrack that connected to Baader cc via m48 but it pushed the focus tube into the ota so I took it off .
Dave
*
Interesting. Did it thread in at the bottom of the focus tube? Like a connector that threads onto the bottom of the focuser and then the CC screws into that?
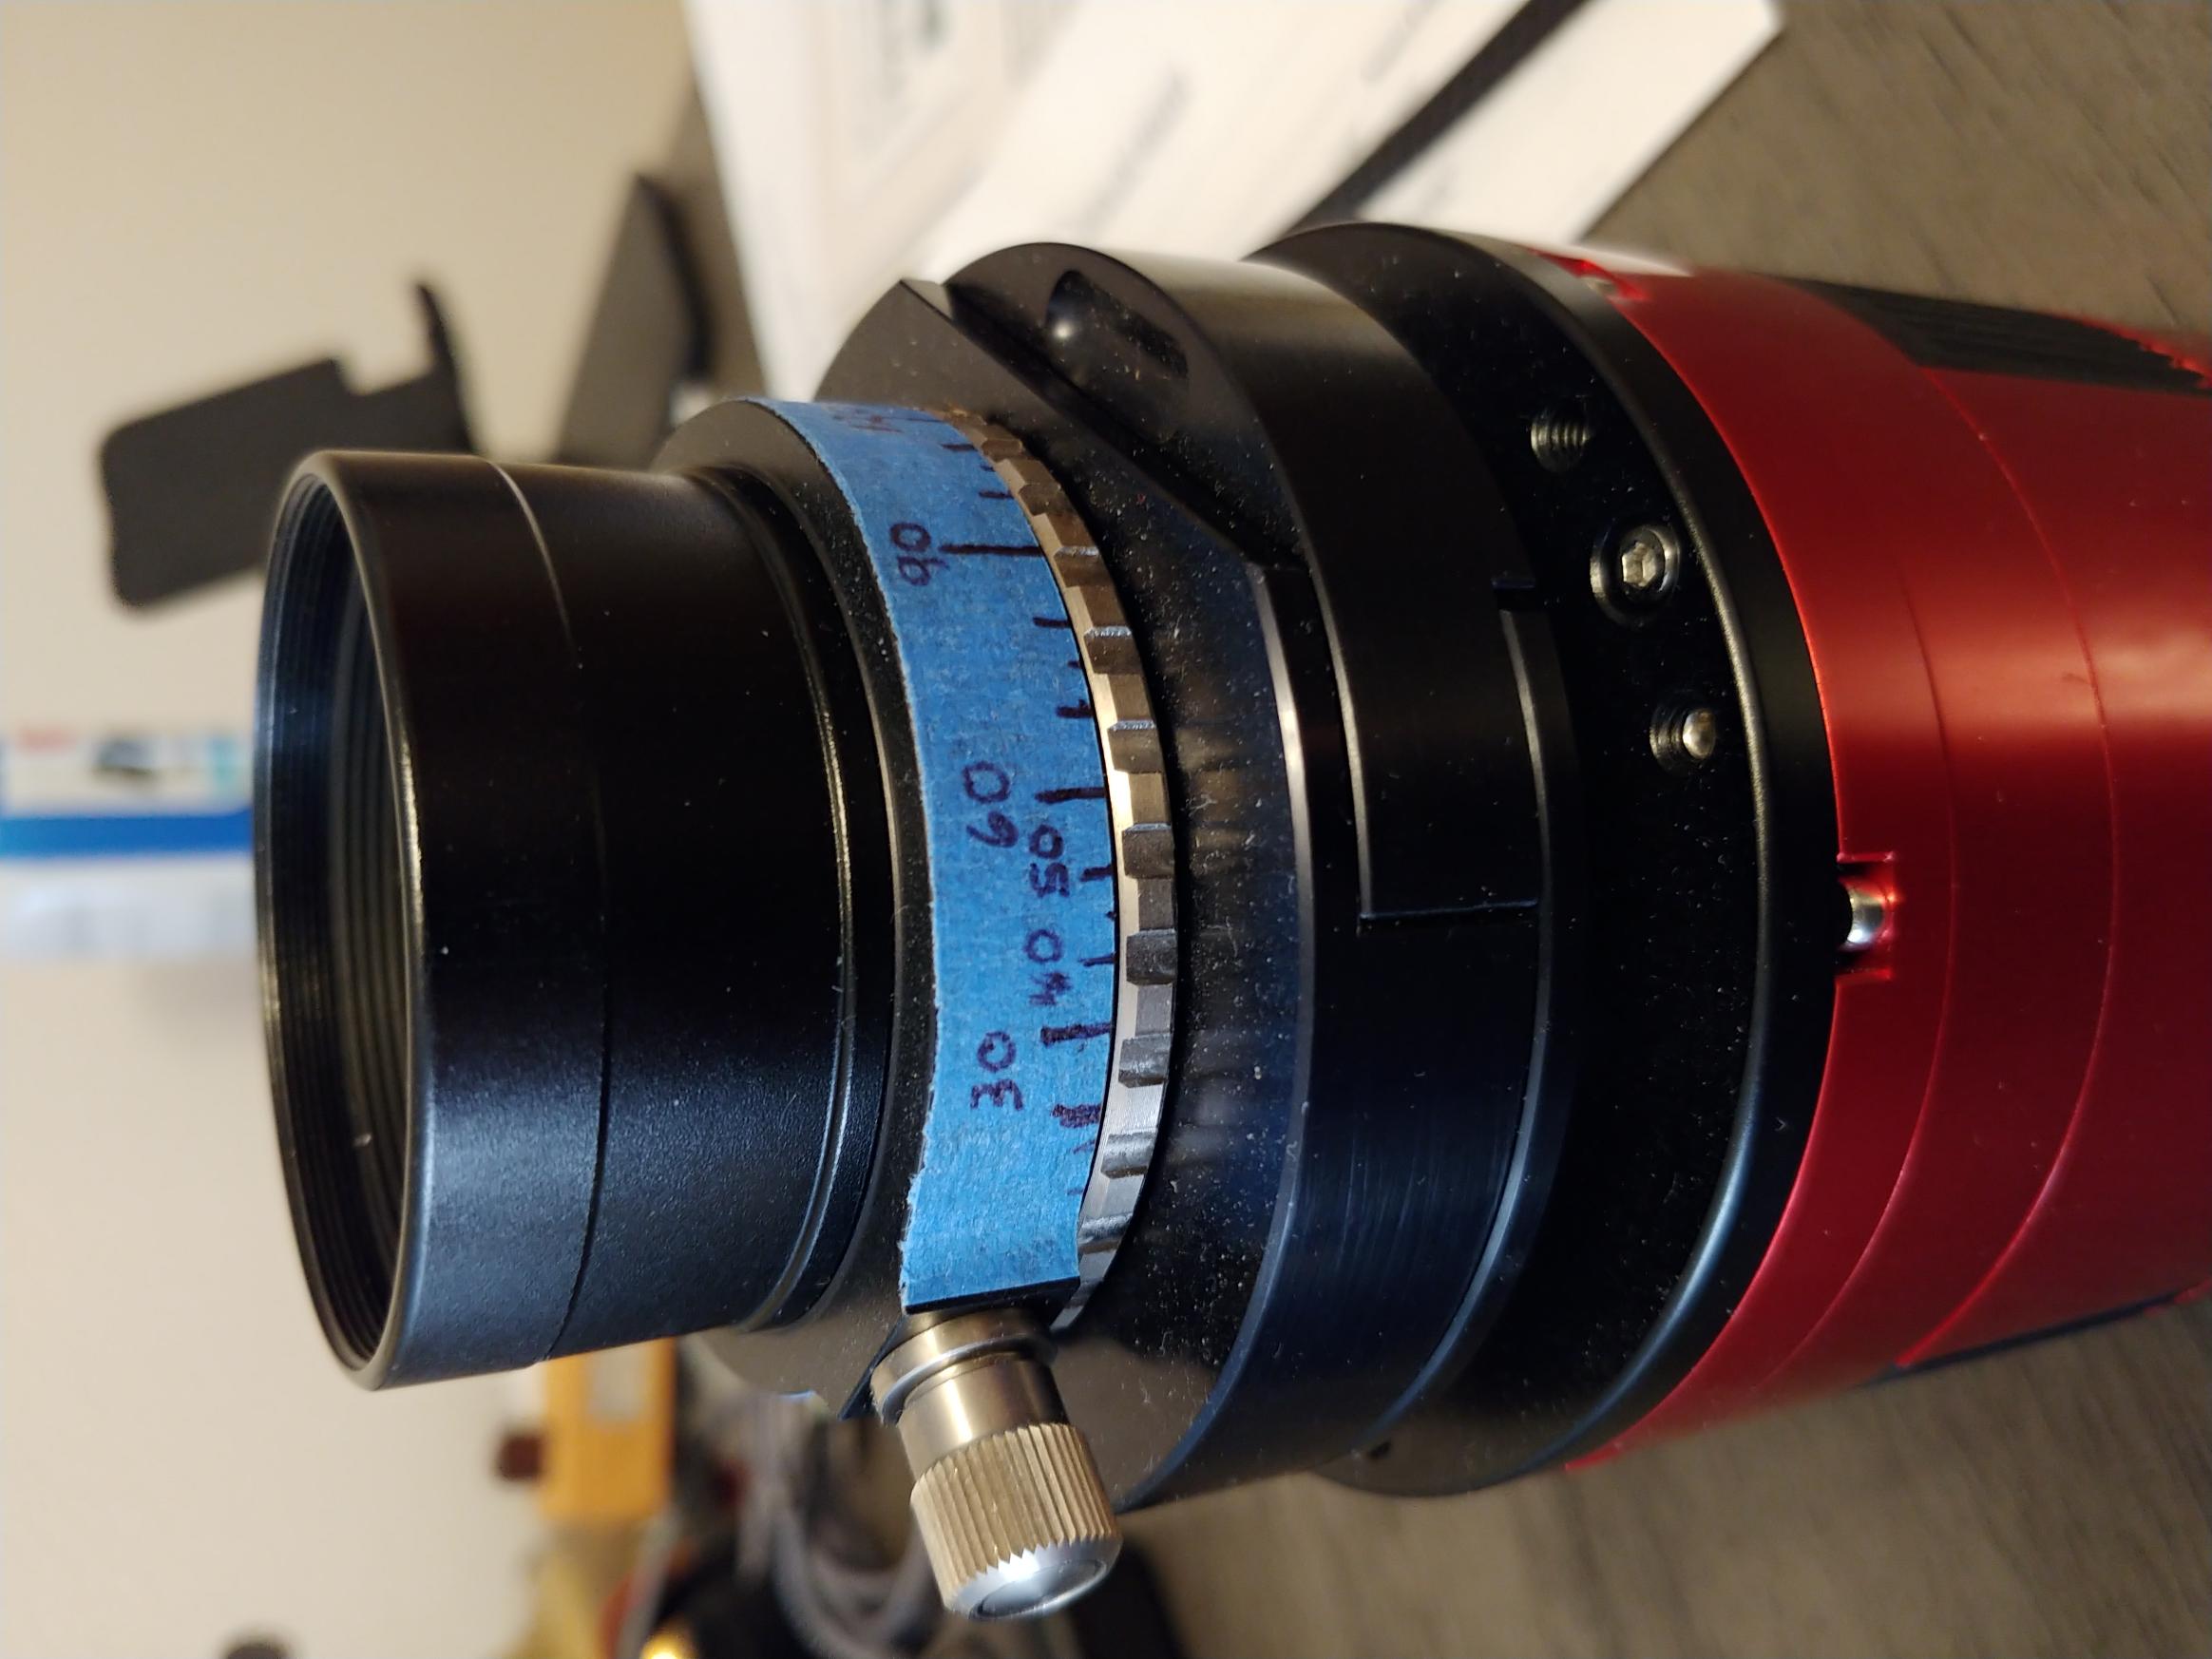
*I cannot speak for Dave B, but since you asked the questions basically:, is it possible?, possible for a 2" focuser?, where do these things thread?, etc., I thought that I would post my setup for you. I should add, it was always my intent to have a non-clamped, fully threaded image train. I did use it with the clamp assembly that came with the focuser, but only to learn the specs of the image train and get familiar with the components. Threading generally provides a "square" setup, and even if not, things like tilt, sensor to CC distance, focal position, etc., become more repeatable upon assembly and disassembly. Also, regarding your question regarding adaptors. Baader has about the most comprehensive set of adaptors for telescopes that can be imagined. You need not use Baader focusers, or other gear to make use of these adaptors.
Here is my focuser with the clamp attachment removed to reveal the threading and adaptor. It is a Baader Steeltrack II. The adaptor is a dovetail with the proper threading to fit my CC. Also a Baader. Note that this recovers a number of precious mm of backfocus over that of the Steeltrack clamp connection.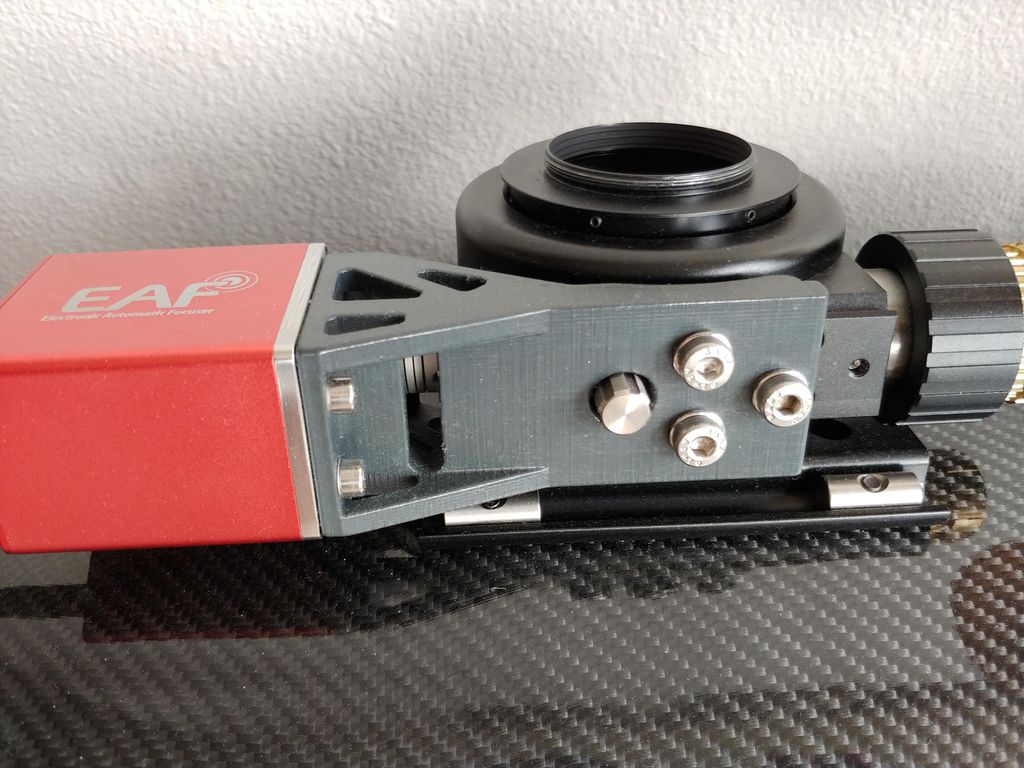
I mention backfocus, because that may likely be a limitation of how you do things. Your question to @Dave B would be answered as a definite "no" with my setup. I do not know the backfocus allowances for your CCs, but mine a fairly low and would never reach a flat field focus if I was to put the CC on the inside of the focus tube. Nevermind the issue with the CC extending into the image cone. If you cannot do it with the CC outside the tube, or as part of the tube within the normal part of the drawtube, then you probably have a rig that is not correctly designed for imaging (meaning not enough back focus included), or your choice of CC is limiting to your setup. I also would not ignore @Arun H 's comments as well. For me, I evaluated my setup with the clamps provided with the focuser and learned what I wanted and the backfocus I had prior to designing and acquiring the CC and other features I have in my image train. I also built with the future in mind. Below is the image of the current simple setup, at correct backfocus distances, correct CC spacing to sensor, etc:
Note, the CC is the first item you see at the top of the image. It is threaded female to accept the male threading that you see in the first image. It adds only 0.5mm or less to the image train. Below the CC is a Baader heavy duty quick release that I use as an economial field rotator. Then comes a filter slider. What cannot be seen is the adaptor (5 or 7 mm, I can't remember) and also some fine aluminum spacers used between the filter slider and the camera body to adjust the spacing between CC and camera sensor. This got me to the correct setup, though I may still need to adjust, since this was the first go with this specific spacing. Earlier work has pointed me to these distances and I am probably very close to perfect. But I will never know if I don't get the rig out and image! Months of clouds, rain and snow!
I know that this setup is future proofed, at least for this camera. I already know that I can swap out the filter slider and replace with a filter wheel if I choose to do that. I have the space. This setup comes to focus with a reasonable amount of extra distance to not interfere with autofocus. I also expect that if I choose, I might be able to use an off-axis guider. But that is not something I want to do in the near future.
I hope this helps. If you find that your current problems or putative setups always interfere with the backfocus of your telescope, you might want to consider remounting your primary in such a way as to move the primary forward and add the needed mm of backfocus. The alternative is to redrill for your focuser.
Best,
Alan
|
You cannot like this item. Reason: "ANONYMOUS".
You cannot remove your like from this item.
Editing a post is only allowed within 24 hours after creating it.
You cannot Like this post because the topic is closed.
|
My scope was the skywatcher 200pds same fitting as in the picture attached to the steeltack and threaded onto the nosepiece of the baader mk3 cc , I should have measured how much it pushed the drawtube into the ota ,never been happy with the mk3 cc but then again I have been having issues with collimation so may not be solely down to the cc , I’ve also added an apeture mask to primary, maybe at some point I can refit the threaded adapter and remeasure the focus tube intrusion and do a star test to see if it still has a detrimental effect on stars
|
You cannot like this item. Reason: "ANONYMOUS".
You cannot remove your like from this item.
Editing a post is only allowed within 24 hours after creating it.
You cannot Like this post because the topic is closed.
Understood. Thanks I'll try camera-UP orientation. That is how I had it originally, but I found everything balanced on the EQ6 a bit better with it hanging closer to the axis of rotation. I do know that I'm maxing out that particular mount with this OTA. With camera down I definitely can see the compression rings affecting the alignment of both the laser and autocollimator... it varies every time I loosen and tighten the collar back up. The focuser is definitely square to the light path/OTA. I can get a tight collimation that holds well. I just end up seeing a little variation every time I adjust the collar tension.
But I hear you about not just jumping into another focuser upgrade. I'll try your recommendations. I'm not so frustrated that I can't work through the small issues I'm having. Thank you for your response!
|
You cannot like this item. Reason: "ANONYMOUS".
You cannot remove your like from this item.
Editing a post is only allowed within 24 hours after creating it.
You cannot Like this post because the topic is closed.
|
Alan that was very helpful thank you. I have a little too much backfocus with the Paracorr... the Nexus is about optimal. Perhaps I should focus on that instead. I don't have enough remaining tube available with the GSO design to move the mirror farther back unless I redesigned the rear end to accomodate an f/4 primary... and I'm not interested in doing that. I'll love the one I'm with for now and learn to work with what I have to the max extent. I really appreciate your response.
|
You cannot like this item. Reason: "ANONYMOUS".
You cannot remove your like from this item.
Editing a post is only allowed within 24 hours after creating it.
You cannot Like this post because the topic is closed.
Dave B:
My scope was the skywatcher 200pds same fitting as in the picture attached to the steeltack and threaded onto the nosepiece of the baader mk3 cc , I should have measured how much it pushed the drawtube into the ota ,never been happy with the mk3 cc but then again I have been having issues with collimation so may not be solely down to the cc , I’ve also added an apeture mask to primary, maybe at some point I can refit the threaded adapter and remeasure the focus tube intrusion and do a star test to see if it still has a detrimental effect on stars
*I've heard mixed reviews of that cc, but for me it seems to work fine.
Replacing my clamp assembly for my Steeltrack only gave me back a few mm, maybe 5mm. So I don't understand how that would be an issue for you, since the dovetails screw on adaptor has a physical stop. Unless, of course you were already working at the razor's edge regarding backfocus or the tolerances between your tube wall and the light path. That means you can only get to focus when the focuser is racked all the way in? And if I misunderstood that you add nothing to the inside of the drawtube? Or the OTA wall is very tight to the optical path.
If you are restricted in backfocus, then moving the primary forward will resolve that. It is possible to do so a small amount without any "engineering" by using the push/pull/locking screws on the primary cell. If you are lucky and the mirror is set in the middle or back of the setting range, just rack in the set screws a bunch to bring the mirror forward. You need to leave enough freedom going forward for collimation adjustments, but those should never be more than minor movements.
|
You cannot like this item. Reason: "ANONYMOUS".
You cannot remove your like from this item.
Editing a post is only allowed within 24 hours after creating it.
You cannot Like this post because the topic is closed.
Alan that was very helpful thank you. I have a little too much backfocus with the Paracorr... the Nexus is about optimal. Perhaps I should focus on that instead. I don't have enough remaining tube available with the GSO design to move the mirror farther back unless I redesigned the rear end to accomodate an f/4 primary... and I'm not interested in doing that. I'll love the one I'm with for now and learn to work with what I have to the max extent. I really appreciate your response.
*Your welcome! These things are so variable and dependant on specific details. So if any information helps!
I was not thinking of you moving your primary mirror back, but forward. The worst issue is if you can't rack "in" enough to come to reach focus. That is when you don't have space enough to add things like cc's or filter sliders. If the issue is opposite, then it's a luxury and simply resolved with appropriate extension rings. Too much back focus is a waste, can lead to vignetting, and issues with secondary sizing. I was probably confusing someone else's comment with yours.
|
You cannot like this item. Reason: "ANONYMOUS".
You cannot remove your like from this item.
Editing a post is only allowed within 24 hours after creating it.
You cannot Like this post because the topic is closed.
So with faster newtonians we all know how collimation permanence starts to get limited by flexure in the image train, mirror flop, and clamp attachments (e.g. paracorr in a 2” adapter)
I have read much of the magically mysterious threaded focuser which supposedly firmly holds the coma corrector in line with the light path/focuser. But… I haven’t really seen much in the way of which focusers have this ability and how exactly it “threads” onto the coma corrector. I have both a 2” Paracorr and a Starizona Nexus 0.75 and can’t really imagine how they would thread onto a focuser.
is there an adapter? Is it only for 3” focusers/coma correctors?
who out there uses a threaded connection, what focuser and coma corrector do you use, and how exactly does it work?
thanks
Focusers larger than 2" will have the ability to support a threaded connection via the endcap. So when I ordered my 3" feathertouch, I choose an M68 endcap because I could purchase this adapter for my 2" televue paracorr CC. Basically the paracorr screws into the adapter so I have an M48 at the front (connects to the OAG/FW/camera side) and an M68 on top, which simply screws into the M68 focuser endcap and voila!! I have firmly secured the CC/OAG/FW/camera train square to the focuser. Was the single best thing I ever did because it instantly made tilt repeatable so I was able to eradicate it (I explain how I did that here. Scroll to the bottom) I also go this M68 to 2" compression ring adapter so I could use my 2" catseye cheshire and autocollimator.
Hope this helps mate.
|
You cannot like this item. Reason: "ANONYMOUS".
You cannot remove your like from this item.
Editing a post is only allowed within 24 hours after creating it.
You cannot Like this post because the topic is closed.
to create to post a reply.