|
TIL that GHS is in the equipment database, so I went back and added it to all my images, as it is such an integral part of them. In other words, I’m adding my thanks to David and Mike!
|
You cannot like this item. Reason: "ANONYMOUS".
You cannot remove your like from this item.
Editing a post is only allowed within 24 hours after creating it.
You cannot Like this post because the topic is closed.
Hi Mike,
Somehow I managed to bungle Step #1, uninstalling GHS version1, while trying to install the new version, and now the new version of GHS will not install. In fact, PixInsight doesn't even see that an update is available and doesn't do anything. Not being fully familiar with the steps involved in uninstalling a script, I tried to figure it out myself and must've missed a step, or did something wrong. Anyway, I need some help, if you know what might be hanging things up.
This is what I did, attempting to uninstall GHS:
1. Under Process/Modules/Manage Modules, I double-clicked GHS to disable it and uninstall. After restarting PI, GHS no longer appeared in the list under Manage Modules, but nothing happened when I ran "Check for Updates" (it said there are no updates currently available for my PI installation), so I removed the repository address from the Manage Repositories list. After restarting PI and re-adding the address to my Manage Repositories list, and checking for updates, still nothing happened... so I went to the Scripts/Edit Scripts function, and removed the entire GHS folder out of the PixInsight/src/scripts/ directory including all files that were included therein. After restarting PI again, removing the repository address, restarting PI again, re-adding the repository address to the Manage Repositories list, and checking for updates, I still get the same message, that there are no updates currently available for my PI installation.
When I check under the Scripts/Edit Scripts area, GHS is absent from the list. When I look in directory folders, GHS is completely absent from the PixInsight/src/scripts directory. I have the address https://www.ghsastro.co.uk/updates/ listed in my repository list but I still get the same message, with no updates currently available for my PI installation. It's like PI still thinks GHS version 1 is installed, and doesn't recognize that it's been removed.
Is there another folder, file, or directory that needs to be removed or restored? I am stuck and really want to use GHS again, but don't know where to go from here. I'm a relatively new PI user and am not a computer programmer. If you have any insight into what may have happened, I'd appreciate your suggestions.
THANK YOU!
-Brandon L. (darkdesertdome)
Hi Brandon
So, the instructions at the start of this thread are a little out of date in that very few people have Version 1 of GHS still on their system. What you uninstalled by going to Process>Modules>Manage Modules, was version 3! The various steps you subsequently took do not force PixInsighT to reinstall I'm afraid. If you are running PixInsight 1.8.9-2 then I recommend you go to Resources>Updates>Reset Updates. This will reset all updates including official PixInsight ones and any other third party repository updates. Restart PixInsight then go to Resources>Updates>Check for Updates - this should find all available updates which you can download and then install by restarting PixInsight again. (If you still are on PixInsight 1.8.9-1 let me know because this won't work on that.)
CS, Mike
|
You cannot like this item. Reason: "ANONYMOUS".
You cannot remove your like from this item.
Editing a post is only allowed within 24 hours after creating it.
You cannot Like this post because the topic is closed.
David Payne:
Hi Jerry,
Lots of good work here.... I am really enjoying your postings
I have been experimenting a little bit on the extraction of lum to use to bring out dim features such as you describe. For many narrowband, most use either an extracted lum from an RGB image (minimizes noise by combining the most images) or the Ha channel, which, most often, has the strongest signal. We are free, however, to use whatever channel or linear combination we want. Since your object has the strongest signal in O3, i would process the grey scale O3 channel as if it were the luminance. Once I get my best "colour" non-linear version, and my best O3/lum non-linear version then I LRGB combine them. This will make the dim O3 nebulosity stand out from the whiter background.
So when picking a luminance to process, I often look at the dim features and their signal stretch. In general I do a linear combination of an extracted RGB lum, and the individual colour channels to get the best SNR I can while emphasizing the features I want. In this case, maybe 50% elum + 50% O3?
Also, on saturation, if you are dimming - saturation will be reduced using the colour option. Often I use a muted colour option when stretching RGB, or not at all for NB and opt for a saturation stretch instead. This is best accomplished with a -ve b (shaped like an arcsinh stretch). If you imagine a right angle triangle in your histogram plot with its apex at 0.5 and corners at (0,0), (0.5,1) and (1,0), the right side of the triangle, sloping down from 0.5,1 to 1,0 represents a "do not cross" line when stretching saturation.
Hope this helps.
Dave
Hi Dave,
This is a lot of fun for me to try to decipher what you are doing and I appreciate all you do is pro bono.
There are a lot of techniques to master here and it is such a pallet that it is hard to know when to use what. I am big on algorithms, but this stretching still requires the human eye it seems...
On this particular image I am so irritated because my seeing has gone crummy with humidity and the moon so I am out of business of this one for a while. When I look at my images they are apples and oranges on star count and FWHM even though to the eye all looks clear.
On the L I have in my Sharpless workflow the use of the H-alpha as a final L in the merging of the H-alpha to the Red channel. I do a fancy dance in Photoshop with the layers to merge part of the Ha and Red together and this then also becomes the L. But you have to control the % by eye, but there is a recipe that works.... will try to follow this principle as you suggest with the O-III and Blue...
Here is the H-alpha Photoshop algorithm... adapted from someone else long lost:
Bring up the Channels window (Windows > Channels) in the RGB image.
Click on the Red channel to make it the only active channel.
This makes the Red channel visible in the image window.
Press Ctrl-A to select the entire image, then Ctrl-C to copy.
The next step is to create a new image that is a composite of the H-alpha and Red images.
Select the H-alpha image and press Ctrl-V to paste the Red channel image as a new layer in top of the H-alpha image.
Change the Opacity setting to 20-30%. (20% shows more HA)
This creates a blend of the Red and H-alpha images.
The detail of the H-alpha image is retained, but the larger and more numerous stars from the Red image become visible as well.
Save this new HaR image as a separate file. (Flatten)
This will be used both for the Luminance image and also to create a new RGB image.
Press =font5Ctrl-A=font0 and =font5Ctrl-C=font0 to select the entire HaR image and copy it.
Go back to the RGB image and make sure the Red channel is still the ONLY active/highlighted channel. If all are selected will paste into all channels.
Press Ctrl-V to paste the HaR image into the Red channel.
Click on the RGB channel to activate the entire image again.
This method uses the HaR image to enlarge the star sizes in the Luminance channel to better match the larger stars of the RGB.
Copy the HaR image and paste it as a new layer on top of the new RGB image. (Need to make new layer)
Change the Opacity to 30-40%. (40% shows more HA but also more pink)
Change the Blending Mode in the Layers window to =font5Luminosity=font0.
This creates the new HaRRGB composite.
I worked this RGB image over carefully stretching the L. I think I got the maximum out of it.

NGC 7640 |
You cannot like this item. Reason: "ANONYMOUS".
You cannot remove your like from this item.
Editing a post is only allowed within 24 hours after creating it.
You cannot Like this post because the topic is closed.
Mike Cranfield:
Hi Mike,
Somehow I managed to bungle Step #1, uninstalling GHS version1, while trying to install the new version, and now the new version of GHS will not install. In fact, PixInsight doesn't even see that an update is available and doesn't do anything. Not being fully familiar with the steps involved in uninstalling a script, I tried to figure it out myself and must've missed a step, or did something wrong. Anyway, I need some help, if you know what might be hanging things up.
This is what I did, attempting to uninstall GHS:
1. Under Process/Modules/Manage Modules, I double-clicked GHS to disable it and uninstall. After restarting PI, GHS no longer appeared in the list under Manage Modules, but nothing happened when I ran "Check for Updates" (it said there are no updates currently available for my PI installation), so I removed the repository address from the Manage Repositories list. After restarting PI and re-adding the address to my Manage Repositories list, and checking for updates, still nothing happened... so I went to the Scripts/Edit Scripts function, and removed the entire GHS folder out of the PixInsight/src/scripts/ directory including all files that were included therein. After restarting PI again, removing the repository address, restarting PI again, re-adding the repository address to the Manage Repositories list, and checking for updates, I still get the same message, that there are no updates currently available for my PI installation.
When I check under the Scripts/Edit Scripts area, GHS is absent from the list. When I look in directory folders, GHS is completely absent from the PixInsight/src/scripts directory. I have the address https://www.ghsastro.co.uk/updates/ listed in my repository list but I still get the same message, with no updates currently available for my PI installation. It's like PI still thinks GHS version 1 is installed, and doesn't recognize that it's been removed.
Is there another folder, file, or directory that needs to be removed or restored? I am stuck and really want to use GHS again, but don't know where to go from here. I'm a relatively new PI user and am not a computer programmer. If you have any insight into what may have happened, I'd appreciate your suggestions.
THANK YOU!
-Brandon L. (darkdesertdome)
Hi Brandon
So, the instructions at the start of this thread are a little out of date in that very few people have Version 1 of GHS still on their system. What you uninstalled by going to Process>Modules>Manage Modules, was version 3! The various steps you subsequently took do not force PixInsighT to reinstall I'm afraid. If you are running PixInsight 1.8.9-2 then I recommend you go to Resources>Updates>Reset Updates. This will reset all updates including official PixInsight ones and any other third party repository updates. Restart PixInsight then go to Resources>Updates>Check for Updates - this should find all available updates which you can download and then install by restarting PixInsight again. (If you still are on PixInsight 1.8.9-1 let me know because this won't work on that.)
CS, Mike
Thanks so much, Mike. I was clearly confused which is often the case when it comes to software and computer things for a Luddite like me, but your reply reminded me that I had never updated to PixInsight 1.8.9-2 and I was still using version 1.8.9-1. I downloaded and installed the new PI version, and then ran all the updates, and GHS is now installed and working properly. Problem solved! Thank you for your help, I really appreciate it! And also thanks for creating this great script. It's fantastic and I can't wait to use the updated version.
CS, Brandon
|
You cannot like this item. Reason: "ANONYMOUS".
You cannot remove your like from this item.
Editing a post is only allowed within 24 hours after creating it.
You cannot Like this post because the topic is closed.
Scott Badger:
Ditto to Ashraf's comments! And thanks Dave!
Mike, the math and your explanation are VERY welcome -- thanks!
So, if the lack saturation using the Colour mode (which preserves saturation) is due to the generally low pixel values overall, and the minimal spread between high and low for the different channels, is that expected of this target, and therefore my final image (as well as most other published images) is technically oversaturated?
Assuming there should be more native saturation, I wondered if any of my processing was responsible for flattening it. I thought maybe using GraXpert on the individual channels, or NoiseX on the RGB while still linear, so I picked a single pixel, one of the more 'colorful' in my final image, and followed it through the processing.
- Drizzling decreased the channel values by about 20%, but increased the high/low ratio by 5%.
- GraXpert significantly elevated the values of each channel (about 25%) but the ratio between high (red) and low (blue) remained the same.
- The biggest change in ratio occurred with the application of SPCC, but that would be expected, right? Before SPCC, there was a 32% difference between red and blue and after it was 16%.
- NoiseX (after combining) had some effect, about a 4% decrease in the high/low ratio between before and after.
I guess I don't see anything to point my finger at processing-wise, so is there something about the data itself that results in less saturation than expected, or again, is the little saturation in my data normal for this target?
Cheers,
Scott
Edit: Forgot to include BlurX, but it caused no significant change in the sample pixel values.
Hi Scott,
IMHO, I think the paradigm that there is a "correct" saturation, hue, and luminance has to be dropped and kicked to the curb. If you have an ideal camera and and ideal filters, you will record photons as they really exist - linear binned (by energy/frequency) channels of counts of photons arriving at your sensor. This is described by the RGB (the bins) model of the photon count. Taking out the fact that there is a limit to the number of photons we can count up to, this is the true physical representation of the light - and we can call this the "RGB" model.
Unfortunately, we don't see that way, due to shortcuts required of our eyes to measure this information, and our eyes/brains to transmit and process this information, we don't see the light as it really is. How we percieve light, is more like an HSL model - representing hue, saturation, and luminance. For the most part, we can map the RGB to the HSL, but there are limitations to this mapping, such sum luminance values can only be represented if saturation or hue is compromised, and vice versa.
We also percieve brightness on a roughly logarithmic scale (actually hyperbolic), or power law scale approximation, and hence - the "magnitude" scale for stars. This is why we have to stretch the linear images non-linearly to get an image where we can percieve the range of luminances - we don't actually see photons linearly.
Colour too, is not percieved as light really is. Instead of having receptors for "yellow" light, for example, we percieve yellow as a mixture of red and green photons. If we see yellow, we actually don't really know if that is true yellow light, or if it is mixture of green and red - we need a spectrograph to make that disctinction. All we can percieve is a ternary representation of a truely graded colour spectrum. Again, this is where the HSL model is more akin to the way we see, rather than the way the light really is.
Now we enter the mathematical and physical limitations of the transformation of the linear R,G,B model into an HSL one, especially when we are non-linearly transforming (stretching) the image. There are any number of ways we can do this, but all will bump into the problem of both the limitations of the HSL model that we see being able to represent the full range of RGB combinations, as well as the infinite numbers of ways you can transform the the stretch, and what parts of the HSL (if any) you wish to hold "invariant" under the stretch.
Doing an RGB stretch doesn't hold any parts of the HSL model invariant - you simply stretch the channels and then do the transformation to HSL (or your monitor and eyes do) and you get what you get. Is that HSL model correct? That depends on what you call correct. Or we can do the HSL transformation first and then transform (such as the "luminance stretch), and then back convert to an RGB model for your monitor to display (and then your eye reconvert it to an non-linear HSL model). To call the saturation truer, or more realistic, or more correct is just inherently the wrong question.
The same if for all the processes you mention - (which can be considered variants of stretching, only including surrounding pixels as well as the pixel values themselves) - to do the transformation. To say they "change" the HSL from one that is correct to one that is incorrect is not a valid statement. It just does it in a particular way. All of the processes always change the pixel values - otherwise they wouldn't be used. Therefore they are all subject to some limitations and strengths and "incorrectness" on how this ends up being percieved.
The reason why we can't just make a single button out of pixinsight or photoshop that simply says "process this correctly" is that there is no answer to this question. It becomes a question of personal taste, equiipment limitations (including one's monitor, eyes, computer, and brain), and what you are trying to display in the image. With AI, we train some of these routines to process in a way that most of us would percieve the images as most pleasing or most effective at communicating the data - but to say it is correct or not correct is not true.
This is limiting, but also freeing. One can argue that you did a great job at processing, but beauty is in the eye of the beholder, and this is a subjective statement.
Back to stretching though, it is not correct to say that RGB stretching removes saturation or that luminance stretching maintains it. No more so than saying that RGB stretching maintains it, while luminance stretching enhances saturation We know we can get higher saturations when using a luminance stretch to brighten an image, but this is not to say one is correct or not.
Hope this helps, but I think we have to stay clear of things that say this is correct, or incorrect. We don't really see the true representation of photons, and no process can claim that it does just this.
Hope this helps,
Dave
|
You cannot like this item. Reason: "ANONYMOUS".
You cannot remove your like from this item.
Editing a post is only allowed within 24 hours after creating it.
You cannot Like this post because the topic is closed.
Jerry Yesavage:
David Payne:
Hi Jerry,
Lots of good work here.... I am really enjoying your postings
I have been experimenting a little bit on the extraction of lum to use to bring out dim features such as you describe. For many narrowband, most use either an extracted lum from an RGB image (minimizes noise by combining the most images) or the Ha channel, which, most often, has the strongest signal. We are free, however, to use whatever channel or linear combination we want. Since your object has the strongest signal in O3, i would process the grey scale O3 channel as if it were the luminance. Once I get my best "colour" non-linear version, and my best O3/lum non-linear version then I LRGB combine them. This will make the dim O3 nebulosity stand out from the whiter background.
So when picking a luminance to process, I often look at the dim features and their signal stretch. In general I do a linear combination of an extracted RGB lum, and the individual colour channels to get the best SNR I can while emphasizing the features I want. In this case, maybe 50% elum + 50% O3?
Also, on saturation, if you are dimming - saturation will be reduced using the colour option. Often I use a muted colour option when stretching RGB, or not at all for NB and opt for a saturation stretch instead. This is best accomplished with a -ve b (shaped like an arcsinh stretch). If you imagine a right angle triangle in your histogram plot with its apex at 0.5 and corners at (0,0), (0.5,1) and (1,0), the right side of the triangle, sloping down from 0.5,1 to 1,0 represents a "do not cross" line when stretching saturation.
Hope this helps.
Dave
Hi Dave,
This is a lot of fun for me to try to decipher what you are doing and I appreciate all you do is pro bono.
There are a lot of techniques to master here and it is such a pallet that it is hard to know when to use what. I am big on algorithms, but this stretching still requires the human eye it seems...
On this particular image I am so irritated because my seeing has gone crummy with humidity and the moon so I am out of business of this one for a while. When I look at my images they are apples and oranges on star count and FWHM even though to the eye all looks clear.
On the L I have in my Sharpless workflow the use of the H-alpha as a final L in the merging of the H-alpha to the Red channel. I do a fancy dance in Photoshop with the layers to merge part of the Ha and Red together and this then also becomes the L. But you have to control the % by eye, but there is a recipe that works.... will try to follow this principle as you suggest with the O-III and Blue...
Here is the H-alpha Photoshop algorithm... adapted from someone else long lost:
Bring up the Channels window (Windows > Channels) in the RGB image.
Click on the Red channel to make it the only active channel.
This makes the Red channel visible in the image window.
Press Ctrl-A to select the entire image, then Ctrl-C to copy.
The next step is to create a new image that is a composite of the H-alpha and Red images.
Select the H-alpha image and press Ctrl-V to paste the Red channel image as a new layer in top of the H-alpha image.
Change the Opacity setting to 20-30%. (20% shows more HA)
This creates a blend of the Red and H-alpha images.
The detail of the H-alpha image is retained, but the larger and more numerous stars from the Red image become visible as well.
Save this new HaR image as a separate file. (Flatten)
This will be used both for the Luminance image and also to create a new RGB image.
Press =font5Ctrl-A=font0 and =font5Ctrl-C=font0 to select the entire HaR image and copy it.
Go back to the RGB image and make sure the Red channel is still the ONLY active/highlighted channel. If all are selected will paste into all channels.
Press Ctrl-V to paste the HaR image into the Red channel.
Click on the RGB channel to activate the entire image again.
This method uses the HaR image to enlarge the star sizes in the Luminance channel to better match the larger stars of the RGB.
Copy the HaR image and paste it as a new layer on top of the new RGB image. (Need to make new layer)
Change the Opacity to 30-40%. (40% shows more HA but also more pink)
Change the Blending Mode in the Layers window to =font5Luminosity=font0.
This creates the new HaRRGB composite.
I worked this RGB image over carefully stretching the L. I think I got the maximum out of it.
NGC 7640
Very nice image Jerry,
Just to be different, I also use continuum subraction (or whatever it is called) to add narrowband to my colour images. I just do it is a slightly different, probably more methodical manner than most.
First off, I always use starless images to get my HaBooster or OIIIBooster files. I use Pixelmath with the following equation
HaBooster = (HaImage - CHa) - K1 * Exposure Ratio * Bandwidth Ratio * Gain Ratio * (RedImage - CRed)
where the ratios are used to compensate for signal strength, and by experience I know this generally results in a K1 between 0.1 and 10 and most often around 1.
CHa and CRed are obtained by finding the MEAN of a background preview (often the same area) on the red and green channels to represent the background level.
I run the pixel math several times varying K1 using the warmer/colder tehncique until I feel that the Booster is only recording the Ha signal over and above the red. Once I have the correct level I then get a value for CHaBooster by again recording the mean of a background area .
Then to the red channel, I use the formula:
HaRed = Red + K2 * (HaBooster - CHaBooster).
Now K2 is often between 0.5 and 1.0 for red, one third that I will add to Lum if desired, and 1/10th that I add to the Blue channel.
If I want to include O3 Booter, I will subtract off a linear combination of the Green and Blue channels rather than Red. And apply it proportionally to the Blue and Green channel depending upon how blue or green I want the result. Also to the lum if desired. You can do these steps either to the starry images or starless images or both. These should not appreciably effect the stars, which will remain their RGB orginal.
It is a bit labourious and time consuming this manual approach, but I know what I am doing every step of the way, and I get what I think are great results.
Sorry, but I don't speak Photoshop so can't comment on your process. I hope this helps,
Dave
|
You cannot like this item. Reason: "ANONYMOUS".
You cannot remove your like from this item.
Editing a post is only allowed within 24 hours after creating it.
You cannot Like this post because the topic is closed.
|
I'm trying to download the program into Pixinsight and I'm getting a Code:301 error. Pixinsight says it can't download the program. Is there a problem with the website?
|
You cannot like this item. Reason: "ANONYMOUS".
You cannot remove your like from this item.
Editing a post is only allowed within 24 hours after creating it.
You cannot Like this post because the topic is closed.
David Payne:
**in-depth and interesting post**
Hi Dave,
I REALLY did not want to open up the correct/true color can of worms!..... But I did very much appreciate your explanation!! : )
What I was really trying to ask, in my inarticulate way, is if the variance between R, G, and B channels in my data is very narrow, as Mike noted, and therefore leads to a nearly grayscale result when I stretch with GHS, is that to be expected for this target, or should I be checking something in my acquisition, calibration, pre-processing? As I mentioned earlier, to get what I hope to achieve color-wise typically takes little adjustment beyond where GHS in Colour mode, or Colour mode plus blend, gets me for most images. This time I was further confused by the auto-stretch showing a lot more color, the color I expected from the images of others (our only context), when usually it's the auto-stretch that looks less colorful.
Cheers,
Scott
|
You cannot like this item. Reason: "ANONYMOUS".
You cannot remove your like from this item.
Editing a post is only allowed within 24 hours after creating it.
You cannot Like this post because the topic is closed.
Thanks Scott.
I guess one way to look at this, is if the histogram for luminance is narrow, there is not a lot of contrast in it. GHS can add as much or little contrast as you like.
You can really tell how much colour is in the image from the histogram, but if the channel histograms differ, it is likely that you have lots of differences in colour. In general adding saturation will separate the channel histograms. If the histogram is narrow, because there is little lum contrast, you might not be able to tell anything about the colour distribution until you stretch it (they all look tall and skinny). You can stretch individual colours or saturation alone, as alternatives to the "colour" stretch option in GHS.
HOpefully that is what you are looking for.
Dave
|
You cannot like this item. Reason: "ANONYMOUS".
You cannot remove your like from this item.
Editing a post is only allowed within 24 hours after creating it.
You cannot Like this post because the topic is closed.
David Payne:
HaBooster = (HaImage - CHa) - K1 * Exposure Ratio * Bandwidth Ratio * Gain Ratio * (RedImage - CRed)
Well I appreciate the methodological rigor of Pi versus eyeballing it in PS, but can you help a little defining the variables:
CHa and CRed are the Ha and R images corrected for the mean of their backgrounds?
The ratios computed like 450/60 for Exposure of the ratio of s exposure of Ha versus Red frames .
But need some help with: varying K1 using the warmer/colder technique. Google comes up short....
JY
|
You cannot like this item. Reason: "ANONYMOUS".
You cannot remove your like from this item.
Editing a post is only allowed within 24 hours after creating it.
You cannot Like this post because the topic is closed.
Jerry Yesavage:
David Payne:
HaBooster = (HaImage - CHa) - K1 * Exposure Ratio * Bandwidth Ratio * Gain Ratio * (RedImage - CRed)
Well I appreciate the methodological rigor of Pi versus eyeballing it in PS, but can you help a little defining the variables:
CHa and CRed are the Ha and R images corrected for the mean of their backgrounds?
The ratios computed like 450/60 for Exposure of the ratio of s exposure of Ha versus Red frames .
But need some help with: varying K1 using the warmer/colder technique. Google comes up short....
JY
CHa and CRed are the mean pixel values in a representative preview of the background in the Ha and Red images. I use the statistics process on the previews to get the numberical answer. I also use a starless image, so I don't have to use the "mode" as the best estimate of the starless mean background. Similarly, CHaBooster is the mean of the background level in the resultant Booster image - it is generally at least an order of magnitude less than CHa or CRed which will confirm that you have used a decent value for K1 in the first equation.
Sorry about the math, it is just the way I think of it. I do use the eyeballs often too - in this case to tell me how much to boost the RGB channels.
Hope this clarifies,
Dave
|
You cannot like this item. Reason: "ANONYMOUS".
You cannot remove your like from this item.
Editing a post is only allowed within 24 hours after creating it.
You cannot Like this post because the topic is closed.
|
Another approach to Continuum Subtraction is to use the new NBColourMapper script that @Adam Block and I have recently launched. This can be used to effect the continuum subtraction with realtime preview feedback. Adam and I recently presented this script on The Astro Imaging Channel - here is a link to that show. Adam starts talking about using the script for continuum subtraction at about 51:43.
|
You cannot like this item. Reason: "ANONYMOUS".
You cannot remove your like from this item.
Editing a post is only allowed within 24 hours after creating it.
You cannot Like this post because the topic is closed.
Scott Badger:
Jerry Yesavage:
Very interesting on the color and will follow that discussion in detail. Black science for me. When Istarted out with GHS under the influence of the videos I tried using the color stretch first but it was just too strong so went back to RGB but added saturation at the second step. Star color got out of control.
Sometimes Colour mode is too saturated for me too, but you can always use the Colour Blend slider to bring it all the way back to RGB, or anything in between. There are also times when I see little to no difference between RGB and Colour, and even a couple times where RGB was the more saturated.
Cheers,
Scott
Colour Blend slider.... is something I had not considered. I think I need to familiarize myself with all the possible tools. I see there are different settings:
I assume you use:
Mode: Color;
Clip Type RGBBlend;
I do not see a big effect on a stretched RGB image, probably needs to be started in linear images.
Interesting, when desperate I use 3DLUT Creator.
|
You cannot like this item. Reason: "ANONYMOUS".
You cannot remove your like from this item.
Editing a post is only allowed within 24 hours after creating it.
You cannot Like this post because the topic is closed.
Depends on the image, but sometimes I use just the Colour mode and no slider, and other times Colour plus some blend (RGBBlend). The image I’ve been asking about, SH2-136, is different in that Colour mode really didn’t bring out any color. I tried playing with the Saturation stretch, but could only get color in the brightest part of the target, but then I’m also not very familiar with using that setting. In the end, I started with Arcsinh for the first one or two stretch iterations to get the coloring I wanted, and proceeded with Colour from there.
Cheers,
Scott
|
You cannot like this item. Reason: "ANONYMOUS".
You cannot remove your like from this item.
Editing a post is only allowed within 24 hours after creating it.
You cannot Like this post because the topic is closed.
David Payne:
Thanks Scott.
I guess one way to look at this, is if the histogram for luminance is narrow, there is not a lot of contrast in it. GHS can add as much or little contrast as you like.
You can really tell how much colour is in the image from the histogram, but if the channel histograms differ, it is likely that you have lots of differences in colour. In general adding saturation will separate the channel histograms. If the histogram is narrow, because there is little lum contrast, you might not be able to tell anything about the colour distribution until you stretch it (they all look tall and skinny). You can stretch individual colours or saturation alone, as alternatives to the "colour" stretch option in GHS.
HOpefully that is what you are looking for.
Dave
I tried using Saturation stretches as I stretched with Colour mode, but as I just mentioned in another reply to this thread, I only succeeded in getting color into the brightest part of the target, but using Arcsinh to start (within GHS) worked well enough. I also could have started with an auto-stretch and worked from there, though in my experience that wouldn't normally be a way to promote color. Anyhow, I'm still wondering if this is expected for this target, or is there something about my data in particular that requires extra effort to bring out any color.
Cheers,
Scott
|
You cannot like this item. Reason: "ANONYMOUS".
You cannot remove your like from this item.
Editing a post is only allowed within 24 hours after creating it.
You cannot Like this post because the topic is closed.
Scott Badger:
Depends on the image, but sometimes I use just the Colour mode and no slider, and other times Colour plus some blend (RGBBlend). The image I’ve been asking about, SH2-136, is different in that Colour mode really didn’t bring out any color. I tried playing with the Saturation stretch, but could only get color in the brightest part of the target, but then I’m also not very familiar with using that setting. In the end, I started with Arcsinh for the first one or two stretch iterations to get the coloring I wanted, and proceeded with Colour from there.
Cheers,
Scott
The arcsinh stretch is essentially duplicated in GHS by setting colour mode and b to -ve: -1 to -2. Setting this b and SP=0 is a great way to stretch saturation as well and give enhanced saturation more in the dims and less in the brights.
Cheers,
Dave
|
You cannot like this item. Reason: "ANONYMOUS".
You cannot remove your like from this item.
Editing a post is only allowed within 24 hours after creating it.
You cannot Like this post because the topic is closed.
Thanks Dave, I'll play with that this afternoon. I don't think I've ever tried setting SP=0 when using GHS, and definitely not SP=0 and b to something other than 0.
Cheers,
Scott
|
You cannot like this item. Reason: "ANONYMOUS".
You cannot remove your like from this item.
Editing a post is only allowed within 24 hours after creating it.
You cannot Like this post because the topic is closed.
Scott Badger:
Thanks Dave, I'll play with that this afternoon. I don't think I've ever tried setting SP=0 when using GHS, and definitely not SP=0 and b to something other than 0.
Cheers,
Scott
Your are in for a lot of fun then....
Dave
|
You cannot like this item. Reason: "ANONYMOUS".
You cannot remove your like from this item.
Editing a post is only allowed within 24 hours after creating it.
You cannot Like this post because the topic is closed.
I find that symmetry point = 0, high local intensity, highlight protection, and colo(u)r stretch is a great way to stretch my separate RGB stars. Preserves the colors from blowing out but really brings them up nicely. So much so that maybe I go a little overboard!
I see the new "Power Law" stretch. What is the typical reason one might use "PLS" instead of GHS?
|
You cannot like this item. Reason: "ANONYMOUS".
You cannot remove your like from this item.
Editing a post is only allowed within 24 hours after creating it.
You cannot Like this post because the topic is closed.
Steve:
I find that symmetry point = 0, high local intensity, highlight protection, and colo(u)r stretch is a great way to stretch my separate RGB stars. Preserves the colors from blowing out but really brings them up nicely. So much so that maybe I go a little overboard!
I see the new "Power Law" stretch. What is the typical reason one might use "PLS" instead of GHS?
I agree. The one thing you have to be mindful of, is that due to a lack of training/sophistication, AI currently only recognizes stars that are stretched with a b varying between 0 and about 1.5. In the future, the AI will get better at recognizing both stars with less aggressive brightness stretches and also better at capturing star halos - differentiating them from nebulosity.
I don't really use it, myself, but Mike and I included Power-law stretching in GHS for completeness. The power law stretch is also known as a "Gamma" stretch, which originally was favoured because it corresponded to CRT monitors and how they were adjusted for contrast and brightness. It is also the kind of stretch that is performed by Photoshop - Levels. One could argue endlessly about whether the Midtones Transfer (Pixinsight - HT, or GHS with b=1) function or the Gamma/power law stretch (Photoshop) does a better job overall, but in the end it depends on the image and the eye of the beholder.
Of course, I believe that using GHS can outperform and pretty much duplicate either Midtones/Transfer or Power-law/Gamma, but I am biased.
Cheers,
Dave
|
You cannot like this item. Reason: "ANONYMOUS".
You cannot remove your like from this item.
Editing a post is only allowed within 24 hours after creating it.
You cannot Like this post because the topic is closed.
David Payne:
Steve:
I find that symmetry point = 0, high local intensity, highlight protection, and colo(u)r stretch is a great way to stretch my separate RGB stars. Preserves the colors from blowing out but really brings them up nicely. So much so that maybe I go a little overboard!
I see the new "Power Law" stretch. What is the typical reason one might use "PLS" instead of GHS?
I agree. The one thing you have to be mindful of, is that due to a lack of training/sophistication, AI currently only recognizes stars that are stretched with a b varying between 0 and about 1.5. In the future, the AI will get better at recognizing both stars with less aggressive brightness stretches and also better at capturing star halos - differentiating them from nebulosity.
...
Cheers,
Dave
I've been doing my star removal (StarXT) on linear images, so through blind luck I've avoided that problem. Then GHS as above on the linear RGB stars.
|
You cannot like this item. Reason: "ANONYMOUS".
You cannot remove your like from this item.
Editing a post is only allowed within 24 hours after creating it.
You cannot Like this post because the topic is closed.
Steve:
David Payne:
Steve:
I find that symmetry point = 0, high local intensity, highlight protection, and colo(u)r stretch is a great way to stretch my separate RGB stars. Preserves the colors from blowing out but really brings them up nicely. So much so that maybe I go a little overboard!
I see the new "Power Law" stretch. What is the typical reason one might use "PLS" instead of GHS?
I agree. The one thing you have to be mindful of, is that due to a lack of training/sophistication, AI currently only recognizes stars that are stretched with a b varying between 0 and about 1.5. In the future, the AI will get better at recognizing both stars with less aggressive brightness stretches and also better at capturing star halos - differentiating them from nebulosity.
...
Cheers,
Dave
I've been doing my star removal (StarXT) on linear images, so through blind luck I've avoided that problem. Then GHS as above on the linear RGB stars.
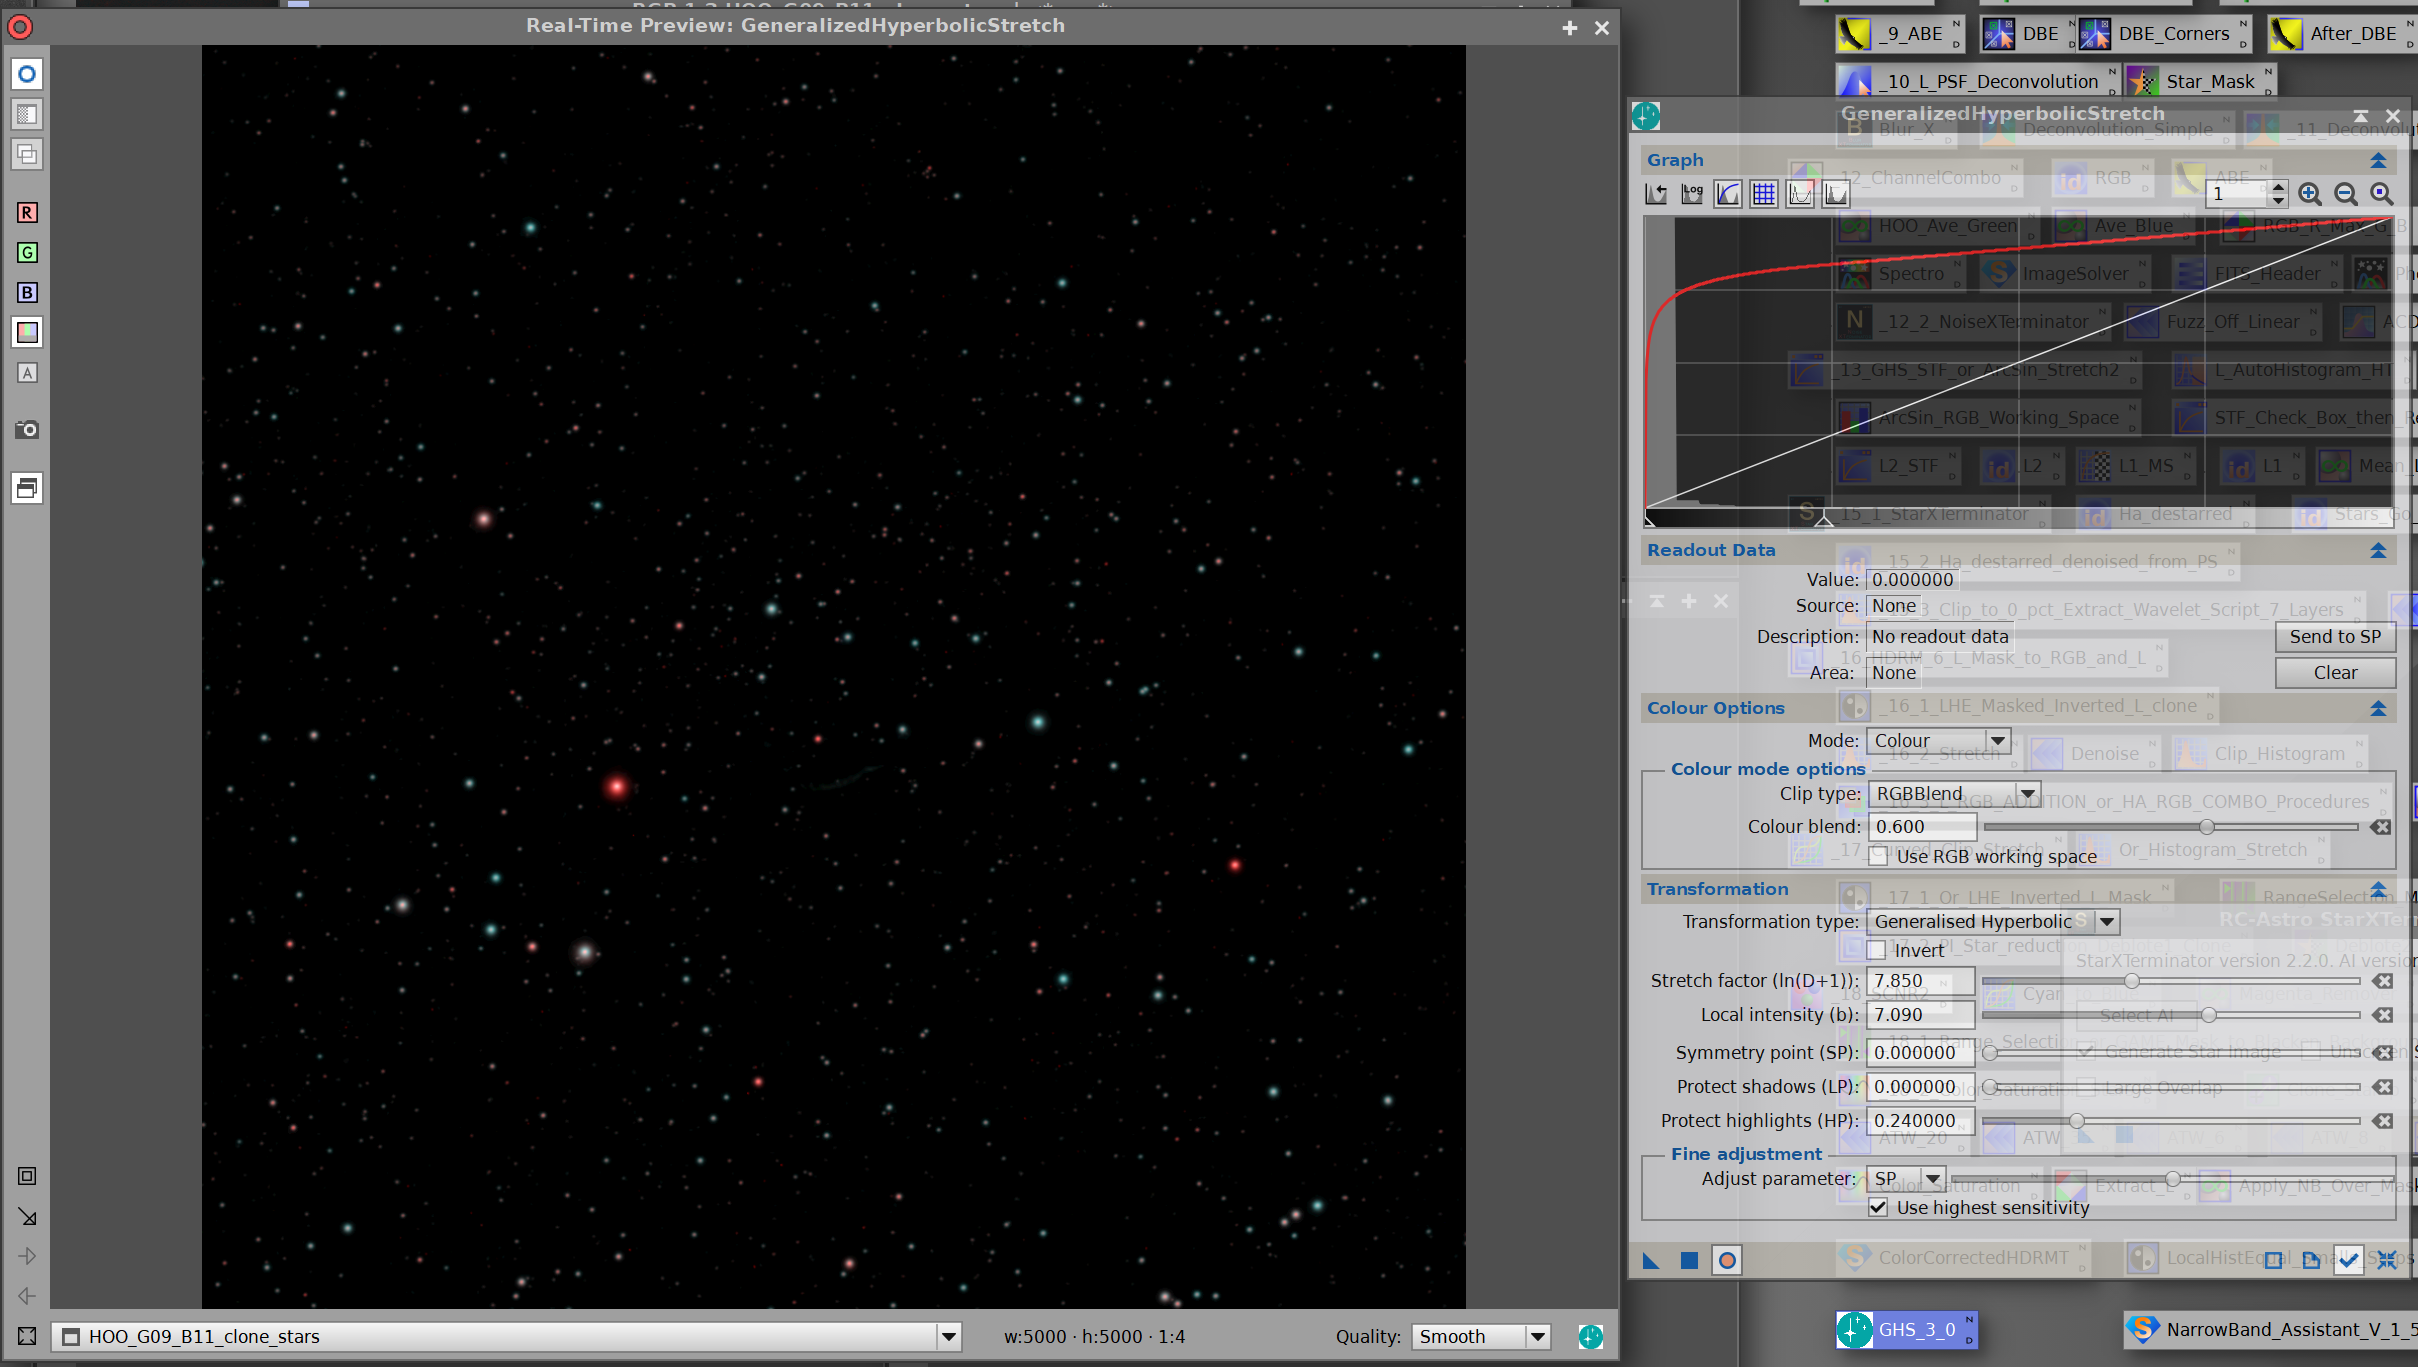
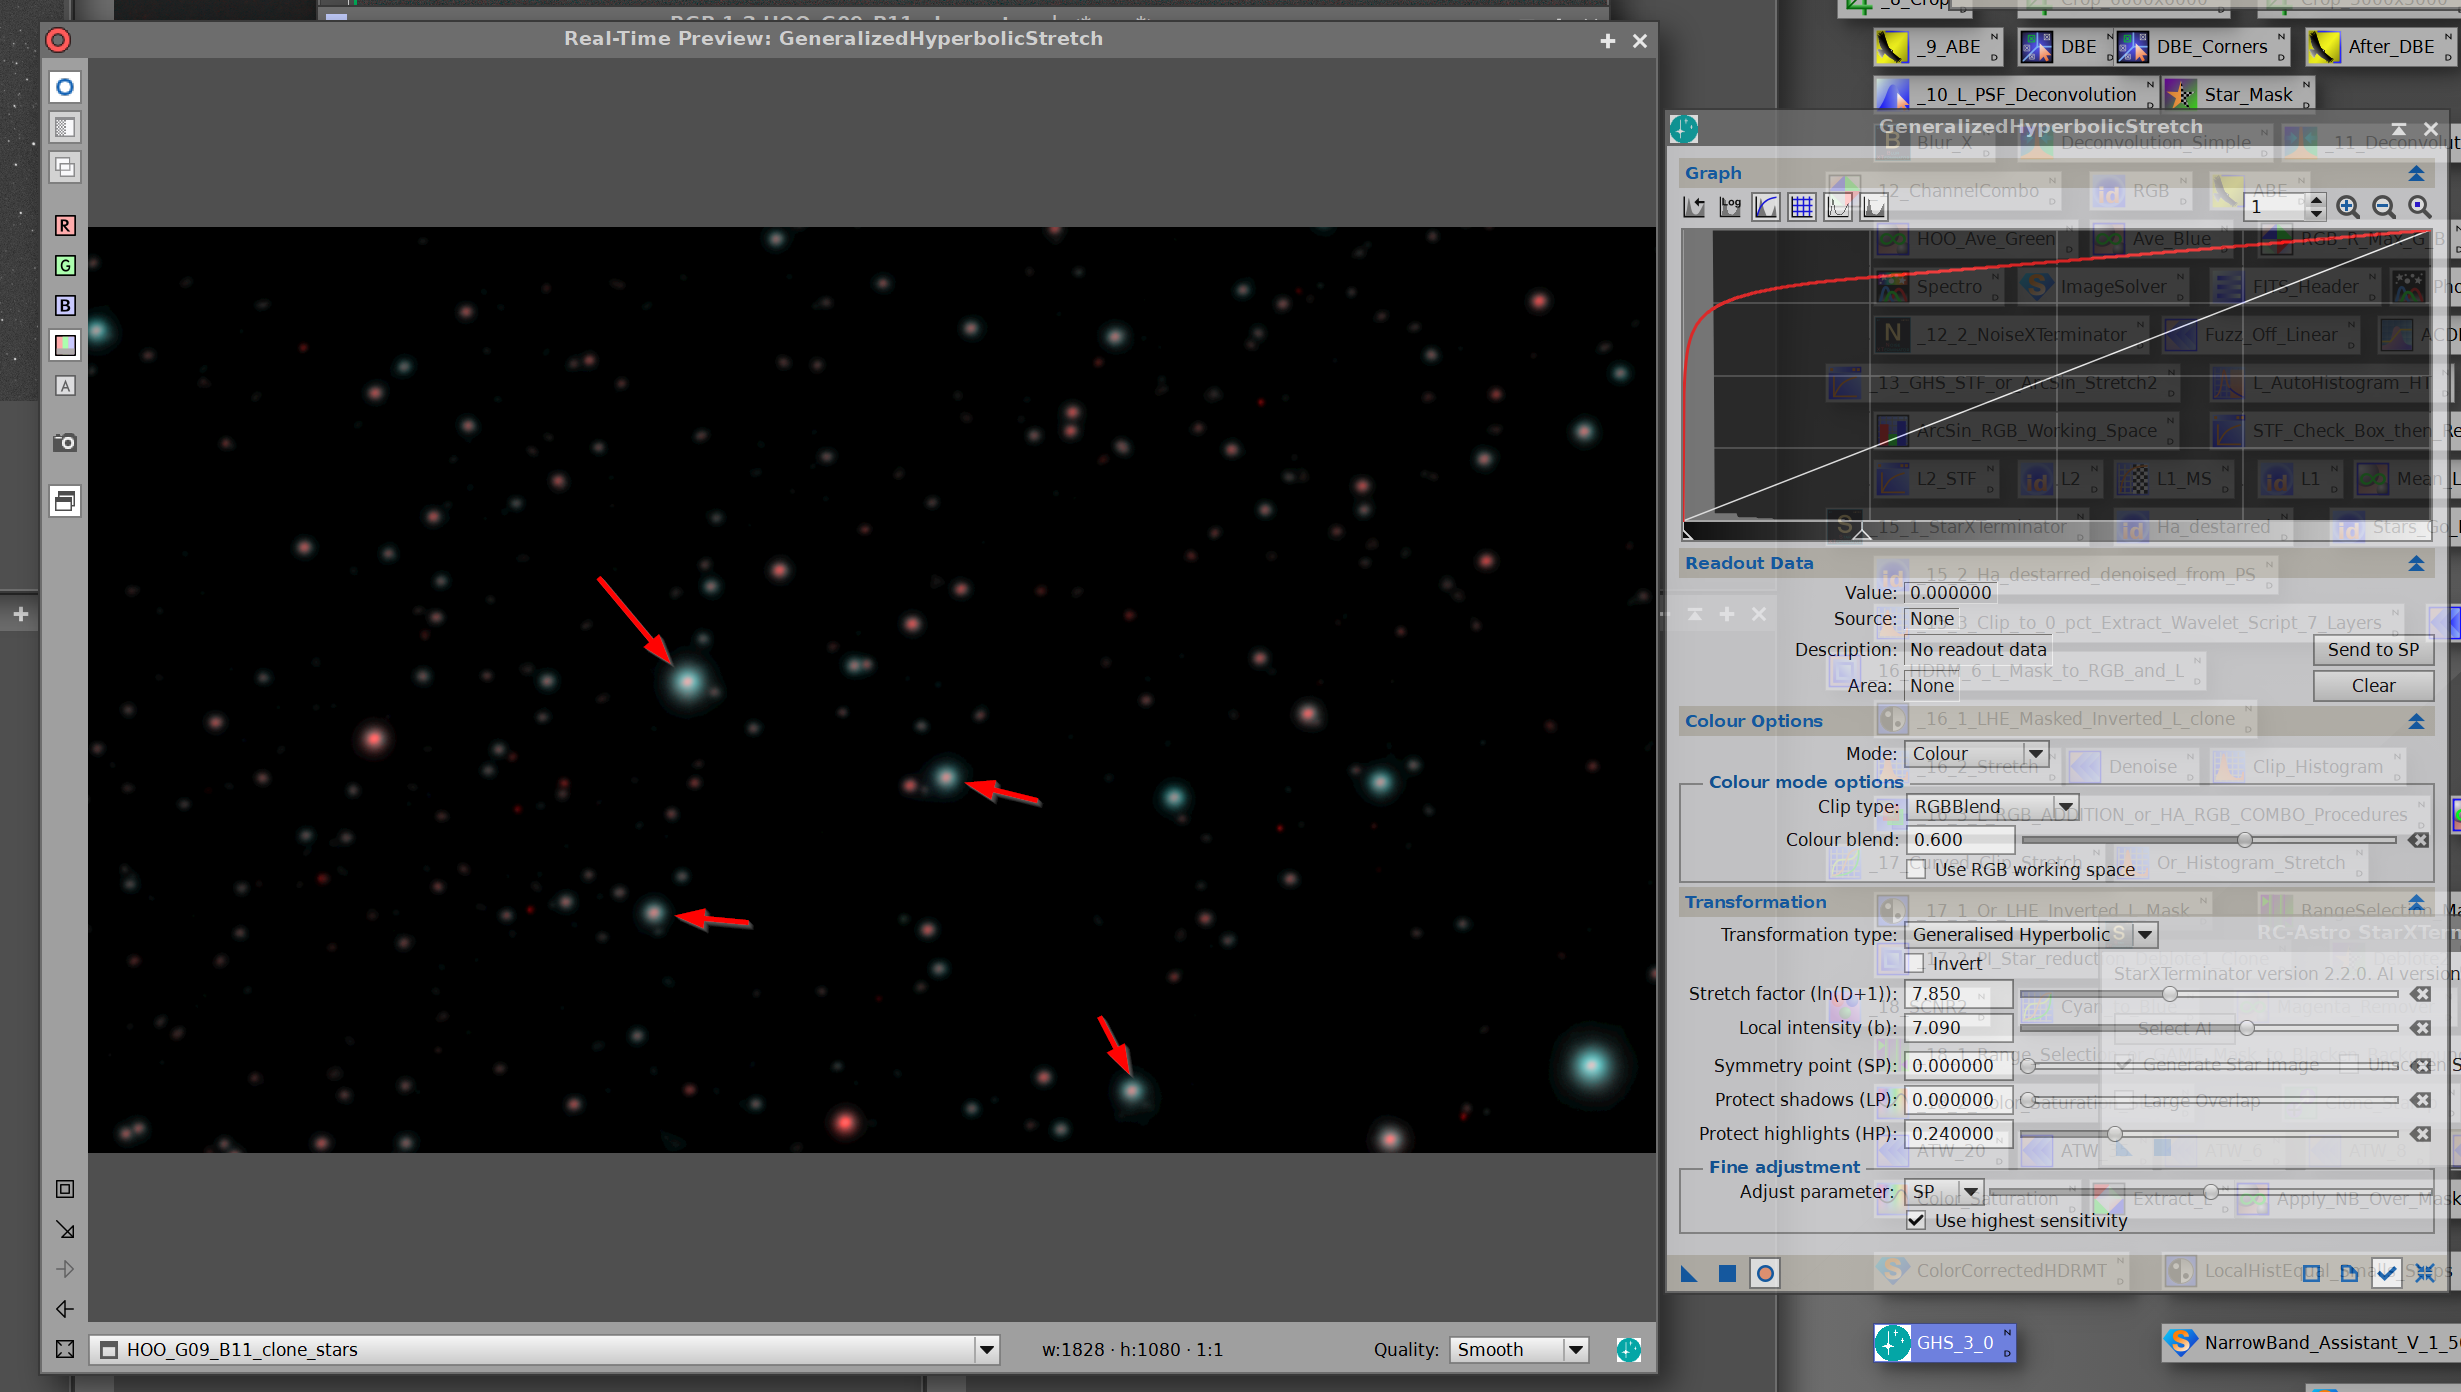
Am sorta watching on the sidelines here trying to learn these new tools and by George these color corrected dual band stars do pop:
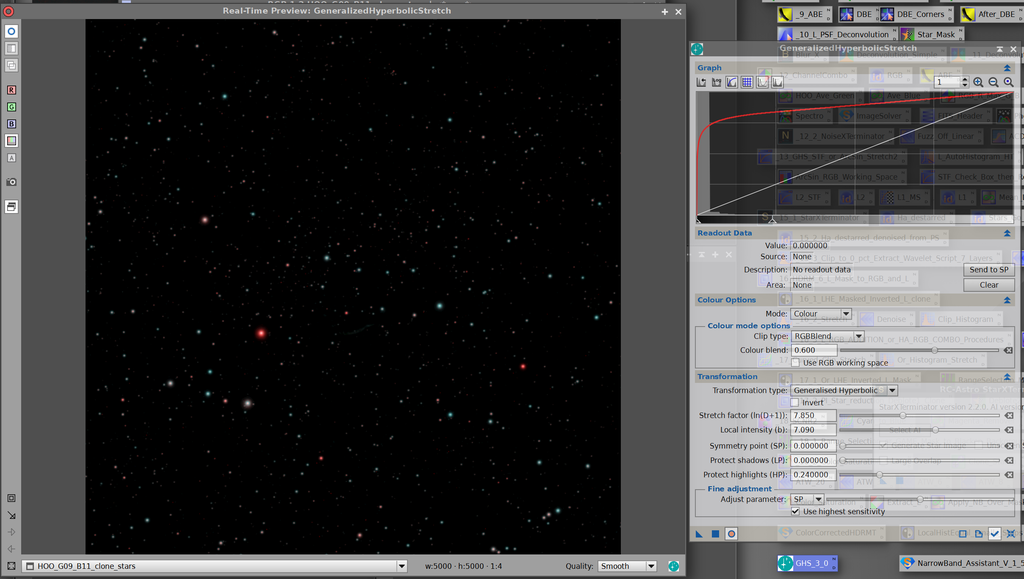
However, in close I have these central red spots inside a blue star.. with weaker stretching these are white. Any hope here for a better job?
 |
You cannot like this item. Reason: "ANONYMOUS".
You cannot remove your like from this item.
Editing a post is only allowed within 24 hours after creating it.
You cannot Like this post because the topic is closed.
Jerry Yesavage:
Am sorta watching on the sidelines here trying to learn these new tools and by George these color corrected dual band stars do pop:
However, in close I have these central red spots inside a blue star.. with weaker stretching these are white. Any hope here for a better job?
I have not tried this with a dual narrowband filter on an OSC, I'm guessing that is the cause. If you measure the value of the interior of the star with a weaker stretch, do you see a slight tendency towards red even if it appears white? I think the first thing I'd try is being even more aggressive with the "protect highlights" slider.
|
You cannot like this item. Reason: "ANONYMOUS".
You cannot remove your like from this item.
Editing a post is only allowed within 24 hours after creating it.
You cannot Like this post because the topic is closed.
Steve:
Jerry Yesavage:
Am sorta watching on the sidelines here trying to learn these new tools and by George these color corrected dual band stars do pop:
However, in close I have these central red spots inside a blue star.. with weaker stretching these are white. Any hope here for a better job?
I have not tried this with a dual narrowband filter on an OSC, I'm guessing that is the cause. If you measure the value of the interior of the star with a weaker stretch, do you see a slight tendency towards red even if it appears white? I think the first thing I'd try is being even more aggressive with the "protect highlights" slider.
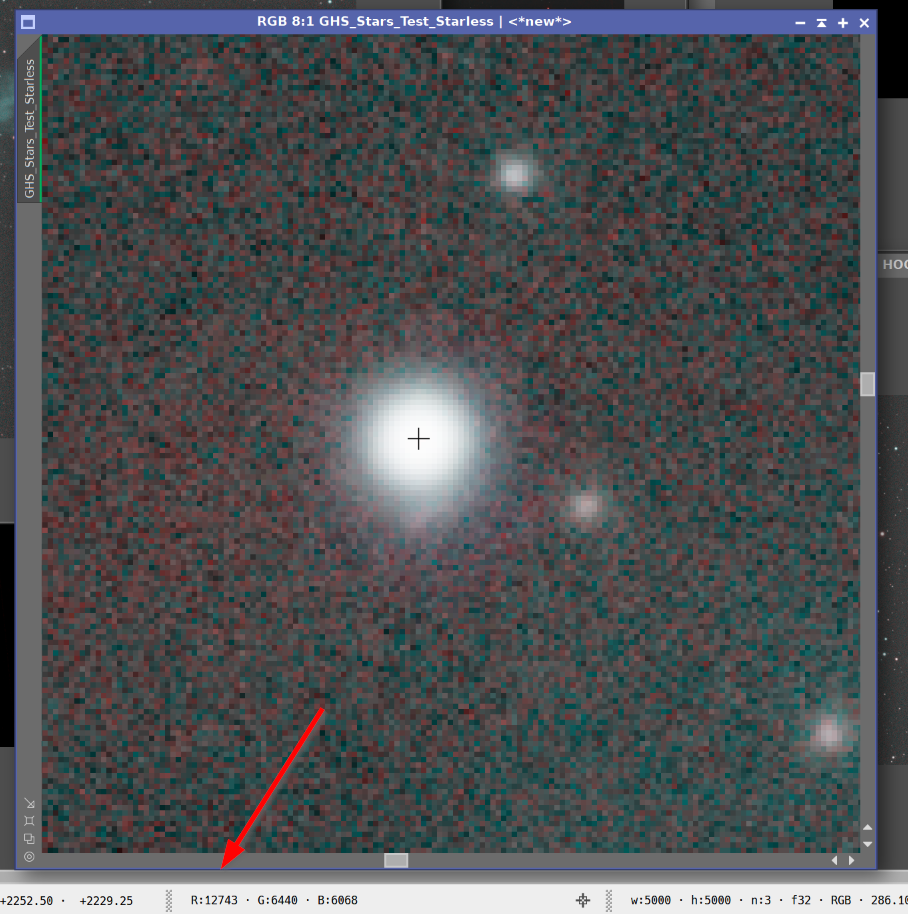
Well, you were right on here. Here is the unstretched version with STF on close in of a blue star and it is pretty much blue and white to the eye but when you look at the RGB readings at the center, that tells the story.

Interesting to see what happens with the same STF after BlurX... I think the R is increased propportionaly more than R&B.... anyway see what is going on... on RGB I hvae generally central white in my stars which is more normal that red in blue!
 |
You cannot like this item. Reason: "ANONYMOUS".
You cannot remove your like from this item.
Editing a post is only allowed within 24 hours after creating it.
You cannot Like this post because the topic is closed.
to create to post a reply.