HI Jerry and Steve,
I just want to clarify what is going on in these stretches and other operations (such as BlurX, or just about any pixel value altering process) when it comes to colour. I don't offer a solution here, just aknowledgment and a bit of an explanation that might help.
Most processes, including GHS RGB stretch are operating on the R,G, and B channels independently using the RGB model. This means that the results for any channel (say R) are independent on the values for B or G. If you separate a colour image into R,G, and B monochrome images, perform the process/operation and then recombine them again, you will get the same result as performing the same operation on the colour image.
Other processes are not independent. These generally use another model, Hue, Saturation, and Luminance (HSL) to represent the data (although others exist too). Think of Hue as a number representing the angle on the colour wheel, or the ordering of each of RGB and is simply a number. Saturation is the spacing of the R,G, and B contributions (large spacing, strong colour, little spacing weak colour), and luminance is an average brightness of the channels.
One important factor to note, however, is that is all cases, the actual numbers used to represent the image in both the RGB representation (or model) and the HSL representation (HSL) the numbers must lie between 0 and 1.
When doing an operation on an HSL model, (such as the "colour" or "luminance" stretch using GHS), the actual operation consists of 3 steps.
1) convert the RGB image "model" to an HSL one
2) perform the actual operation (in this case a colour stretch) on the HSL model
3) back convert the transformed (stretched HSL image back to RGB).
While the operation is ultimately re-represented using the RGB model, the operation, on say, Red, is not longer independent of the starting values for Green and Blue. If you do the operation on, say luminance, this will effect all three colour values in RGB, and can change either/both saturation or hue. Another problem is that this all sounds great, except for the limitation that the numbers have to add up to 1 and the operation, when performed on the HSL model, might violate this condition under the RGB model. For example....
When doing a colour stretch, the amount of stretch is determined from a stretch of the luminance channel from the conversion from RGB to HSL. Lets say you end up trying to double luminance (2x) for a given pixel - say take the luminance from 0.4 to 0.8. Sounds good. The way the colour stretch (or arcsinh stretch) works, then is to proportionally increase the original R,G,B channels by the same proportions. This appears to add (or maintain?) saturation by increasing spacing between the individual colour channels (by multiplying all the R,G,B values by 2, in this case). But, and HORRORS!, what if the individual channels were R=0.3, G=0.3, and B=0.6 (to give the original luminance (average) = 0.4). OK, Red and Green both move to 0.6 and Blue moves to 1.2.... but wait Blue isn't allowed to go past 1.0! So how do you deal with that! A simple method is to just clip blue and set it to 1.0. However, this will result in this pixel being less blue changing both the hue and saturation of the pixel.
This is why you see (remember or brains "see" the image more like the HSL model than the RGB one) the hue and/or saturation can change using this operations. It is essentially a result of clipping one or more of the R,G, and B channels.
During stretching, you can minimizing that amount that this happens, by back averaging (that's what the slider is for., or changing the rules modifying what happens when this occurs, or using a -ve b/arsinch which tames the stretch on brighter pixels. But the problem is there. It is there for BlurX, it is there for HDRMT, it is there for any process that attempts to brighten the luminance of any pixel - there are values for R,G, and B that are invalid that can force a change in the perceived hue and/or saturation.
In the case of BlurX, I am not sure, but it might be identifying stars based on their luminance and then correcting them, deconvolving them, and shrinking them based on this luminance. This can change hue and saturation in the same way. It isn't necessarily clipping that causes the problem, just that you cannot operate on one of the luminance, saturation, or hue independently without affecting the other two, or affecting all three of the resulting R,G, and B channels.
It boils down to our imperfect and limited equipment - cameras, models, computers, monitors, printers, eyes and brains. Part of the art, in my view, of astrophotography processing, is making the best image within the limitations of this equipment. Of course, there are better way of dealing with this non-correspondence of the RGB and HSL models and ingenuity of people keep coming up with better compromises.
This effect is demonstrated quite nicely by your examples, and thanks for sharing.
Dave
|
You cannot like this item. Reason: "ANONYMOUS".
You cannot remove your like from this item.
Editing a post is only allowed within 24 hours after creating it.
You cannot Like this post because the topic is closed.
|
Thank you for that excellent explanation, Dave!
|
You cannot like this item. Reason: "ANONYMOUS".
You cannot remove your like from this item.
Editing a post is only allowed within 24 hours after creating it.
You cannot Like this post because the topic is closed.
Thank you for that excellent explanation, Dave!
Yes indeed, I read this very carefully and was very understandable.  I get the explanation of truncating 1.2 to 1.0! I have gotten a bit lazy with my cloudy skys trying to avoid collecting RGB on my NB PNs, but I put those filters back in the schedule after looking at the image. I get the explanation of truncating 1.2 to 1.0! I have gotten a bit lazy with my cloudy skys trying to avoid collecting RGB on my NB PNs, but I put those filters back in the schedule after looking at the image.
What was funny was that the pre BlurX values for RGB were sort of:
5.1k 3.6k 3.6k
After BlurX:
12.7k 6.4k 6.1k
The poor man's deconvolution did improve FWHM but at the price of also distorting that Red value in the center.
Their increases were proportionally more like 2.5 1.8 1.7, so something funny happened when it went from RGB, HSL and back to RGB. I guess this is sorta the tippy top point of the histogram
Anyway, time for RGB. But, alas I have to say that drives me crazy too. I once wrote this up regarding slight differences in filters:
"The relative signal in each passband for L, R, G, B is
RelativeSignalQHY = {3.13, 1.00, 1.14, 1.05} QHY QE curve" YOU GET TOO MUCH GREEN,
This resulted in my changing the exposures of my RGB to 22 19 and 21 seconds respectively. (for my Stellarvue).
Discussion in this image:

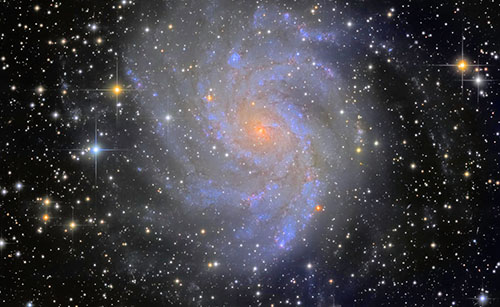
M 31
Anyway, very illuminating discussion.
|
You cannot like this item. Reason: "ANONYMOUS".
You cannot remove your like from this item.
Editing a post is only allowed within 24 hours after creating it.
You cannot Like this post because the topic is closed.
Hi Mike,
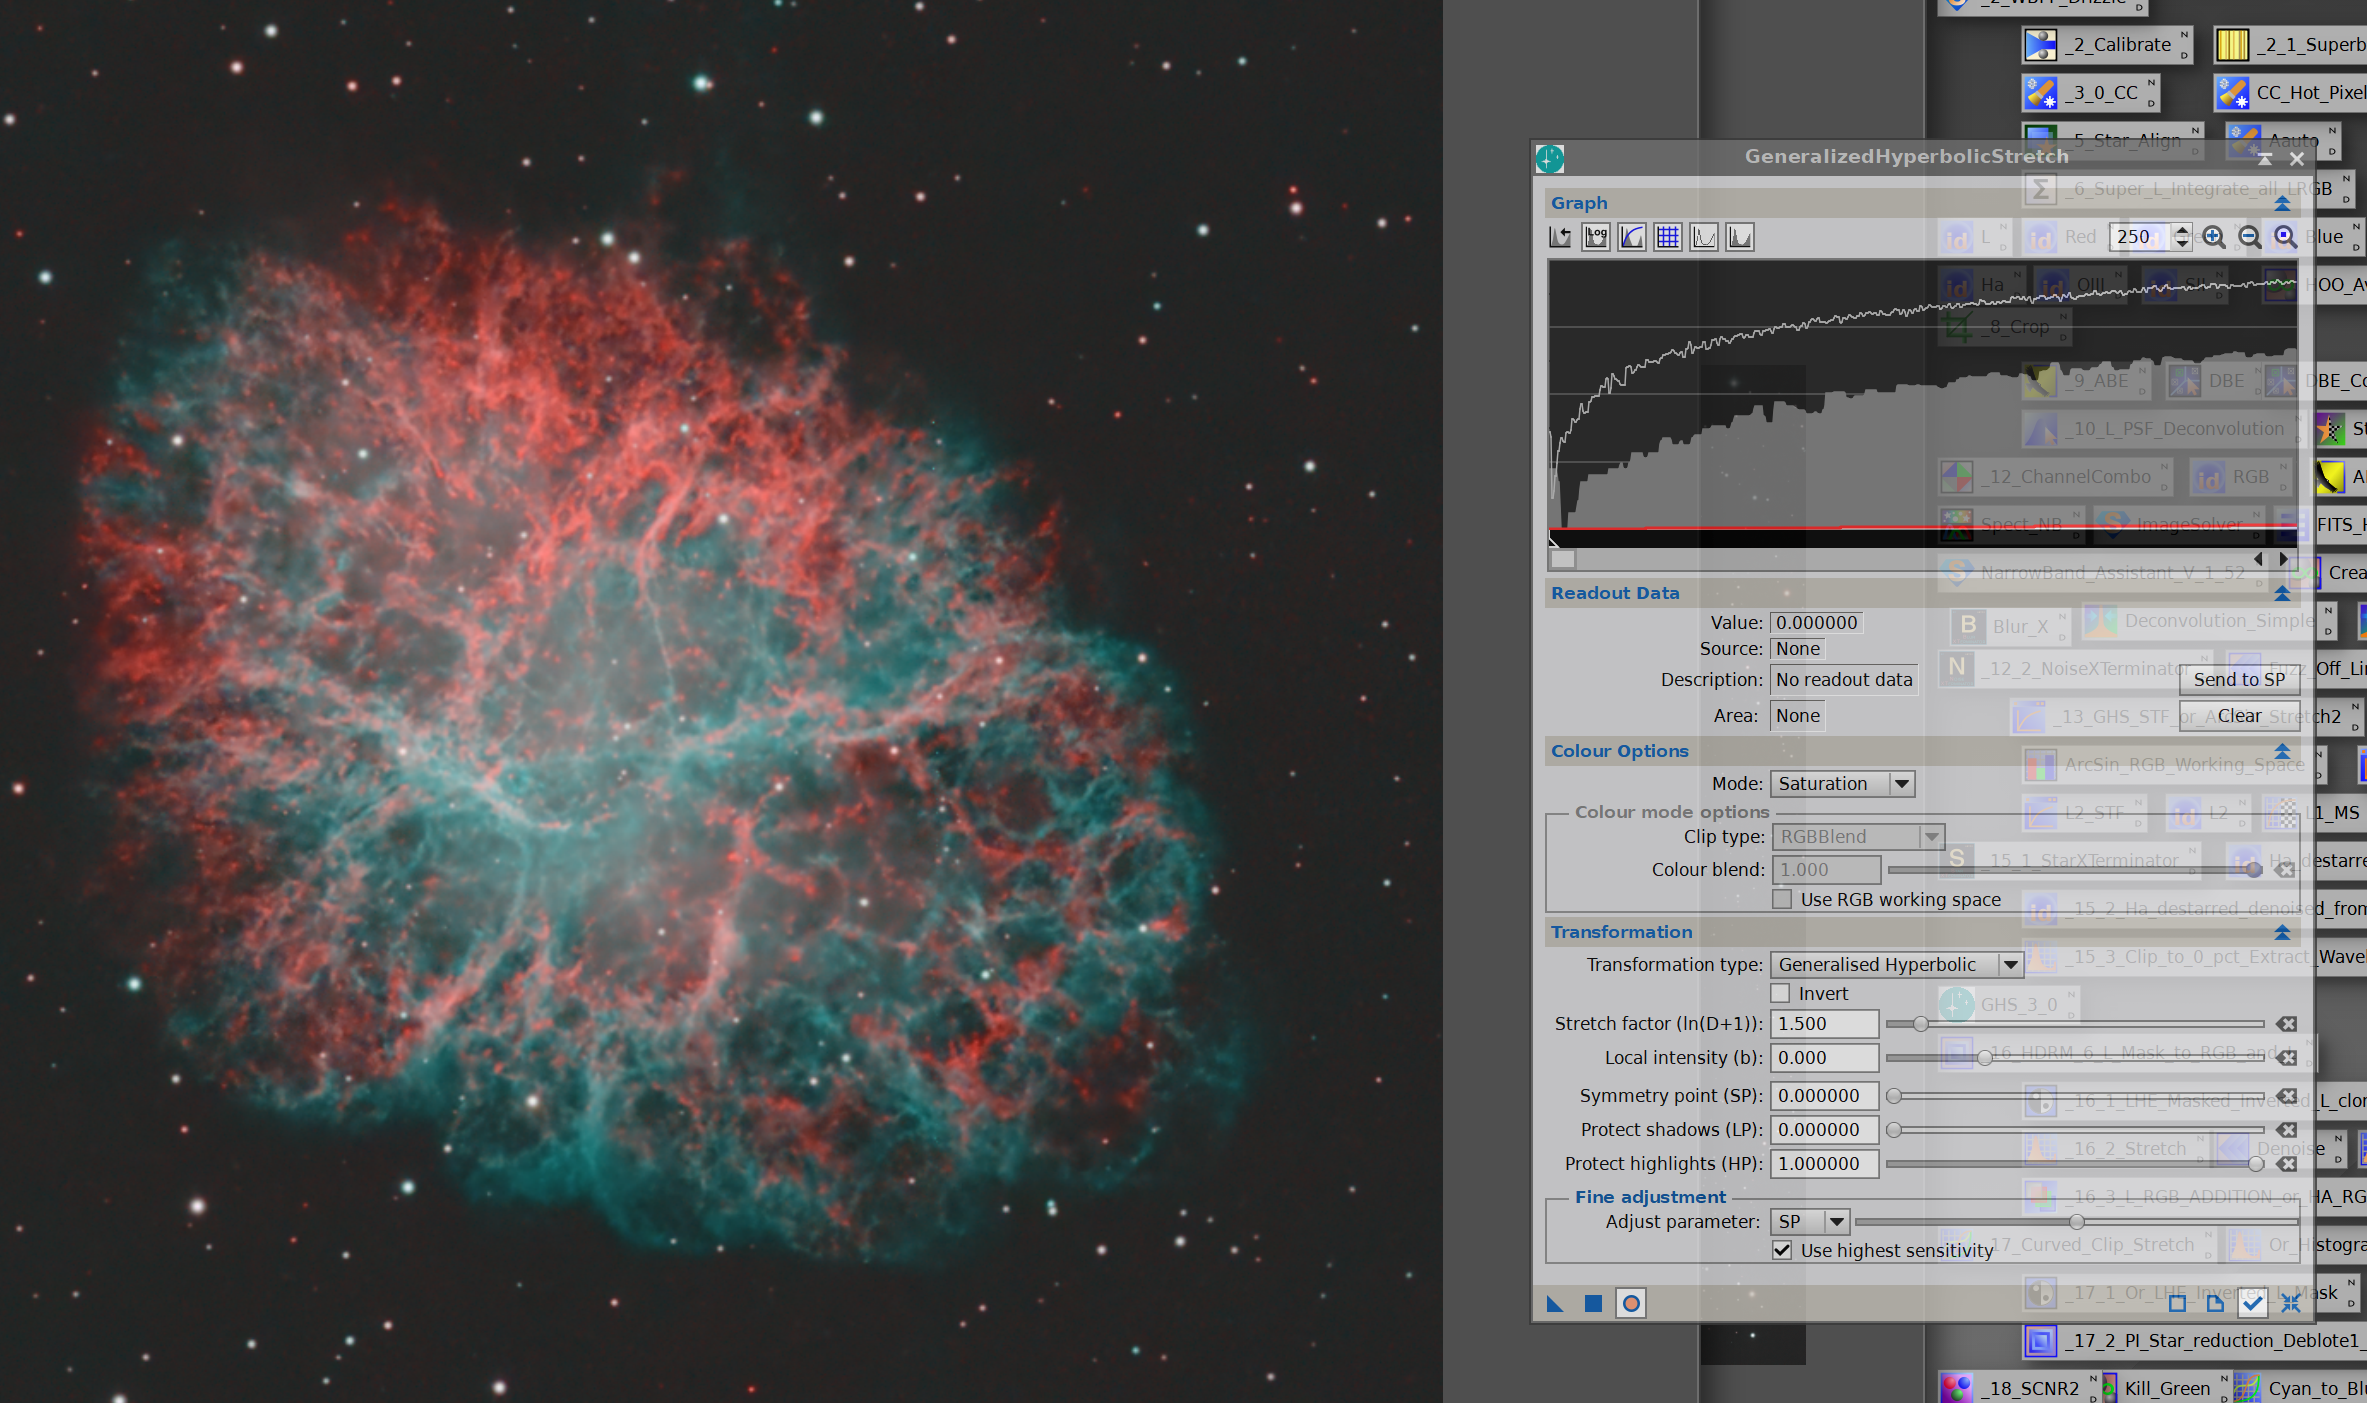
This is great news. I just used GHS v1 on the Crescent nebula today. I'll install v2 and try it out. Thanks for all of your efforts.
CS,
Mark
|
You cannot like this item. Reason: "ANONYMOUS".
You cannot remove your like from this item.
Editing a post is only allowed within 24 hours after creating it.
You cannot Like this post because the topic is closed.
Jerry Yesavage:
Thank you for that excellent explanation, Dave!
Yes indeed, I read this very carefully and was very understandable. I get the explanation of truncating 1.2 to 1.0! I have gotten a bit lazy with my cloudy skys trying to avoid collecting RGB on my NB PNs, but I put those filters back in the schedule after looking at the image.
What was funny was that the pre BlurX values for RGB were sort of:
5.1k 3.6k 3.6k
After BlurX:
12.7k 6.4k 6.1k
The poor man's deconvolution did improve FWHM but at the price of also distorting that Red value in the center.
Their increases were proportionally more like 2.5 1.8 1.7, so something funny happened when it went from RGB, HSL and back to RGB. I guess this is sorta the tippy top point of the histogram
Anyway, time for RGB. But, alas I have to say that drives me crazy too. I once wrote this up regarding slight differences in filters:
"The relative signal in each passband for L, R, G, B is
RelativeSignalQHY = {3.13, 1.00, 1.14, 1.05} QHY QE curve" YOU GET TOO MUCH GREEN,
This resulted in my changing the exposures of my RGB to 22 19 and 21 seconds respectively. (for my Stellarvue).
Discussion in this image:
M 31
Anyway, very illuminating discussion.
Hi Jerry
I read the conversation on your M31 link about SPCC. Have you found better results using your different exposure lengths and then SPCC compared to equal exposure lengths and letting SPCC do all the work?
Regarding the BXT numbers, are these values from a 16-bit integer image? Was it just application of BXT that increased the values? That would seem very surprising! Sorry for the questions but I don't really understand - probably just me being a bit slow!
CS, Mike
|
You cannot like this item. Reason: "ANONYMOUS".
You cannot remove your like from this item.
Editing a post is only allowed within 24 hours after creating it.
You cannot Like this post because the topic is closed.
Mike Cranfield:
Hi Jerry
I read the conversation on your M31 link about SPCC. Have you found better results using your different exposure lengths and then SPCC compared to equal exposure lengths and letting SPCC do all the work?
Regarding the BXT numbers, are these values from a 16-bit integer image? Was it just application of BXT that increased the values? That would seem very surprising! Sorry for the questions but I don't really understand - probably just me being a bit slow!
CS, Mike
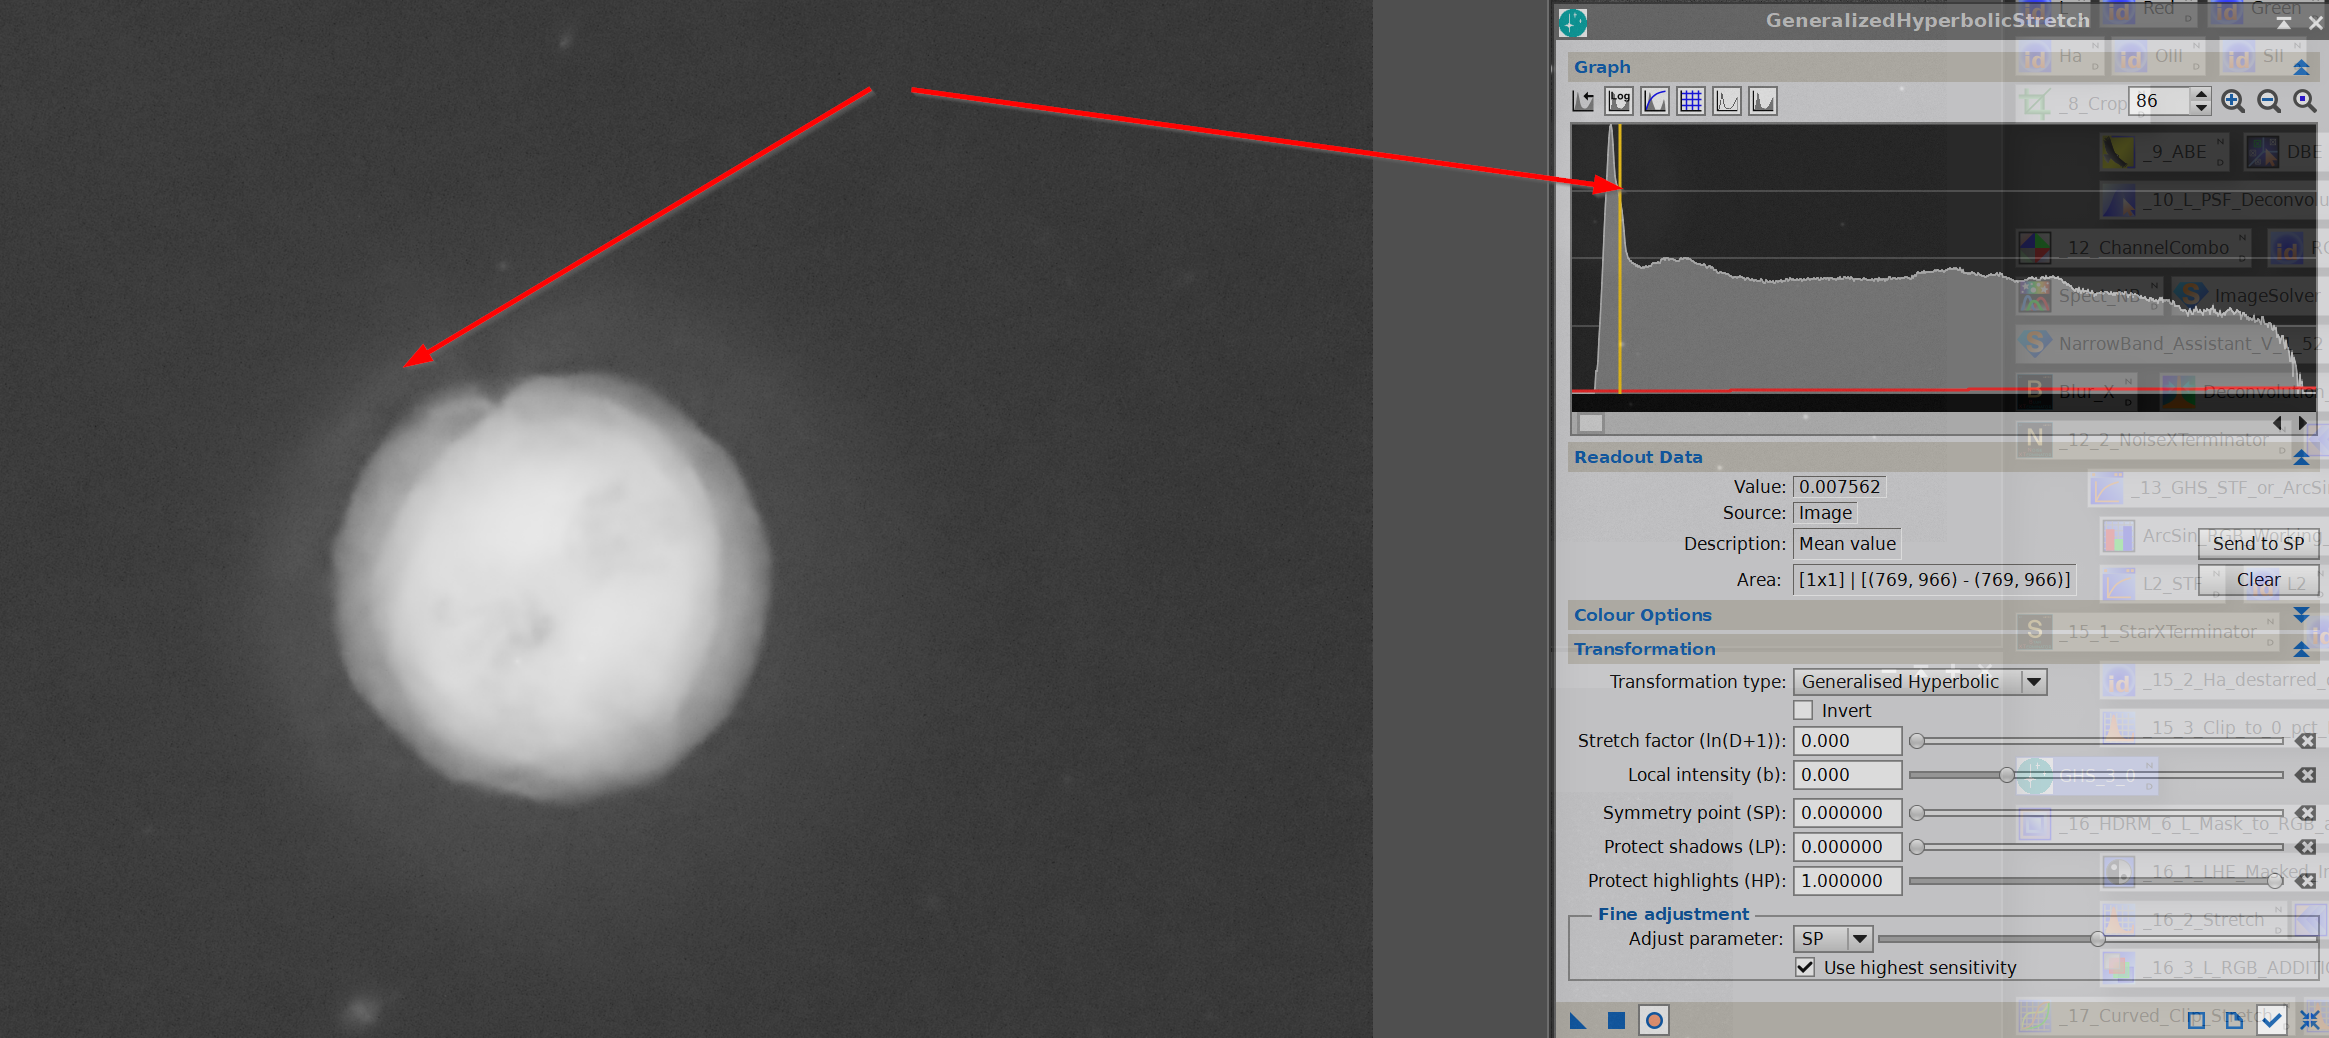
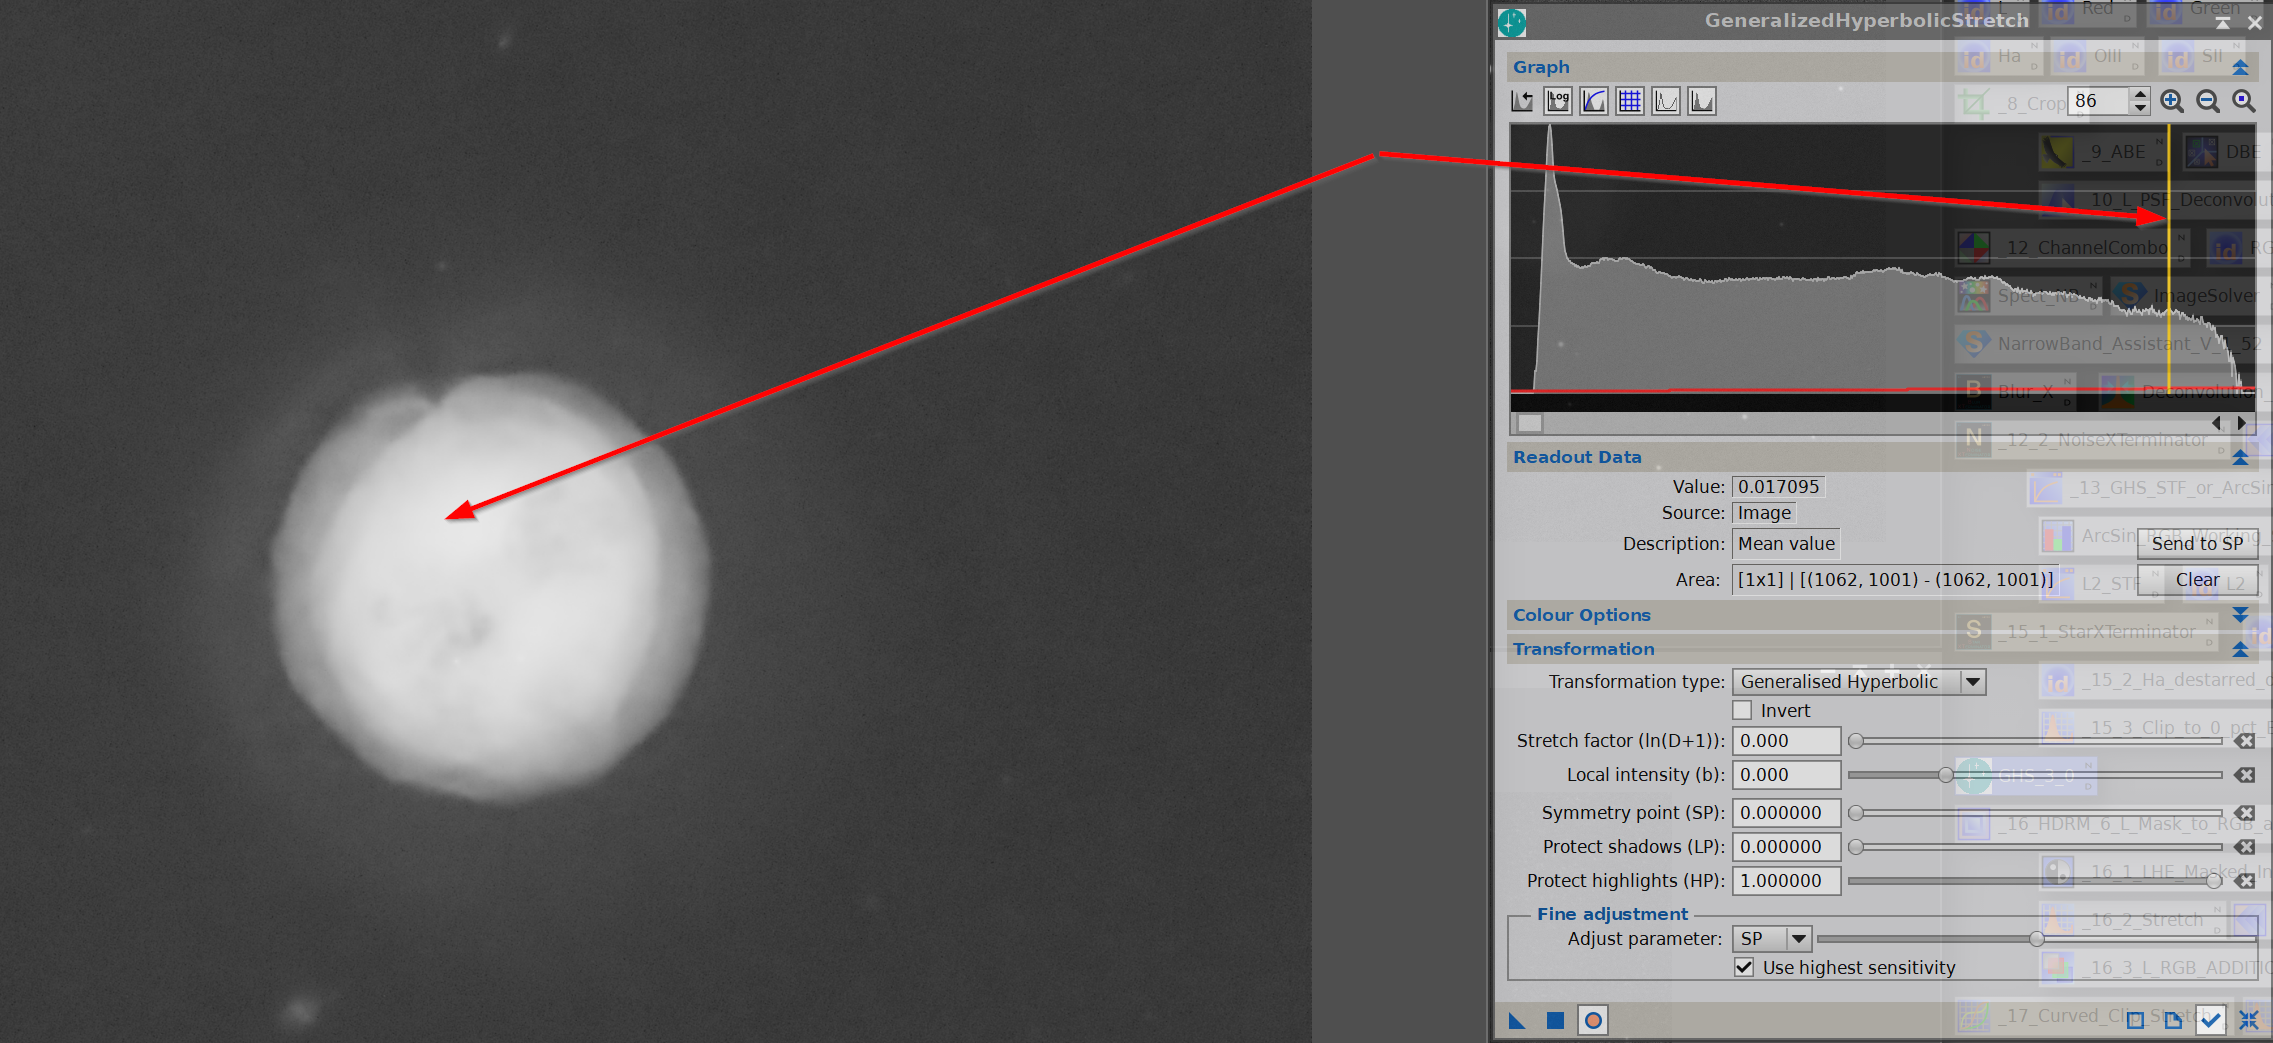
On the exposure lengths, the reason I mentioned I and use a slightly lower green is I think the green just comes through a bit too strong on my filters. When I take the RGB readings at the center of a blue or for that matter a red star there is too much green. SPCC does not seem to fully do the job and so I think I am better off controlling the exposure length from the start. This is picky picky, but you can check what you are getting just by doing what I did above to put the cursor in the blown up center of a star and see what the readings are. May vary with filters.
The point about BXT is that it makes FWHM smaller. This comes out as smaller sharper stars. The peak values at the center of the star are higher (read potentially blown out). In NB stars this translates to a red polka dot in the center of a blue star or in the case of an RGB star more of a white center.... I may have to tone down the BlurX.
|
You cannot like this item. Reason: "ANONYMOUS".
You cannot remove your like from this item.
Editing a post is only allowed within 24 hours after creating it.
You cannot Like this post because the topic is closed.
Jerry Yesavage:
Mike Cranfield:
Hi Jerry
I read the conversation on your M31 link about SPCC. Have you found better results using your different exposure lengths and then SPCC compared to equal exposure lengths and letting SPCC do all the work?
Regarding the BXT numbers, are these values from a 16-bit integer image? Was it just application of BXT that increased the values? That would seem very surprising! Sorry for the questions but I don't really understand - probably just me being a bit slow!
CS, Mike
On the exposure lengths, the reason I mentioned I and use a slightly lower green is I think the green just comes through a bit too strong on my filters. When I take the RGB readings at the center of a blue or for that matter a red star there is too much green. SPCC does not seem to fully do the job and so I think I am better off controlling the exposure length from the start. This is picky picky, but you can check what you are getting just by doing what I did above to put the cursor in the blown up center of a star and see what the readings are. May vary with filters.
The point about BXT is that it makes FWHM smaller. This comes out as smaller sharper stars. The peak values at the center of the star are higher (read potentially blown out). In NB stars this translates to a red polka dot in the center of a blue star or in the case of an RGB star more of a white center.... I may have to tone down the BlurX.
Hi Jerry,
That is what BlurX / deconvolution is supposed to do. By making stars smaller, it also makes them brighter. The total illumination of the star is held constant. This goes for all the objects in the image. However, the limits of the HSL model still hold both with BlurX and GHS.
You might try running SCC before BlurX, which should tame the green before deconvolution.
Cheers,
Dave
|
You cannot like this item. Reason: "ANONYMOUS".
You cannot remove your like from this item.
Editing a post is only allowed within 24 hours after creating it.
You cannot Like this post because the topic is closed.
David Payne:
You might try running SCC before BlurX, which should tame the green before deconvolution.
That is what's recommended. Star color issues when using BX before SPCC came up shortly after it was released.
Cheers,
Scott
|
You cannot like this item. Reason: "ANONYMOUS".
You cannot remove your like from this item.
Editing a post is only allowed within 24 hours after creating it.
You cannot Like this post because the topic is closed.
Hey Guys, been a while since I posted anything here but have some images using GHS that may deserve some comment.
I have been working with data from a Planewave 20" in Taiwan. This gives me a lot of photons with which to work and have been stretching away. Also using some color tools (3DLUT). If you get the chance maybe you could look at a couple of these images as see if there are any fine point I might consider.
This one is new and I discuss it a bit with Gary Lopez:

NGC 6946 (Fireworks Galaxy) Lulin Observatory Data
This one also uses GHS a lot:

M76 Lulin Observatory Data
A couple of the others using GHS extensively:

NGC 2023 Lulin Observatory Data

M82 Lulin Observatory Data
I am not sure you are familiar with 3dLUT but there are some very sophisticated color stretching tools in it... I have a nice who is a cinema pro and uses it in the movies...
Cheers and best wishes.
|
You cannot like this item. Reason: "ANONYMOUS".
You cannot remove your like from this item.
Editing a post is only allowed within 24 hours after creating it.
You cannot Like this post because the topic is closed.
That's a nice set of images there Jerry - thanks for sharing them.
On NGC6946, the extended spiral arms on the right hand side have a yellowish hue. Is this coming in from the 3DLUT transformation?
I think your M76 image is my favourite of the 4!
Am I right that all four are flipped from their natural orientation?
CS, Mike
|
You cannot like this item. Reason: "ANONYMOUS".
You cannot remove your like from this item.
Editing a post is only allowed within 24 hours after creating it.
You cannot Like this post because the topic is closed.
Hi,
Yeah they are all flipped. I used their orientations. I should fix the next set.
You have good eyes for the yellow. This is a defect in their flats that in not repairable. It is on the blue filter... not sure what is wrong but I cannot fix it. It does not show up in M76, which is dual band.
Anyway, I think I am getting the maximum mileage out of GHS but it is a funny dance between SP, b and D. I do not have a deep understanding of the theory.
CS, Jerry Y
|
You cannot like this item. Reason: "ANONYMOUS".
You cannot remove your like from this item.
Editing a post is only allowed within 24 hours after creating it.
You cannot Like this post because the topic is closed.
Anyway, I think I am getting the maximum mileage out of GHS but it is a funny dance between SP, b and D. I do not have a deep understanding of the theory.
... but you clearly have a great understanding of the practice!
|
You cannot like this item. Reason: "ANONYMOUS".
You cannot remove your like from this item.
Editing a post is only allowed within 24 hours after creating it.
You cannot Like this post because the topic is closed.
|
Thanks for the contribution!
|
You cannot like this item. Reason: "ANONYMOUS".
You cannot remove your like from this item.
Editing a post is only allowed within 24 hours after creating it.
You cannot Like this post because the topic is closed.
Hi Jerry
I hope you will forgive me but I was intrigued by that yellow hue. I took the liberty of "screen shot"-ing your image and then proceeded as follows:
Using the colour mask script I created a colour mask targeting yellow from 45degrees to 75degrees. I set the max lightness parameter to 0.66 so I wouldn't get the cores of those brighter yellowish stars and created a linear mask.
After producing the colour mask I used clone stamp to clean it up and get rid of those areas (eg on the left of the image) I don't want to target.
Then I inverted the NGC6946 image and then applied the colour mask on it. Inversion because then reducing the yellow converts to reducing the blue channel.
I used GHS on just the blue channel with "Invert" checked, a negative b and a very small D just to reduce the blue tinge in that area in the inverted image.
Apply GHS, remove the mask and invert the image back again.
Next with the mask applied again I used GHS again to just touch down the saturation very slightly to get a better blend with the rest of the image
My result shown below is by no means perfect but I think it shows a possible way you may be able to correct that yellow hue to some extent.
CS, Mike
 |
You cannot like this item. Reason: "ANONYMOUS".
You cannot remove your like from this item.
Editing a post is only allowed within 24 hours after creating it.
You cannot Like this post because the topic is closed.
Thanks so much for the teaching. I think the bright yellow/orange stars come from the less than judicious use of the "color" stretching at the start. I have yet to master that tool. Here is the Blue Flat I had to use:
I have no idea where that big blotch came from but it is not in the light images and hence I knew I had a yellow problem. These are not my images so I do not complain too loudly (beggars cannot be choosers). I cropped the image to minimize the impact and used GradientXpert. I probably should have used a Blue flat from another sequence. I focused on getting the fine detail in the arms of the galaxy and the color would not come out with a pretty saturated RGB image, hence the heavy hand with the color stretch. I also used I believe a 60/40 ratio of RGB/L when I added in the L.
Again, thanks for the help. GHS is an essential tool.
PS I should have clone stamped this flat.
PPS I am now working on M1... I am not going to see data like this from my skys and a C11 ever. Luckily this is like M76 dual band and the flats are perfect. The color stretching I think is very important but is again very tricky. I think if I just got that right from the start would be key:

Here if I am not careful the Ha (red) will be too saturated and I have tried to tone it down using HP. I think SP is in the right place and the stars look good.
I redid this with exactly the same stretch applied to RGB and then increased saturation. Looks like the way to go:
 |
You cannot like this item. Reason: "ANONYMOUS".
You cannot remove your like from this item.
Editing a post is only allowed within 24 hours after creating it.
You cannot Like this post because the topic is closed.
Jerry Yesavage:
I have no idea where that big blotch came from
I once had a set of flats with a blotch that was in a different place in each flat - turned out a bug had got onto my flat panel and was walking around while I was shooting the flats - maybe an insect has taken up residence on their flat panel here!
|
You cannot like this item. Reason: "ANONYMOUS".
You cannot remove your like from this item.
Editing a post is only allowed within 24 hours after creating it.
You cannot Like this post because the topic is closed.
Jerry Yesavage:
Hey Guys, been a while since I posted anything here but have some images using GHS that may deserve some comment.
I have been working with data from a Planewave 20" in Taiwan. This gives me a lot of photons with which to work and have been stretching away. Also using some color tools (3DLUT). If you get the chance maybe you could look at a couple of these images as see if there are any fine point I might consider.
This one is new and I discuss it a bit with Gary Lopez:
NGC 6946 (Fireworks Galaxy) Lulin Observatory Data
This one also uses GHS a lot:
M76 Lulin Observatory Data
A couple of the others using GHS extensively:
NGC 2023 Lulin Observatory Data
M82 Lulin Observatory Data
I am not sure you are familiar with 3dLUT but there are some very sophisticated color stretching tools in it... I have a nice who is a cinema pro and uses it in the movies...
Cheers and best wishes.
Very nice images, Jerry. I see you do have a preference for the yellow as I think your Ha signal is generating it. I don't know 3DLUT and not sure how colour assignment works there. Of course, you are free to use any assignment you want for false colour.
|
You cannot like this item. Reason: "ANONYMOUS".
You cannot remove your like from this item.
Editing a post is only allowed within 24 hours after creating it.
You cannot Like this post because the topic is closed.
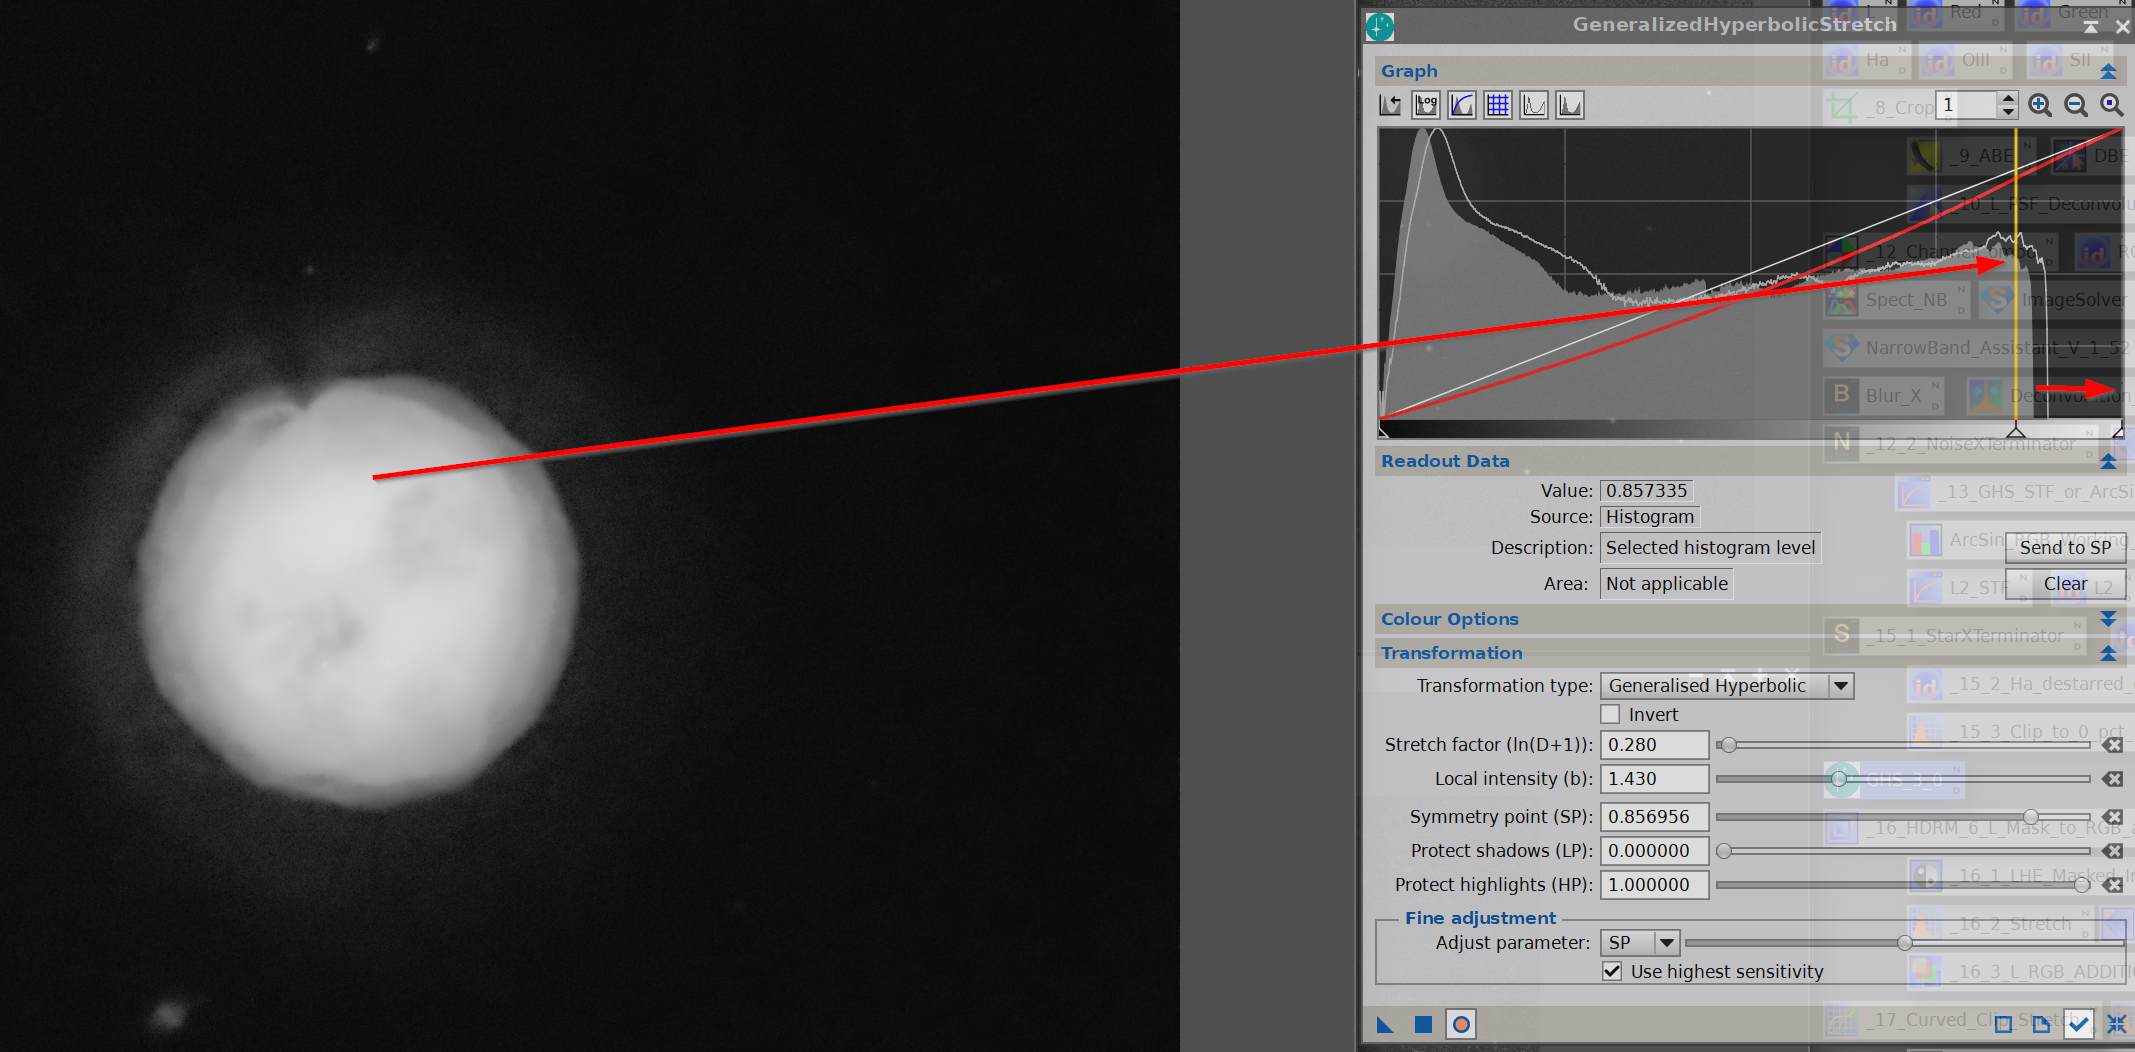
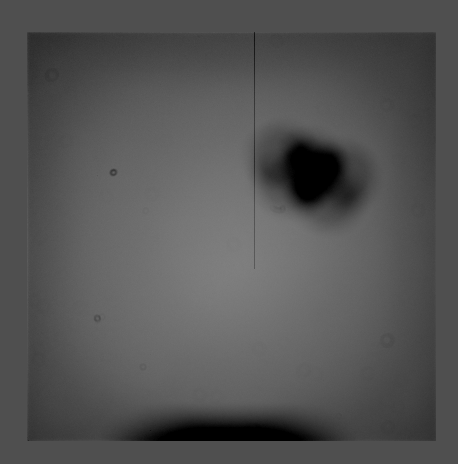
Thanks for all the help. I have a new challenge, remarkably also from another Planewave 20... these are very good data but I cannot figure out the best approach to stretch these O-III date from the Owl to be able to maximally visualize the outter ring, inner ring and the core. This histogram is the linear.. note the stretch.
Where, theoretically, should I start stretching... the middle one?

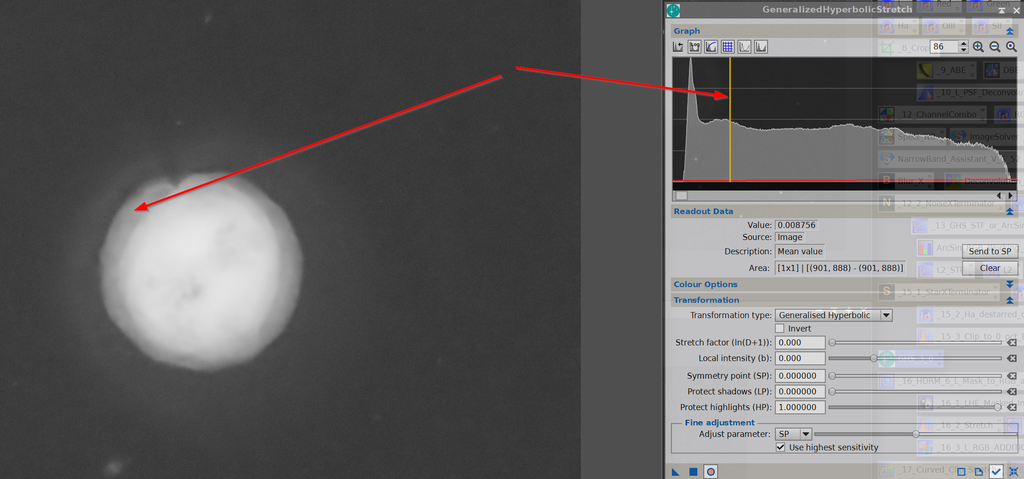

This is what I got after about 5 stretches but I do not seem to be able to stretch that bright area on the right of the histogram.... whole histogram does not have the ideal gradient....
 |
You cannot like this item. Reason: "ANONYMOUS".
You cannot remove your like from this item.
Editing a post is only allowed within 24 hours after creating it.
You cannot Like this post because the topic is closed.
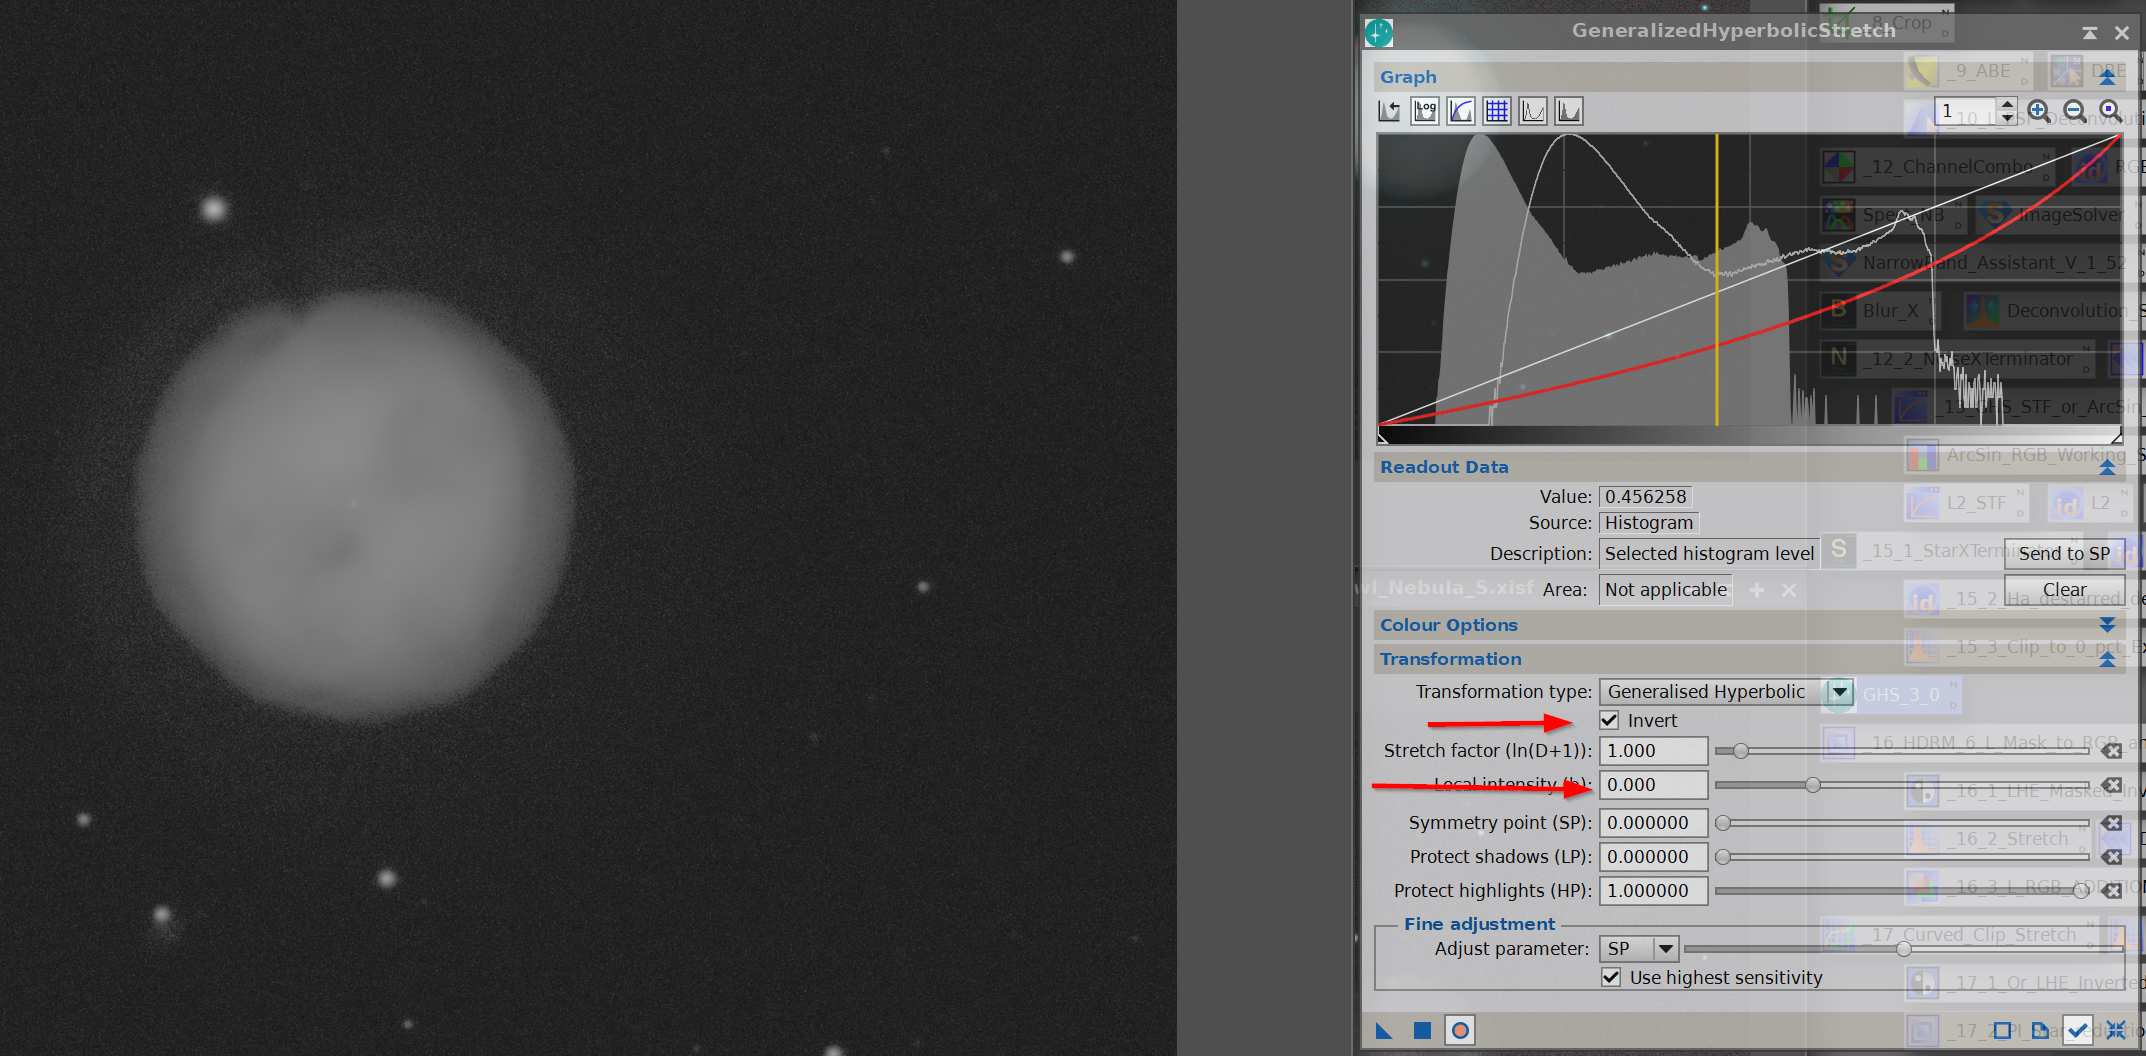
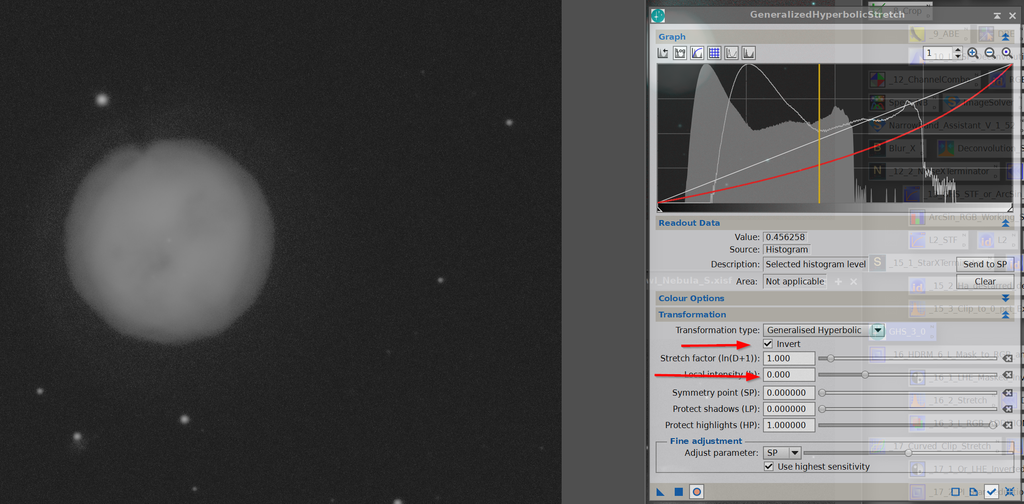
Something fun to try and might help is to select the lowest point on your histogram and use this as your symmetry point. However check "invert", leave b=0 for now and pull up the histogram here. Another suggestion on your second from the top image, apply way more HP (moving it down towards SP).
Hope this helps,
Dave
|
You cannot like this item. Reason: "ANONYMOUS".
You cannot remove your like from this item.
Editing a post is only allowed within 24 hours after creating it.
You cannot Like this post because the topic is closed.
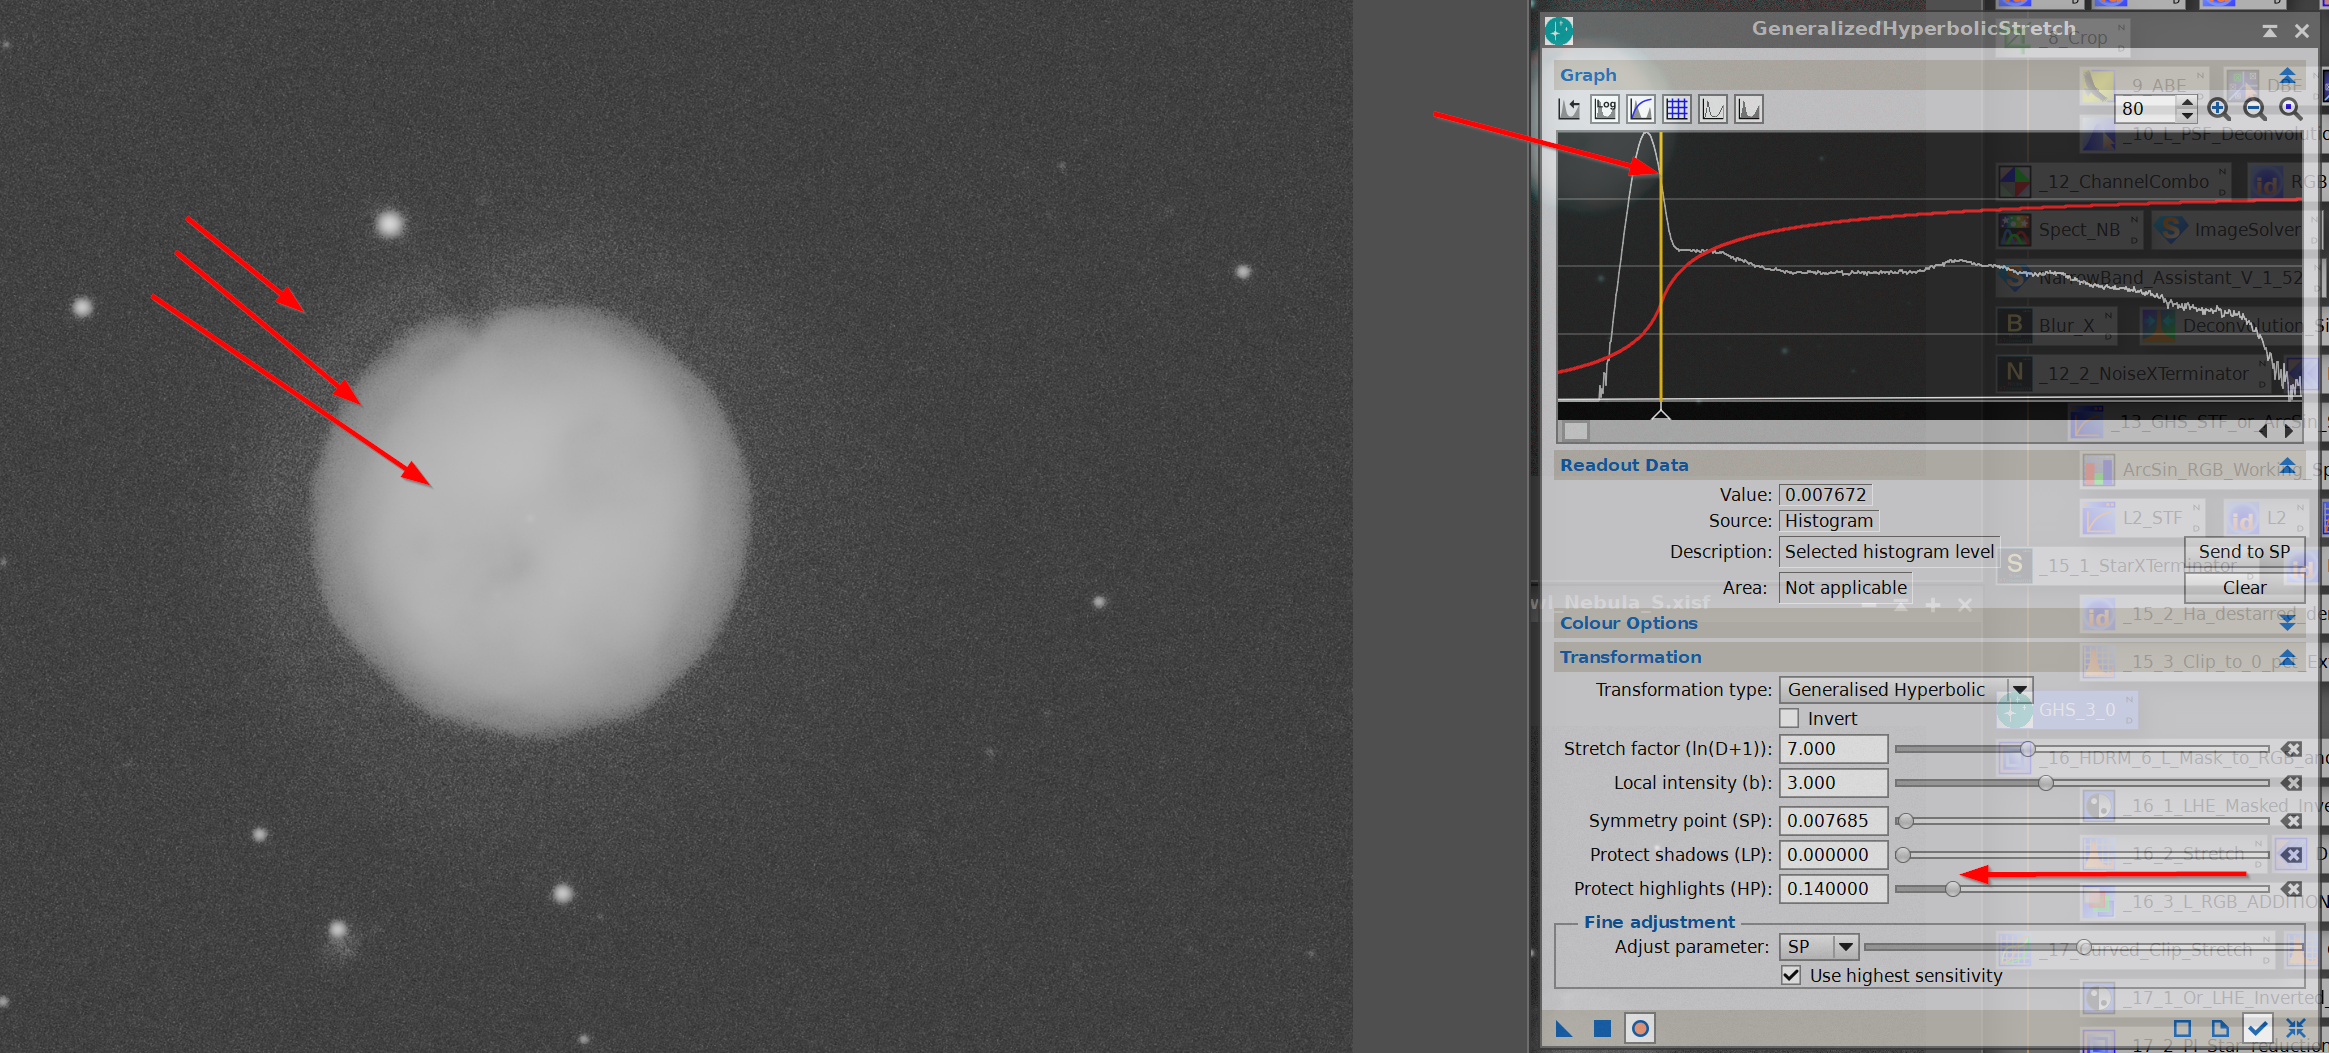
Tried to follow the directions a bit. This is my standard initial stretch D=7; b=3 and SP on the right side of the big dark bump at the right, which I take to be the background. SP here I think separates out the dimmest light.

Then got this:

The tried the invert but image just got dim....
 |
You cannot like this item. Reason: "ANONYMOUS".
You cannot remove your like from this item.
Editing a post is only allowed within 24 hours after creating it.
You cannot Like this post because the topic is closed.
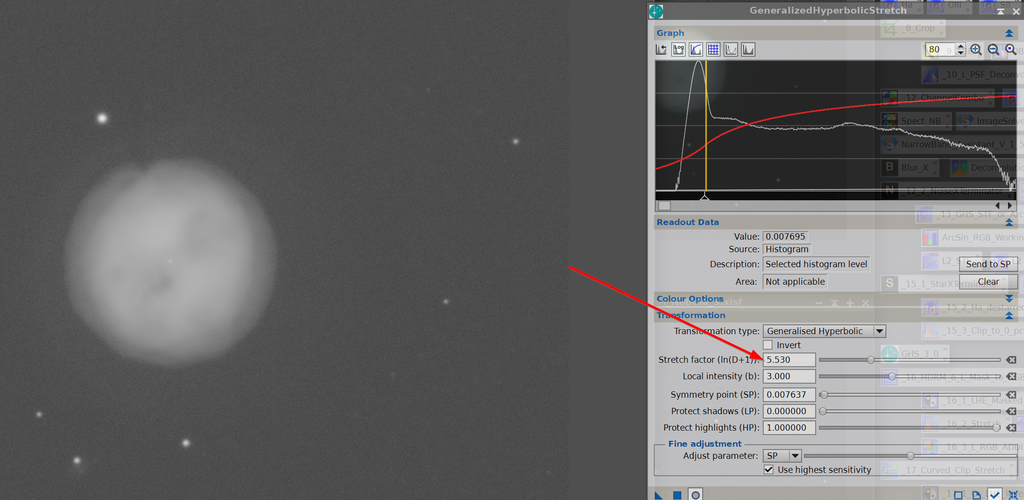
Hi Jerry,
On the first, you are stretching too much and getting the dip in the middle. Try to avoid creating it in the first place. On the last, you didn't set SP and left it at zero.
Cheers,
Dave
|
You cannot like this item. Reason: "ANONYMOUS".
You cannot remove your like from this item.
Editing a post is only allowed within 24 hours after creating it.
You cannot Like this post because the topic is closed.
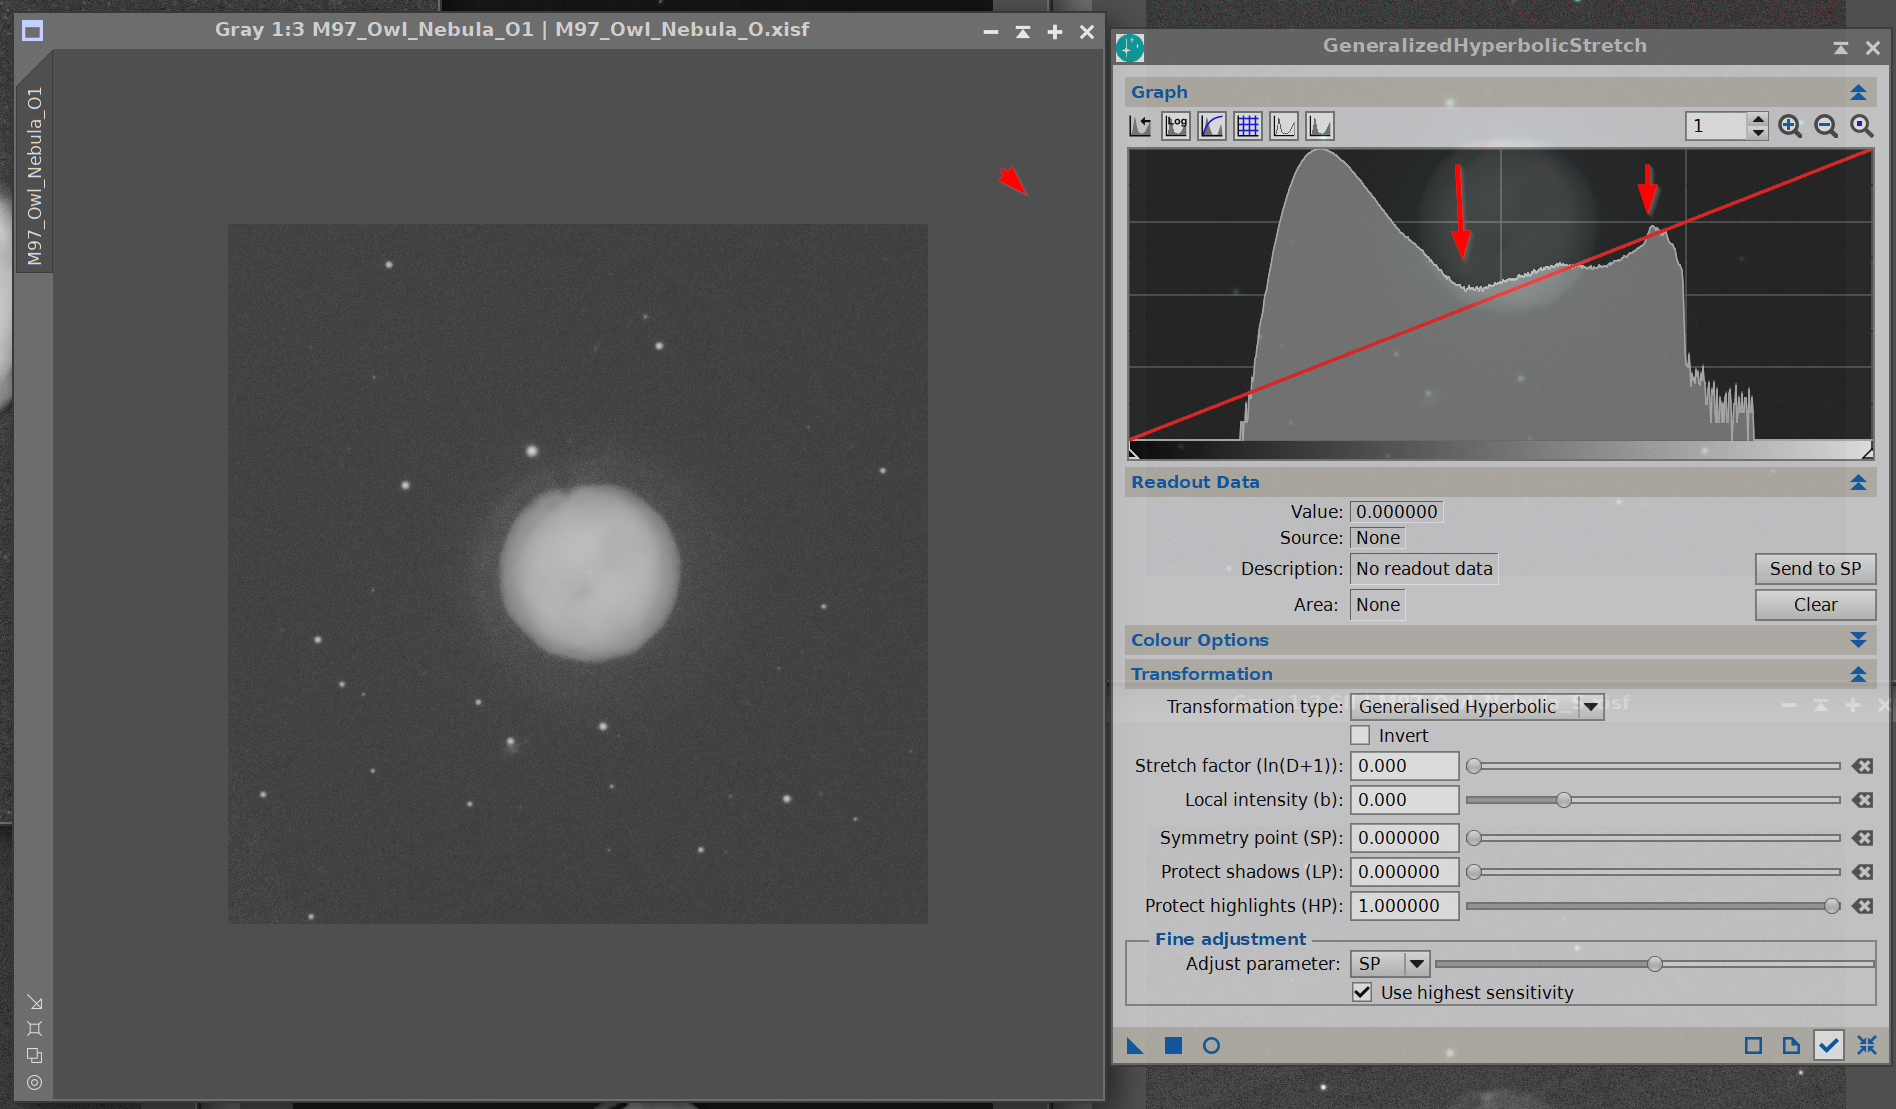
OOOps,
This is fine tuning but seems important.
Here D is toned down a bit, maybe not enough but trying to keep that outer rung:
Here it is applied, still with a dip, but not as pronounced:
 |
You cannot like this item. Reason: "ANONYMOUS".
You cannot remove your like from this item.
Editing a post is only allowed within 24 hours after creating it.
You cannot Like this post because the topic is closed.
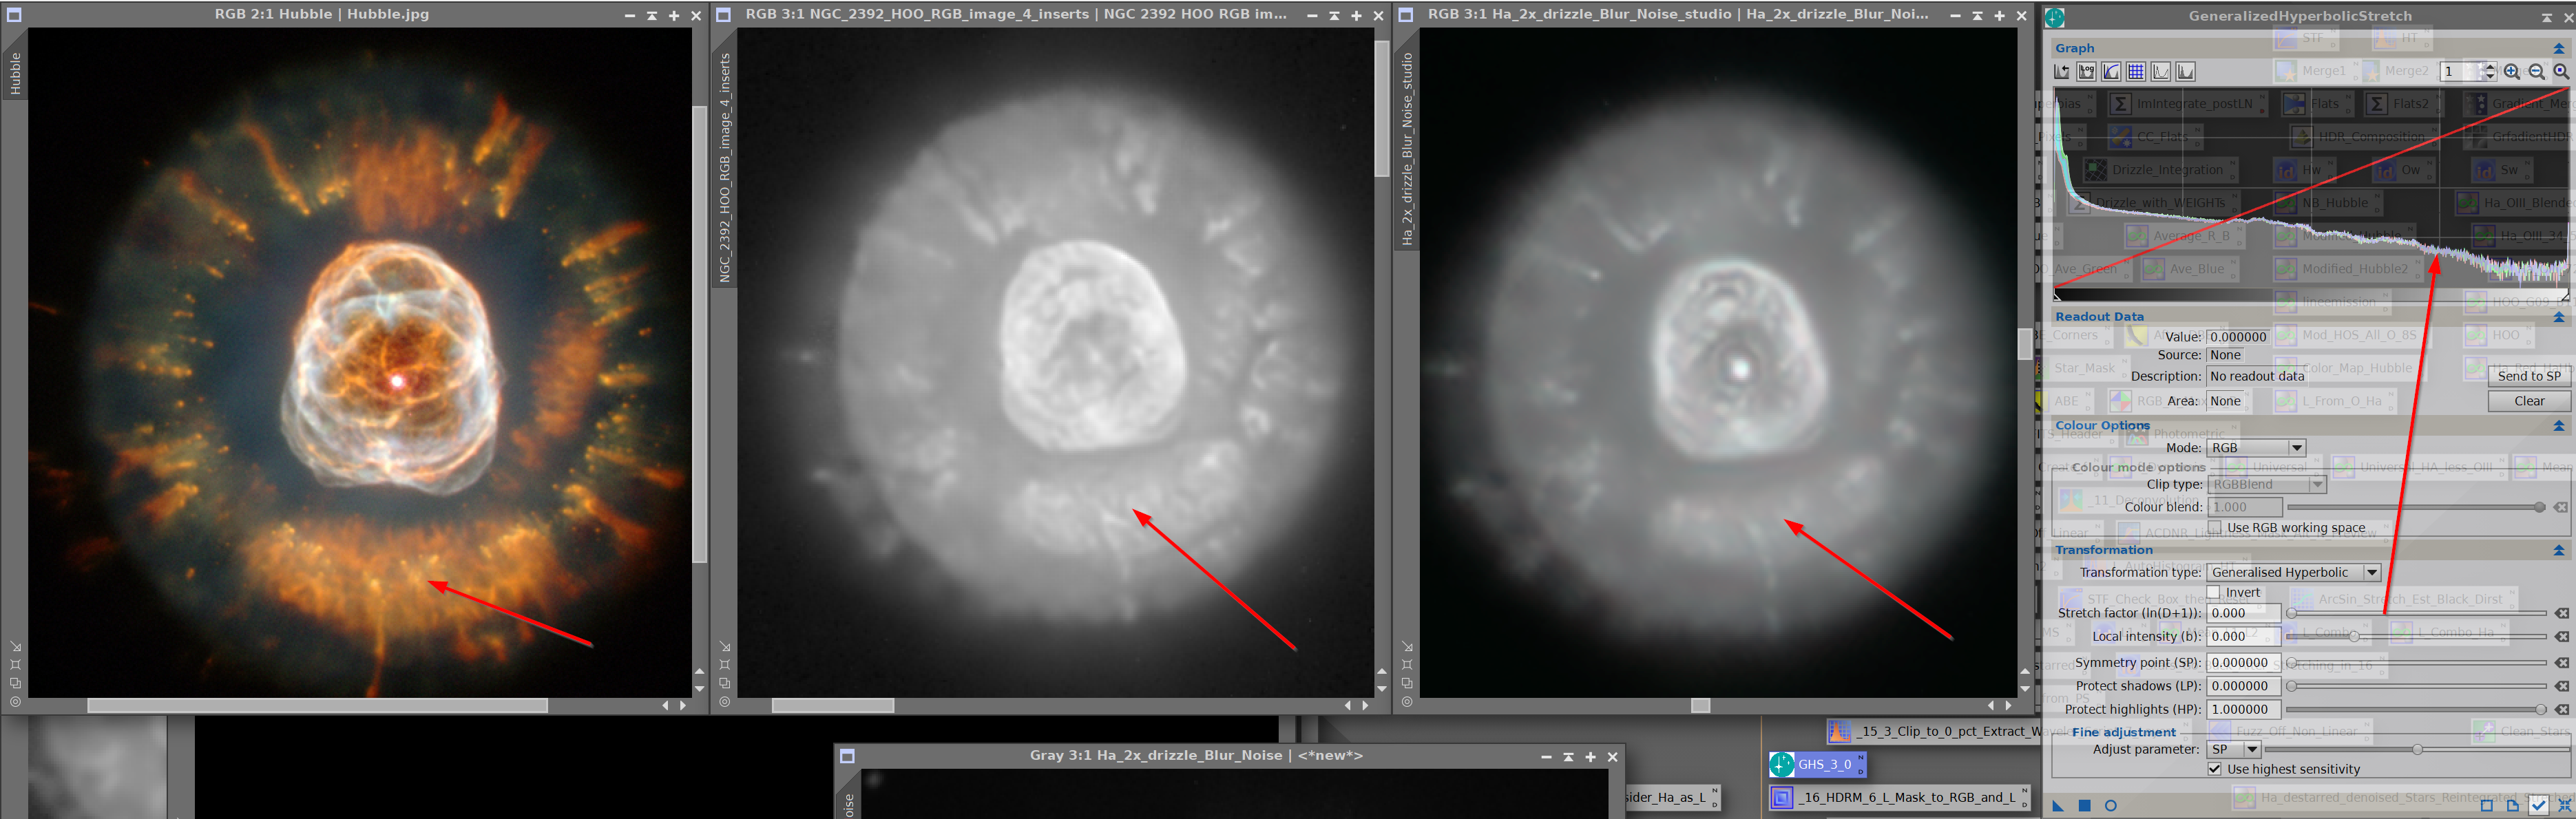
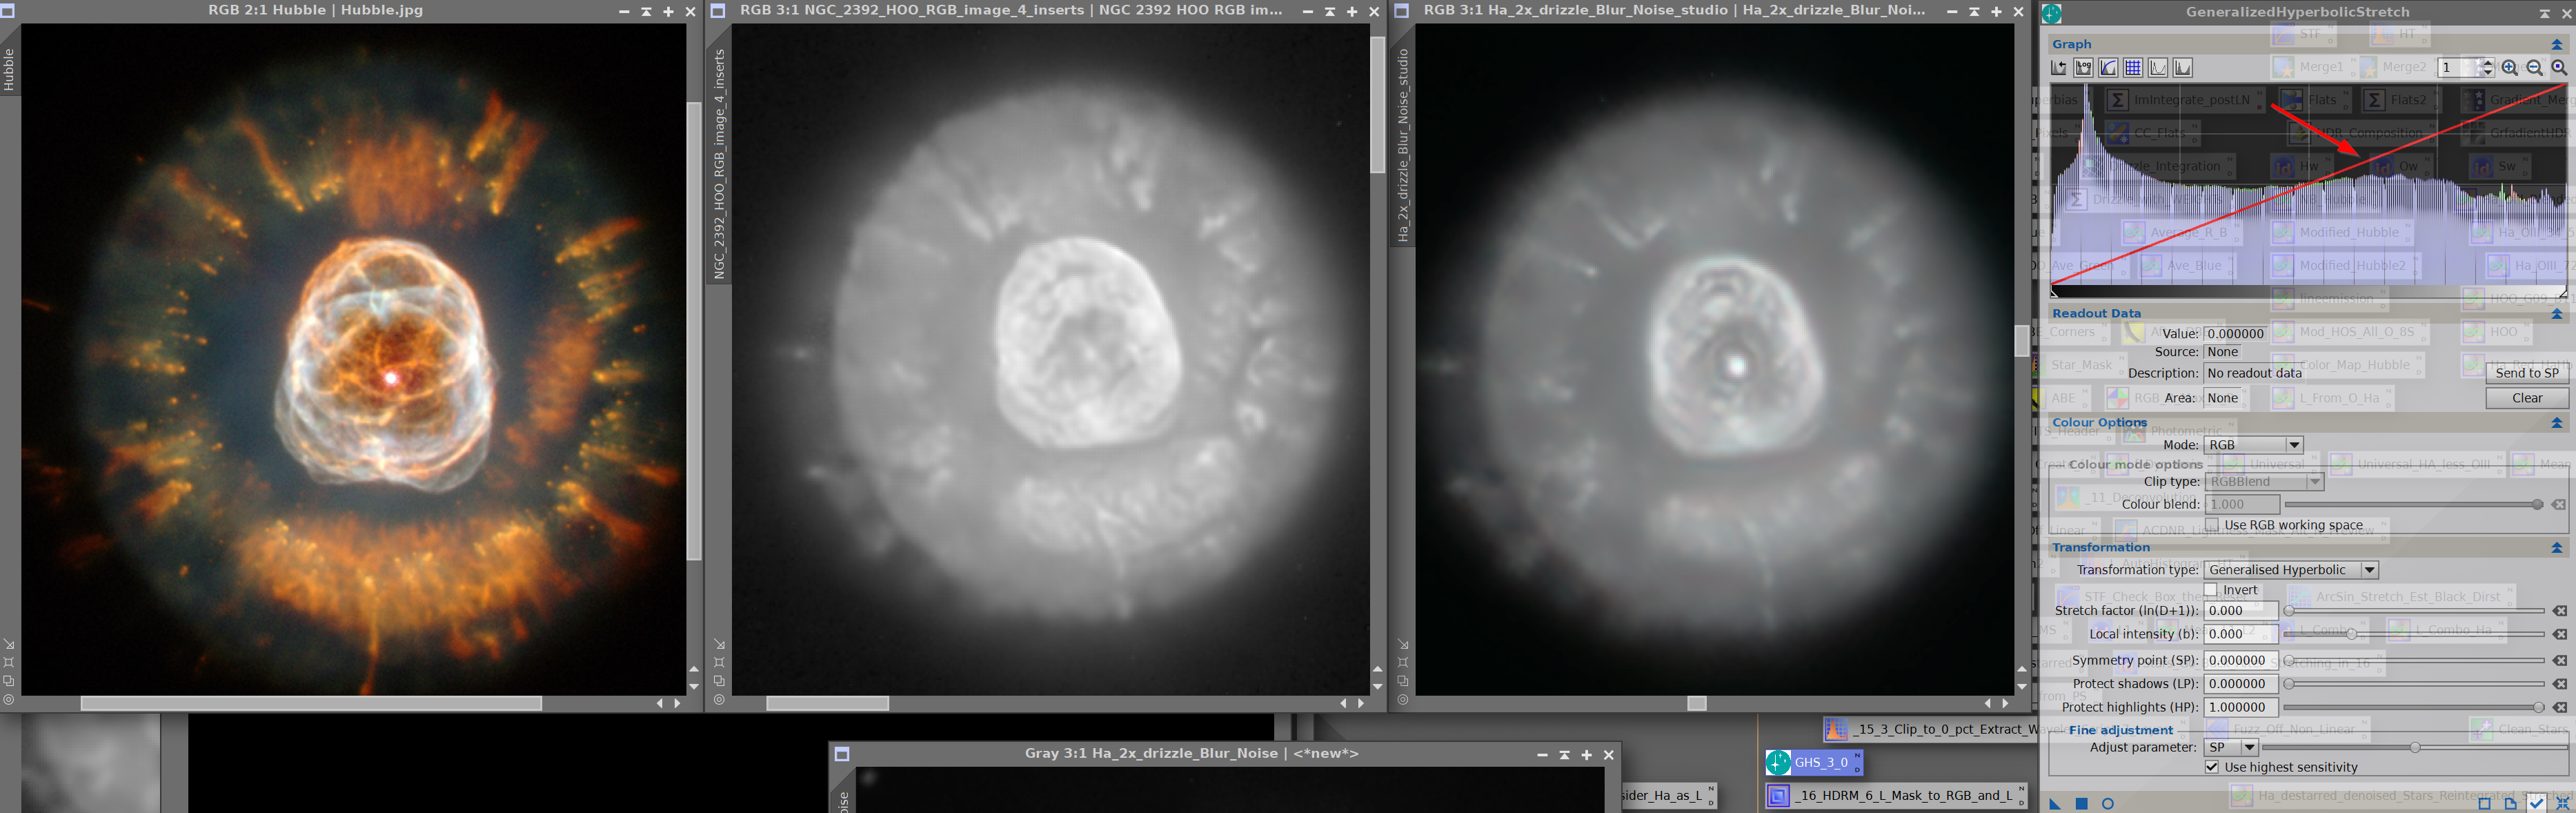
Hey Guys,
One more GHS challenge for you. Am working with some high quality im ages collected by a collaborator who is good at stretching in Photoshop.

The gold standard for the Eskimo is on the left (Hubble) followed by my friend's image then mine. Am not getting the detail. This has been hit by BlurX, but I think there is more stretching that can be done in the bright area and have tried to put the SP there and both inverted and regular stretches.
Here is my friend's histogram... lookit how nice and flat it is! Love to be able to get the same result in GHS.
 |
You cannot like this item. Reason: "ANONYMOUS".
You cannot remove your like from this item.
Editing a post is only allowed within 24 hours after creating it.
You cannot Like this post because the topic is closed.
Hi Jerry,
Looking at the two histograms, you need to shift to the right.
Put SP near the peak of your histogram. This will add contrast here, and brightness to everything to the right. I would try being agressive with b, and add some HP protection for the brightest part of the image. It is the pixels to the right of the peak that you want shifted more to the right.
Hope this helps,
Dave
|
You cannot like this item. Reason: "ANONYMOUS".
You cannot remove your like from this item.
Editing a post is only allowed within 24 hours after creating it.
You cannot Like this post because the topic is closed.
to create to post a reply.